Monday, June 30, 2025
Monday, June 30, 2025
Monday, June 30, 2025
How to create a white-label ticketing platform in 30 minutes
How to create a white-label ticketing platform in 30 minutes
Written by:

Julian Neuss
5 minutes
5 minutes
5 minutes

In this post:
In this post:
In this post:
Section
Section
Section
Introduction
In this article, we’ll guide you step-by-step through all the configurations needed so that, in less than 30 minutes, you can have a fully operational white-label Fanz ticketing platform. You’ll learn how to customize your platform for selling tickets to your events, ensuring everything is ready to provide a smooth, professional buying experience for your customers. From choosing a domain to integrating payment functions, we’ll cover all the essentials so you can start selling your events efficiently and successfully.
1. What is a white-label ticketing platform?
A white-label ticketing platform is a complete ticket sales and box office solution that allows event organizers to register and have their own ticket sales website, operating under their own domain, logo, and colors.
The buyer browses, pays, and receives their ticket within your ecosystem, allowing you to sell tickets online without external branding while strengthening your own brand.
Fanz provides the technical system: hosting, PCI DSS security, AFIP invoicing, and constant updates—offering a comprehensive solution.
2. Benefits for organizers and attendees
For event organizers
Ticketing with your own domain (Argentina or global)
Ticketing with custom logo and branding
Integrated sales and marketing tools
0% commission + full control over payments and cash flow
For attendees
Fast purchase from any device
Multiple secure payment methods and exclusive discounts
QR ready for Apple & Google Wallet
Unified customer support
Prerequisites
Registered domain (e.g., yourevents.com) in Namecheap, GoDaddy, Donweb, or your preferred registrar.
Corporate email address (e.g., info@yourevents.com) with IMAP/SMTP access for verification.
Logo in SVG/PNG (512×512 px) and favicon (32×32 px).
Banner images for desktop (1920×600 px) and mobile (1080×1080 px).
Legal texts: Terms, Privacy Policy, and Refund Policy.
SEO Tip: Rename assets with keywords (e.g., white-label-ticketing-argentina-banner.jpg) and use descriptive alt text.
Step-by-step configuration
Step 1 – Connect your own domain
In your Fanz dashboard, go to White Label → Domain.
Copy the DNS records (CNAME + TXT) shown.
Paste them into your registrar’s settings.
Wait for propagation (5 min – 4 h).

Step 2 – Verify sending email
Enter the email you’ll use to send tickets.
AWS SES sends a confirmation email—click the link.
Once verified, it’s ready to send.

Once you have that ready, the email will be confirmed.

Step 3 – Brand info & footer
Fill in legal name, CUIT, fiscal address, and support email—these populate your footer and invoices.

This is how the configuration will appear on the other side in the footer:

Step 4 – Branding customization
Logo: 1:1 ratio, SVG preferred.
Favicon: 32×32 px transparent.
Colors: choose light/dark mode or define HEX codes.
Wallet pass logo for Apple/Google Wallet.
Real-time preview for desktop and mobile, simulating the physical space.

Example of the Enigmax website
Example of the Expo Mate website

Step 5 – White-label details
Add carousel images for desktop and mobile.

Configure support email (can differ from ticket-sending email).

Add legal terms and policies (displayed in footer).


Link your social media accounts.

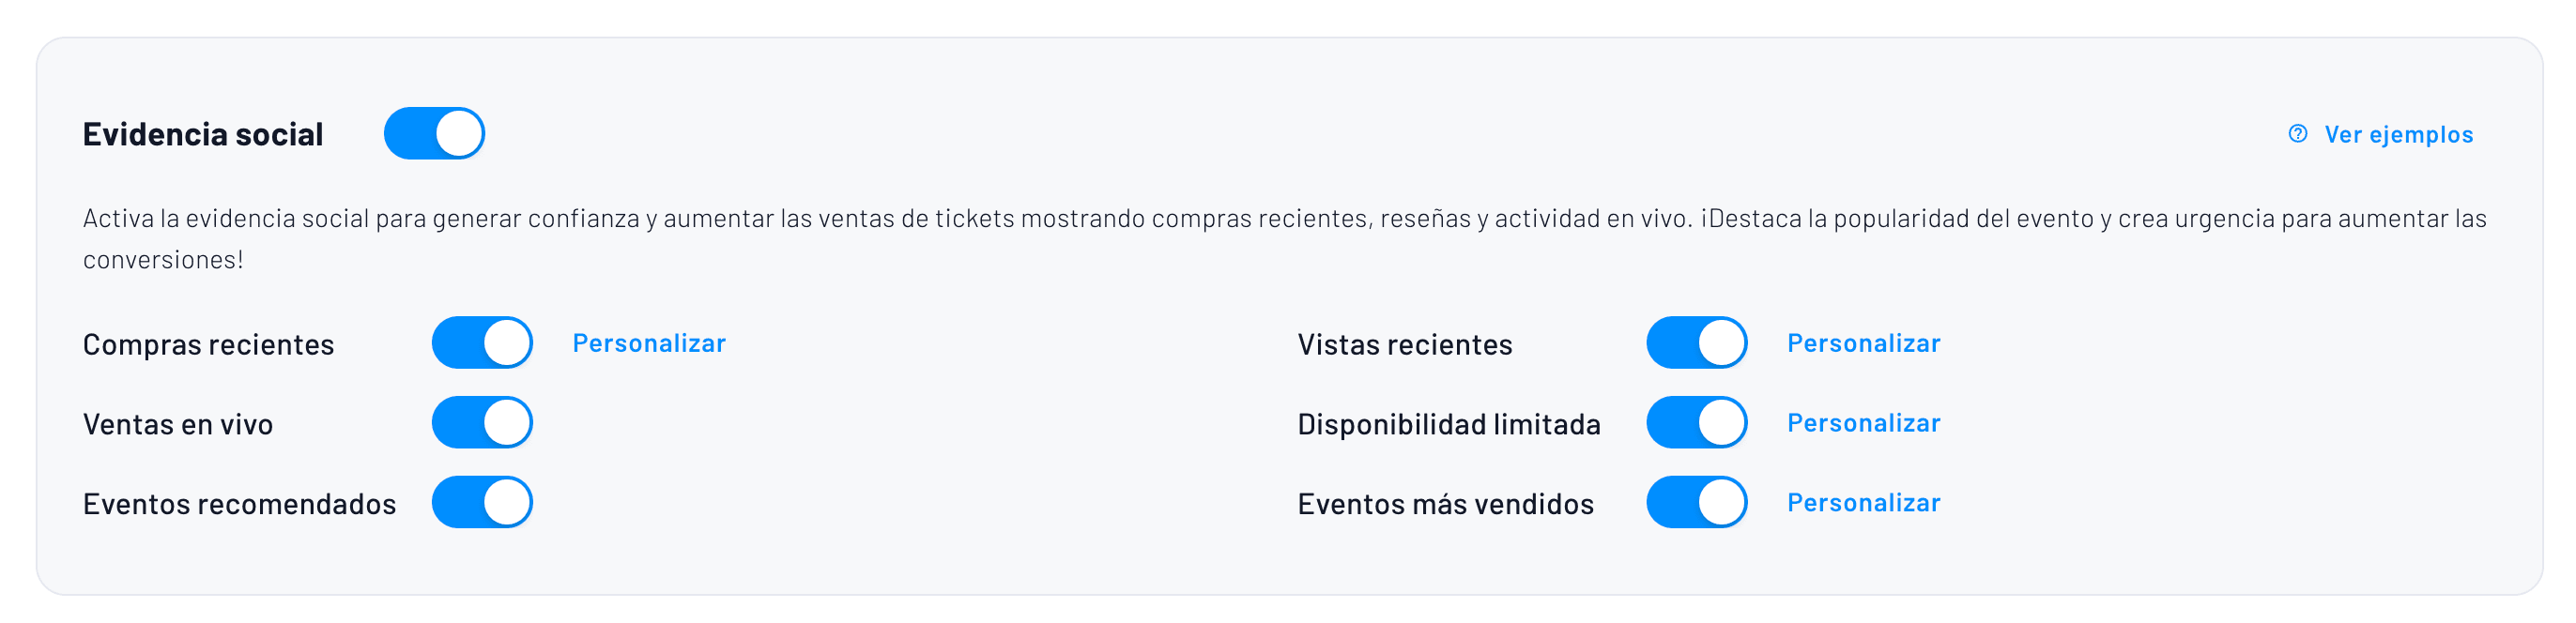
Step 6 – Social proof
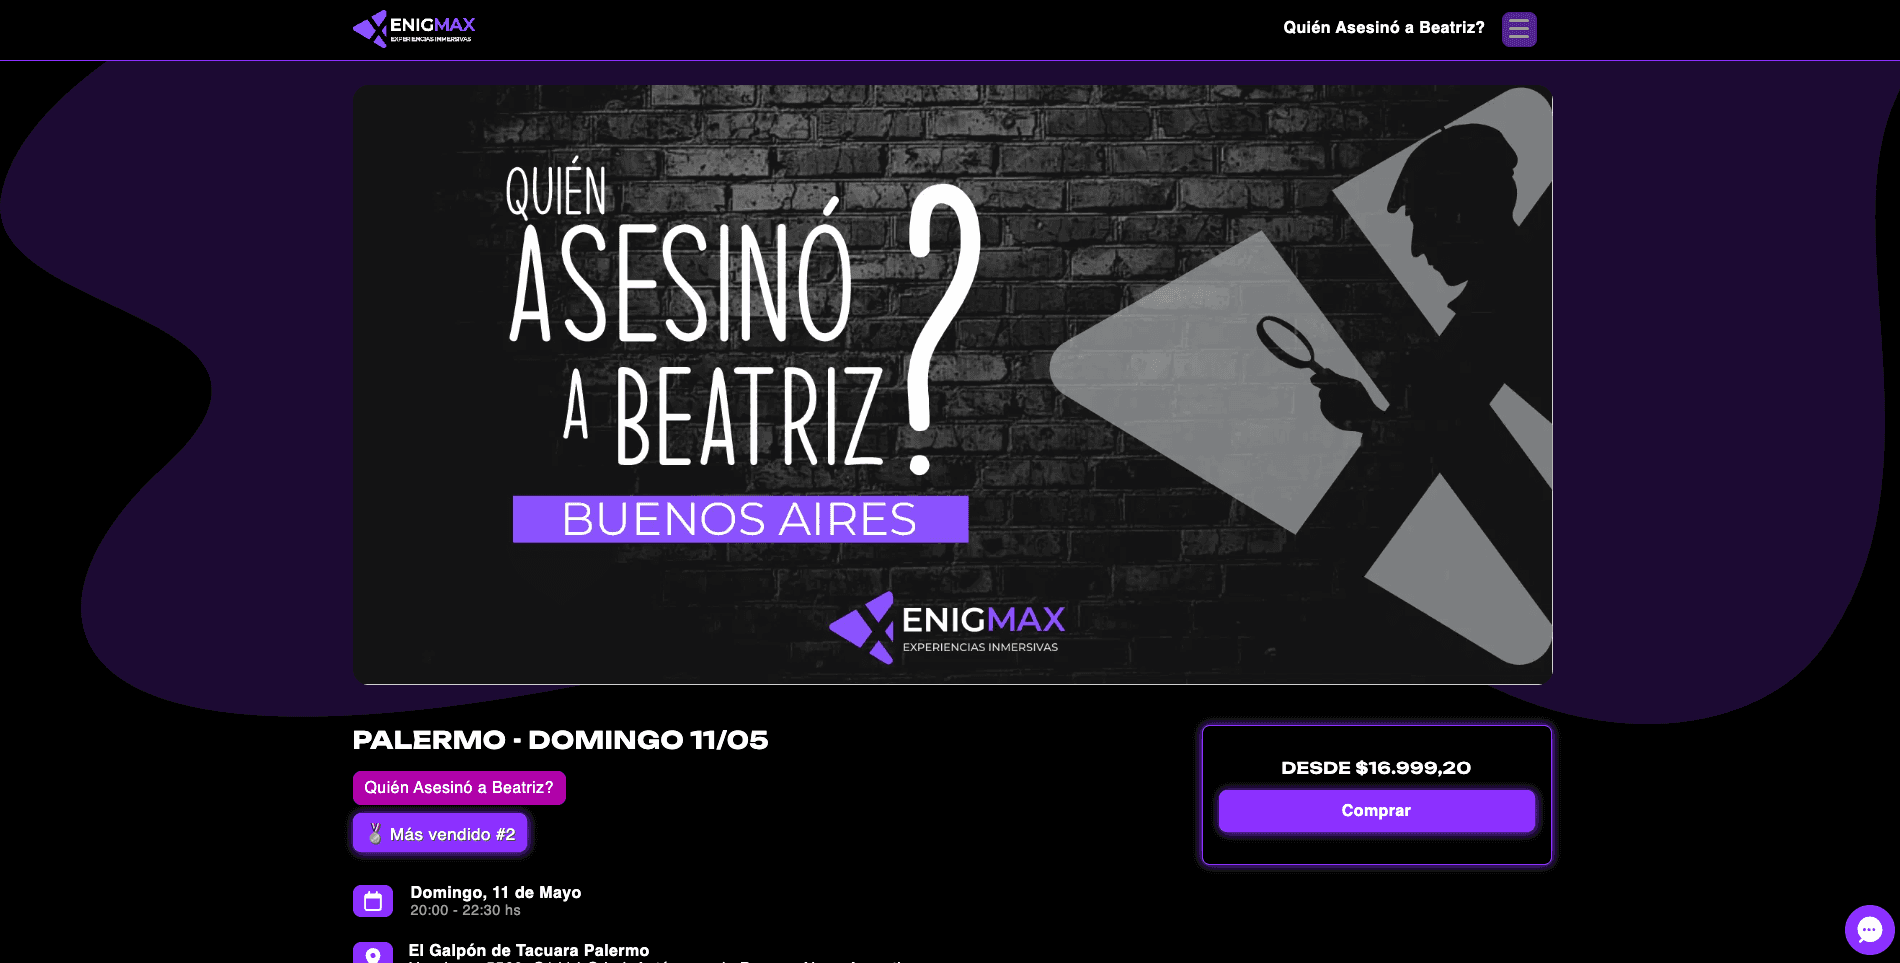
Activate dynamic chips: recent purchases, live sales, visits/hour, low availability, #1 best-seller. Configure thresholds and texts.
Example: “Only 5 tickets left!” or “32 people viewed this in the last hour.”
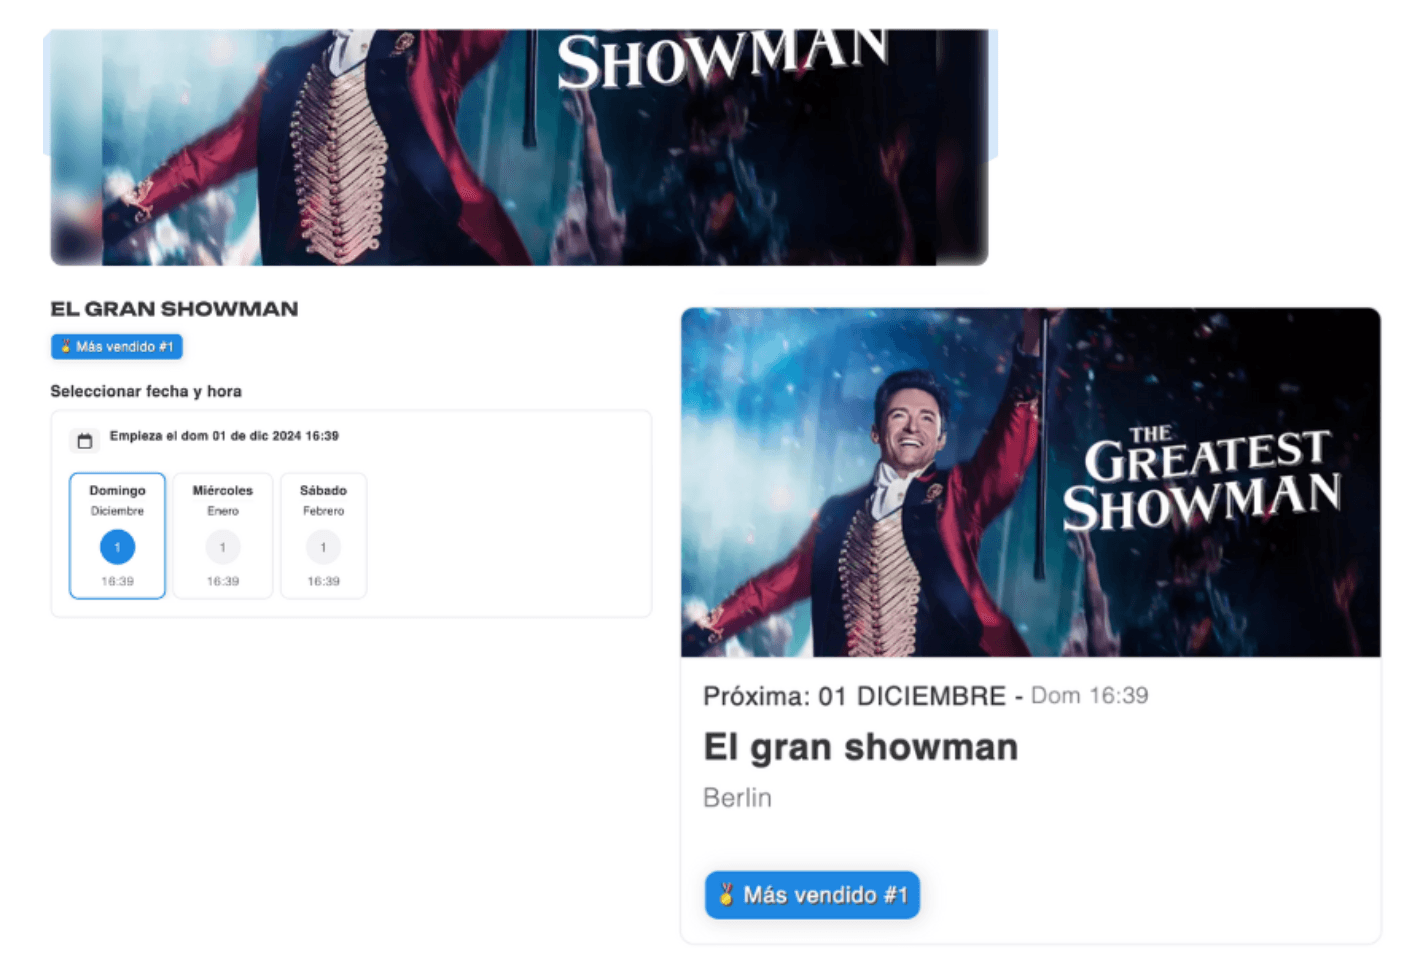
Example of how the “#1 Best-Selling” event chip looks
Example of how the “visits in the last hour” chip looks, creating urgency for the buyer:

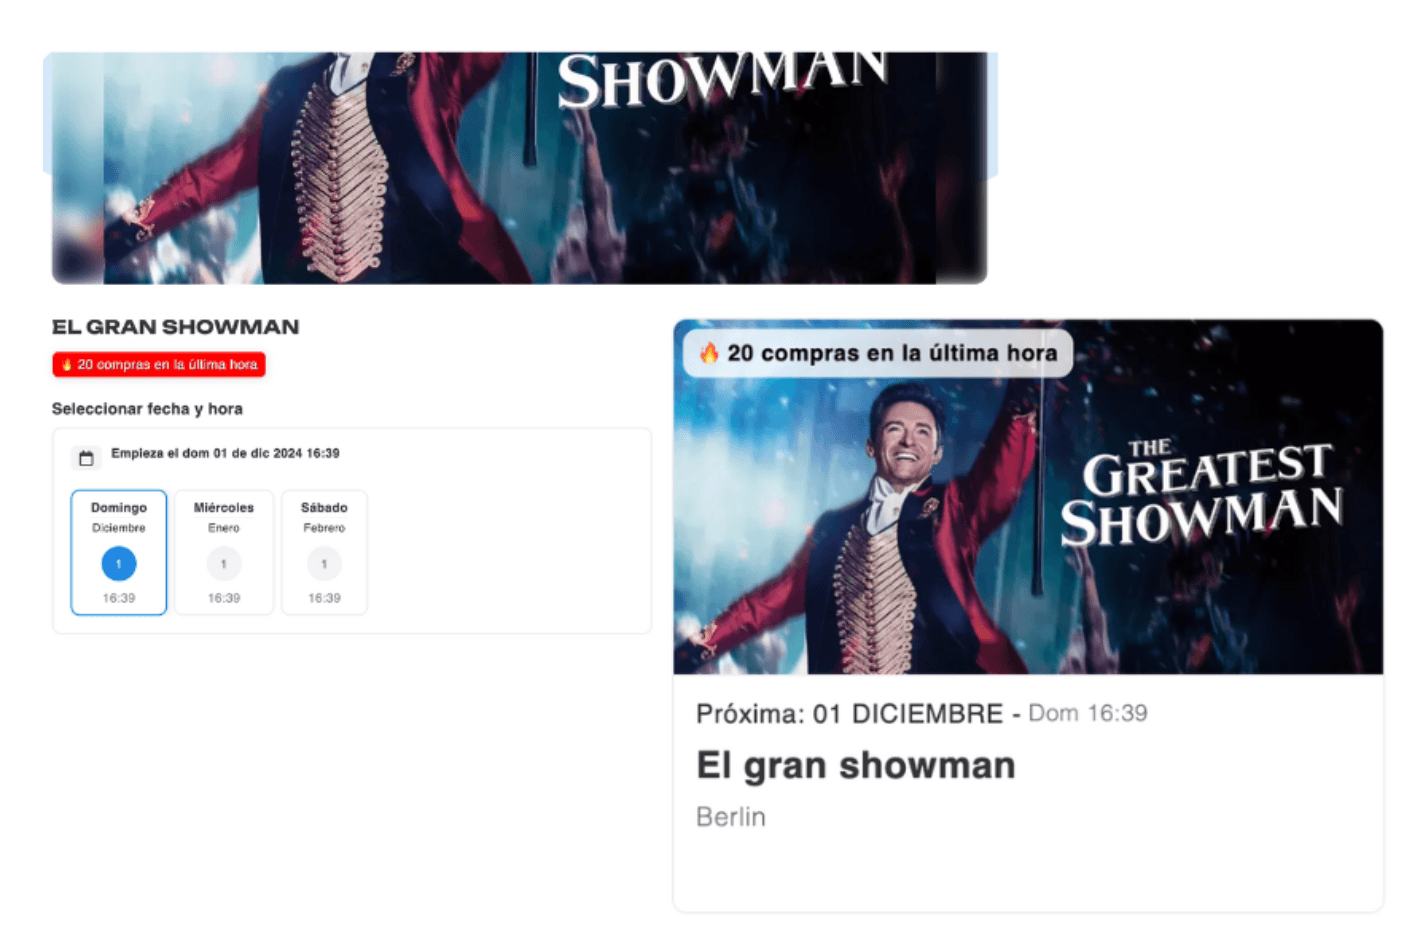
Example of how the “purchases in the last hour” chip looks, creating urgency for the buyer:
Example of how the “last tickets remaining” chip looks, creating urgency for the buyer:

Example of how the banners look when a user makes a purchase while you are browsing the event or your company’s listings. You can see people buying in real time.
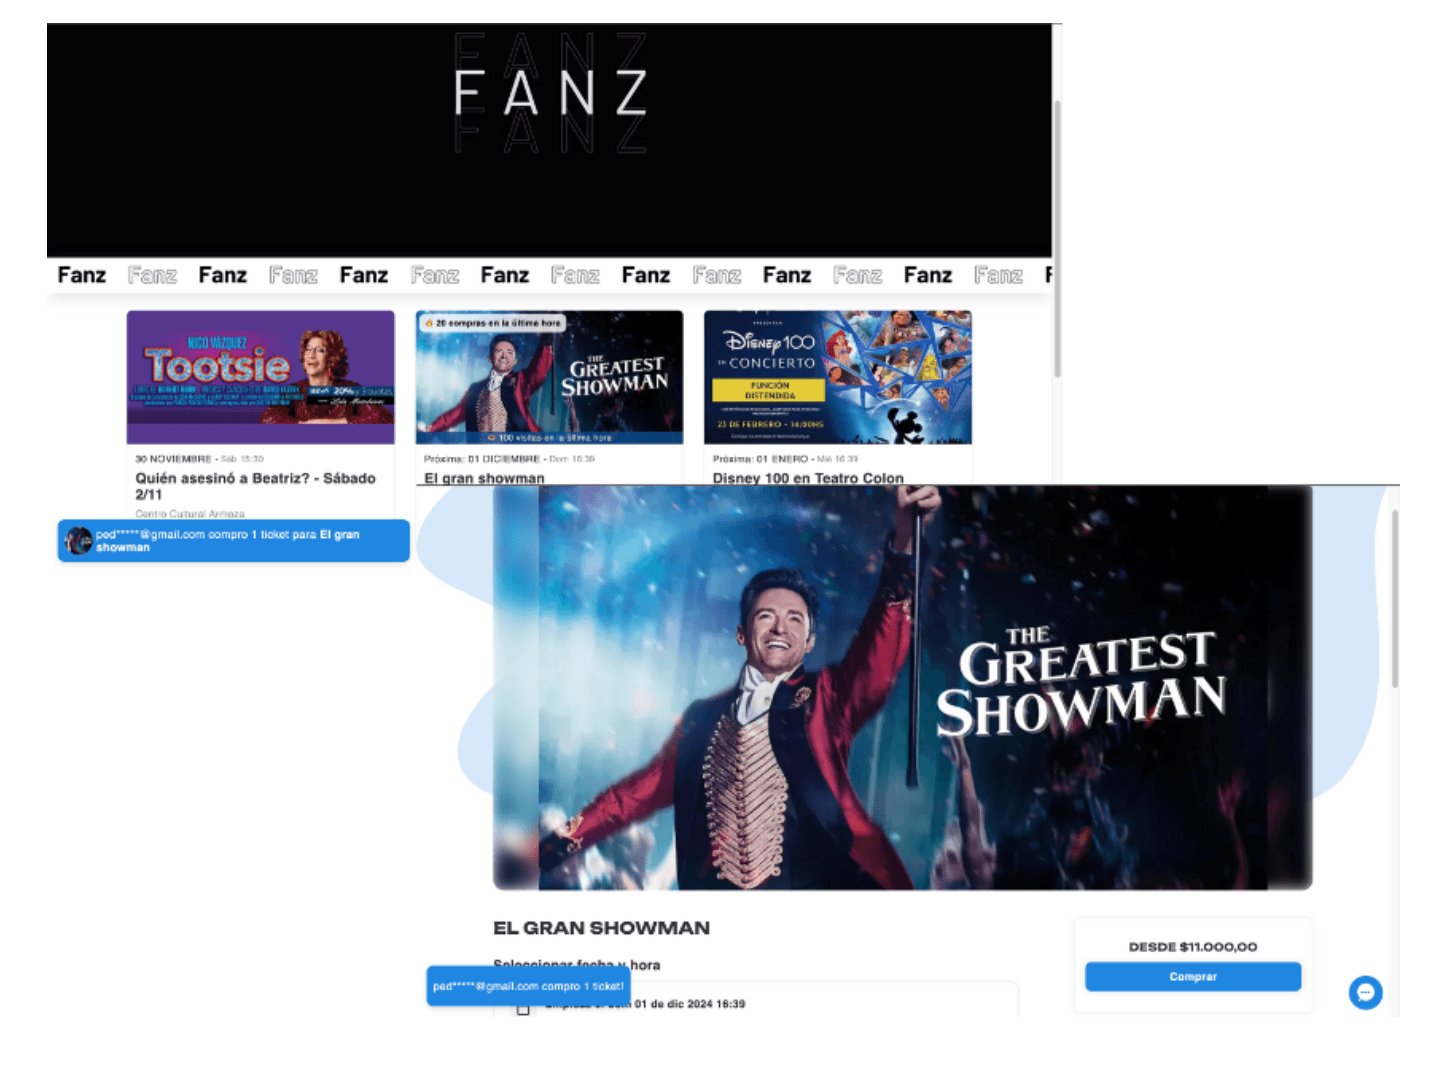
Example of the recommended carousel to keep your buyers always in the loop, purchasing more of your products with an all-in-one solution.

Example of an event card with all social proof banners activated!

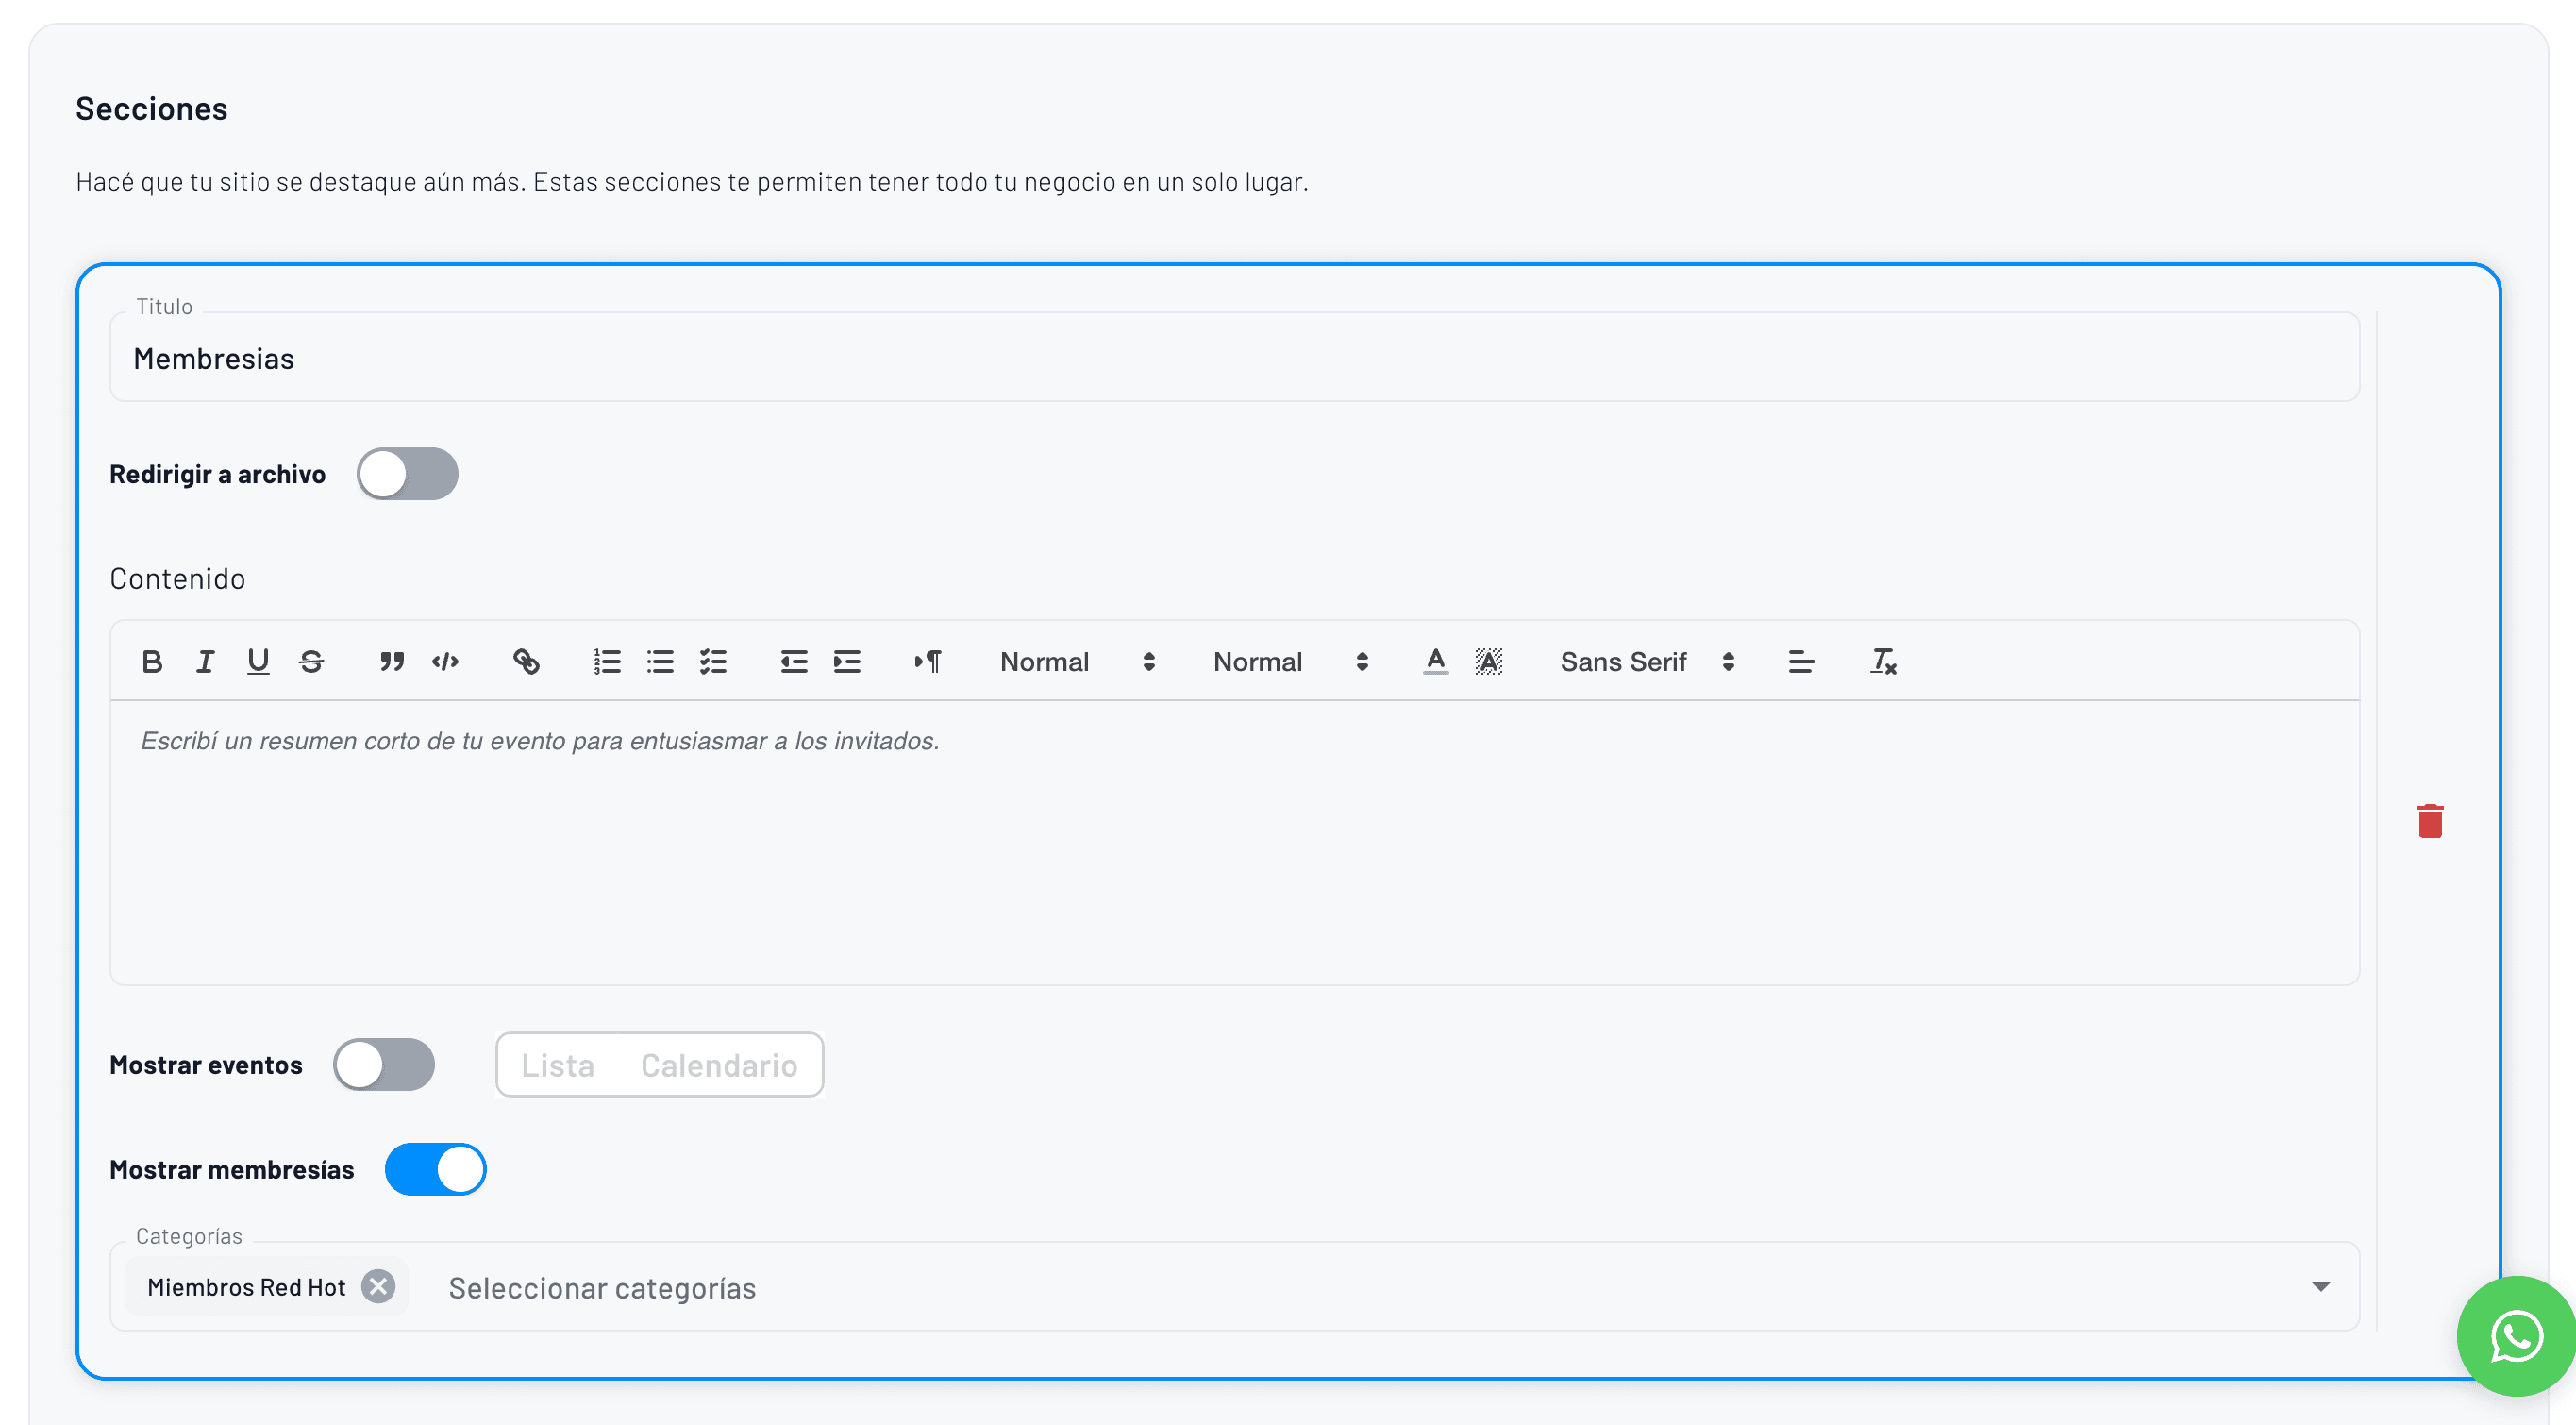
Step 7 – Navigation sections
This is the final part where you configure the sections of the navigation bar.
This is how the sections are displayed in the upper right corner of the event page on desktop.

Lo único restante sería la configuración de las preguntas frecuentes para la marca blanca. Esto mismo va a alimentar el bot de inteligencia artificial que responde preguntas para todos tus usuarios.

This is how the AI bot that answers questions looks.

5. Payments and local gateways
Integrate Mercado Pago, Stripe, or bank transfer in minutes. Control payments within the same system, and reconcile each ticket sale automatically.
6. Secure access & entry control
QR ticket scanning in <0.3s prevents fraud, logs attendance in real-time, and eliminates paper.
7. Integrated marketing tools
Send email, SMS, or video campaigns before, during, and after the event.
Segment by past purchases, location, or device, and track conversions in one dashboard.
8. Best practices for white-label ticket sales
Keep HTTPS active (SSL included).
Optimize SEO for each event: slug, meta-title, meta-description, schema Event.
Set up automated reminders (7d, 3d, 1h before).
Integrate Facebook & Google Ads pixels in one click.
Use the fast-scan feature for QR tickets.
9. FAQs
Can I use multiple domains? Yes, each requires its own workspace.
How long does payment gateway activation take? Less than 5 min with a verified account.
Does it support hybrid or streaming events? Yes, you can embed URLs and send automatic access links.
What marketing tools are included? Email, SMS, remarketing automation, audience segmentation, and analytics.
10. Conclusion & next step
Now you know how to create your own white-label ticketing platform in under 30 minutes.
With Fanz, you get ticketing with your own logo, branding, and domain—while controlling sales, marketing, access, and payments from one place.
Ready to start?
Request your free 15-minute demo and publish your first event today.
Introduction
In this article, we’ll guide you step-by-step through all the configurations needed so that, in less than 30 minutes, you can have a fully operational white-label Fanz ticketing platform. You’ll learn how to customize your platform for selling tickets to your events, ensuring everything is ready to provide a smooth, professional buying experience for your customers. From choosing a domain to integrating payment functions, we’ll cover all the essentials so you can start selling your events efficiently and successfully.
1. What is a white-label ticketing platform?
A white-label ticketing platform is a complete ticket sales and box office solution that allows event organizers to register and have their own ticket sales website, operating under their own domain, logo, and colors.
The buyer browses, pays, and receives their ticket within your ecosystem, allowing you to sell tickets online without external branding while strengthening your own brand.
Fanz provides the technical system: hosting, PCI DSS security, AFIP invoicing, and constant updates—offering a comprehensive solution.
2. Benefits for organizers and attendees
For event organizers
Ticketing with your own domain (Argentina or global)
Ticketing with custom logo and branding
Integrated sales and marketing tools
0% commission + full control over payments and cash flow
For attendees
Fast purchase from any device
Multiple secure payment methods and exclusive discounts
QR ready for Apple & Google Wallet
Unified customer support
Prerequisites
Registered domain (e.g., yourevents.com) in Namecheap, GoDaddy, Donweb, or your preferred registrar.
Corporate email address (e.g., info@yourevents.com) with IMAP/SMTP access for verification.
Logo in SVG/PNG (512×512 px) and favicon (32×32 px).
Banner images for desktop (1920×600 px) and mobile (1080×1080 px).
Legal texts: Terms, Privacy Policy, and Refund Policy.
SEO Tip: Rename assets with keywords (e.g., white-label-ticketing-argentina-banner.jpg) and use descriptive alt text.
Step-by-step configuration
Step 1 – Connect your own domain
In your Fanz dashboard, go to White Label → Domain.
Copy the DNS records (CNAME + TXT) shown.
Paste them into your registrar’s settings.
Wait for propagation (5 min – 4 h).
Step 2 – Verify sending email
Enter the email you’ll use to send tickets.
AWS SES sends a confirmation email—click the link.
Once verified, it’s ready to send.
Once you have that ready, the email will be confirmed.
Step 3 – Brand info & footer
Fill in legal name, CUIT, fiscal address, and support email—these populate your footer and invoices.
This is how the configuration will appear on the other side in the footer:
Step 4 – Branding customization
Logo: 1:1 ratio, SVG preferred.
Favicon: 32×32 px transparent.
Colors: choose light/dark mode or define HEX codes.
Wallet pass logo for Apple/Google Wallet.
Real-time preview for desktop and mobile, simulating the physical space.
Example of the Enigmax website
Example of the Expo Mate website
Step 5 – White-label details
Add carousel images for desktop and mobile.
Configure support email (can differ from ticket-sending email).
Add legal terms and policies (displayed in footer).
Link your social media accounts.
Step 6 – Social proof
Activate dynamic chips: recent purchases, live sales, visits/hour, low availability, #1 best-seller. Configure thresholds and texts.
Example: “Only 5 tickets left!” or “32 people viewed this in the last hour.”
Example of how the “#1 Best-Selling” event chip looks
Example of how the “visits in the last hour” chip looks, creating urgency for the buyer:
Example of how the “purchases in the last hour” chip looks, creating urgency for the buyer:
Example of how the “last tickets remaining” chip looks, creating urgency for the buyer:
Example of how the banners look when a user makes a purchase while you are browsing the event or your company’s listings. You can see people buying in real time.
Example of the recommended carousel to keep your buyers always in the loop, purchasing more of your products with an all-in-one solution.
Example of an event card with all social proof banners activated!
Step 7 – Navigation sections
This is the final part where you configure the sections of the navigation bar.
This is how the sections are displayed in the upper right corner of the event page on desktop.
Lo único restante sería la configuración de las preguntas frecuentes para la marca blanca. Esto mismo va a alimentar el bot de inteligencia artificial que responde preguntas para todos tus usuarios.
This is how the AI bot that answers questions looks.
5. Payments and local gateways
Integrate Mercado Pago, Stripe, or bank transfer in minutes. Control payments within the same system, and reconcile each ticket sale automatically.
6. Secure access & entry control
QR ticket scanning in <0.3s prevents fraud, logs attendance in real-time, and eliminates paper.
7. Integrated marketing tools
Send email, SMS, or video campaigns before, during, and after the event.
Segment by past purchases, location, or device, and track conversions in one dashboard.
8. Best practices for white-label ticket sales
Keep HTTPS active (SSL included).
Optimize SEO for each event: slug, meta-title, meta-description, schema Event.
Set up automated reminders (7d, 3d, 1h before).
Integrate Facebook & Google Ads pixels in one click.
Use the fast-scan feature for QR tickets.
9. FAQs
Can I use multiple domains? Yes, each requires its own workspace.
How long does payment gateway activation take? Less than 5 min with a verified account.
Does it support hybrid or streaming events? Yes, you can embed URLs and send automatic access links.
What marketing tools are included? Email, SMS, remarketing automation, audience segmentation, and analytics.
10. Conclusion & next step
Now you know how to create your own white-label ticketing platform in under 30 minutes.
With Fanz, you get ticketing with your own logo, branding, and domain—while controlling sales, marketing, access, and payments from one place.
Ready to start?
Request your free 15-minute demo and publish your first event today.
Book your meeting today.
Sell with your own branding and domain, get instant payouts, and boost your sales by up to 35% with automated remarketing.
