Tuesday, June 17, 2025
Tuesday, June 17, 2025
Tuesday, June 17, 2025
How to create an online event step-by-step: from zero to published in 10 minutes
How to create an online event step-by-step: from zero to published in 10 minutes
Written by:

Julian Neuss
8 minutes
8 minutes
8 minutes
In this post:
In this post:
In this post:
Section
Section
Section
Introduction
In this guide, you’ll see—with screenshots and without skipping any steps—how to go from a blank page to a fully configured event ready to sell tickets. We’ll upload the main photo, choose the category, set the location, define whether there are numbered seats, decide if the buyer must provide an ID, display an agenda and FAQs, create tickets with prices, and, if you wish, generate hundreds of showtimes in just two clicks. You’ll also learn how to invite your team and connect your social media. By the end, your event will be published under your own white-label domain, ready to collect payments via Mercado Pago. Our platform also offers advantages such as zero commission for organizers and a simple, streamlined event management process.
Step 1 — Basic event details
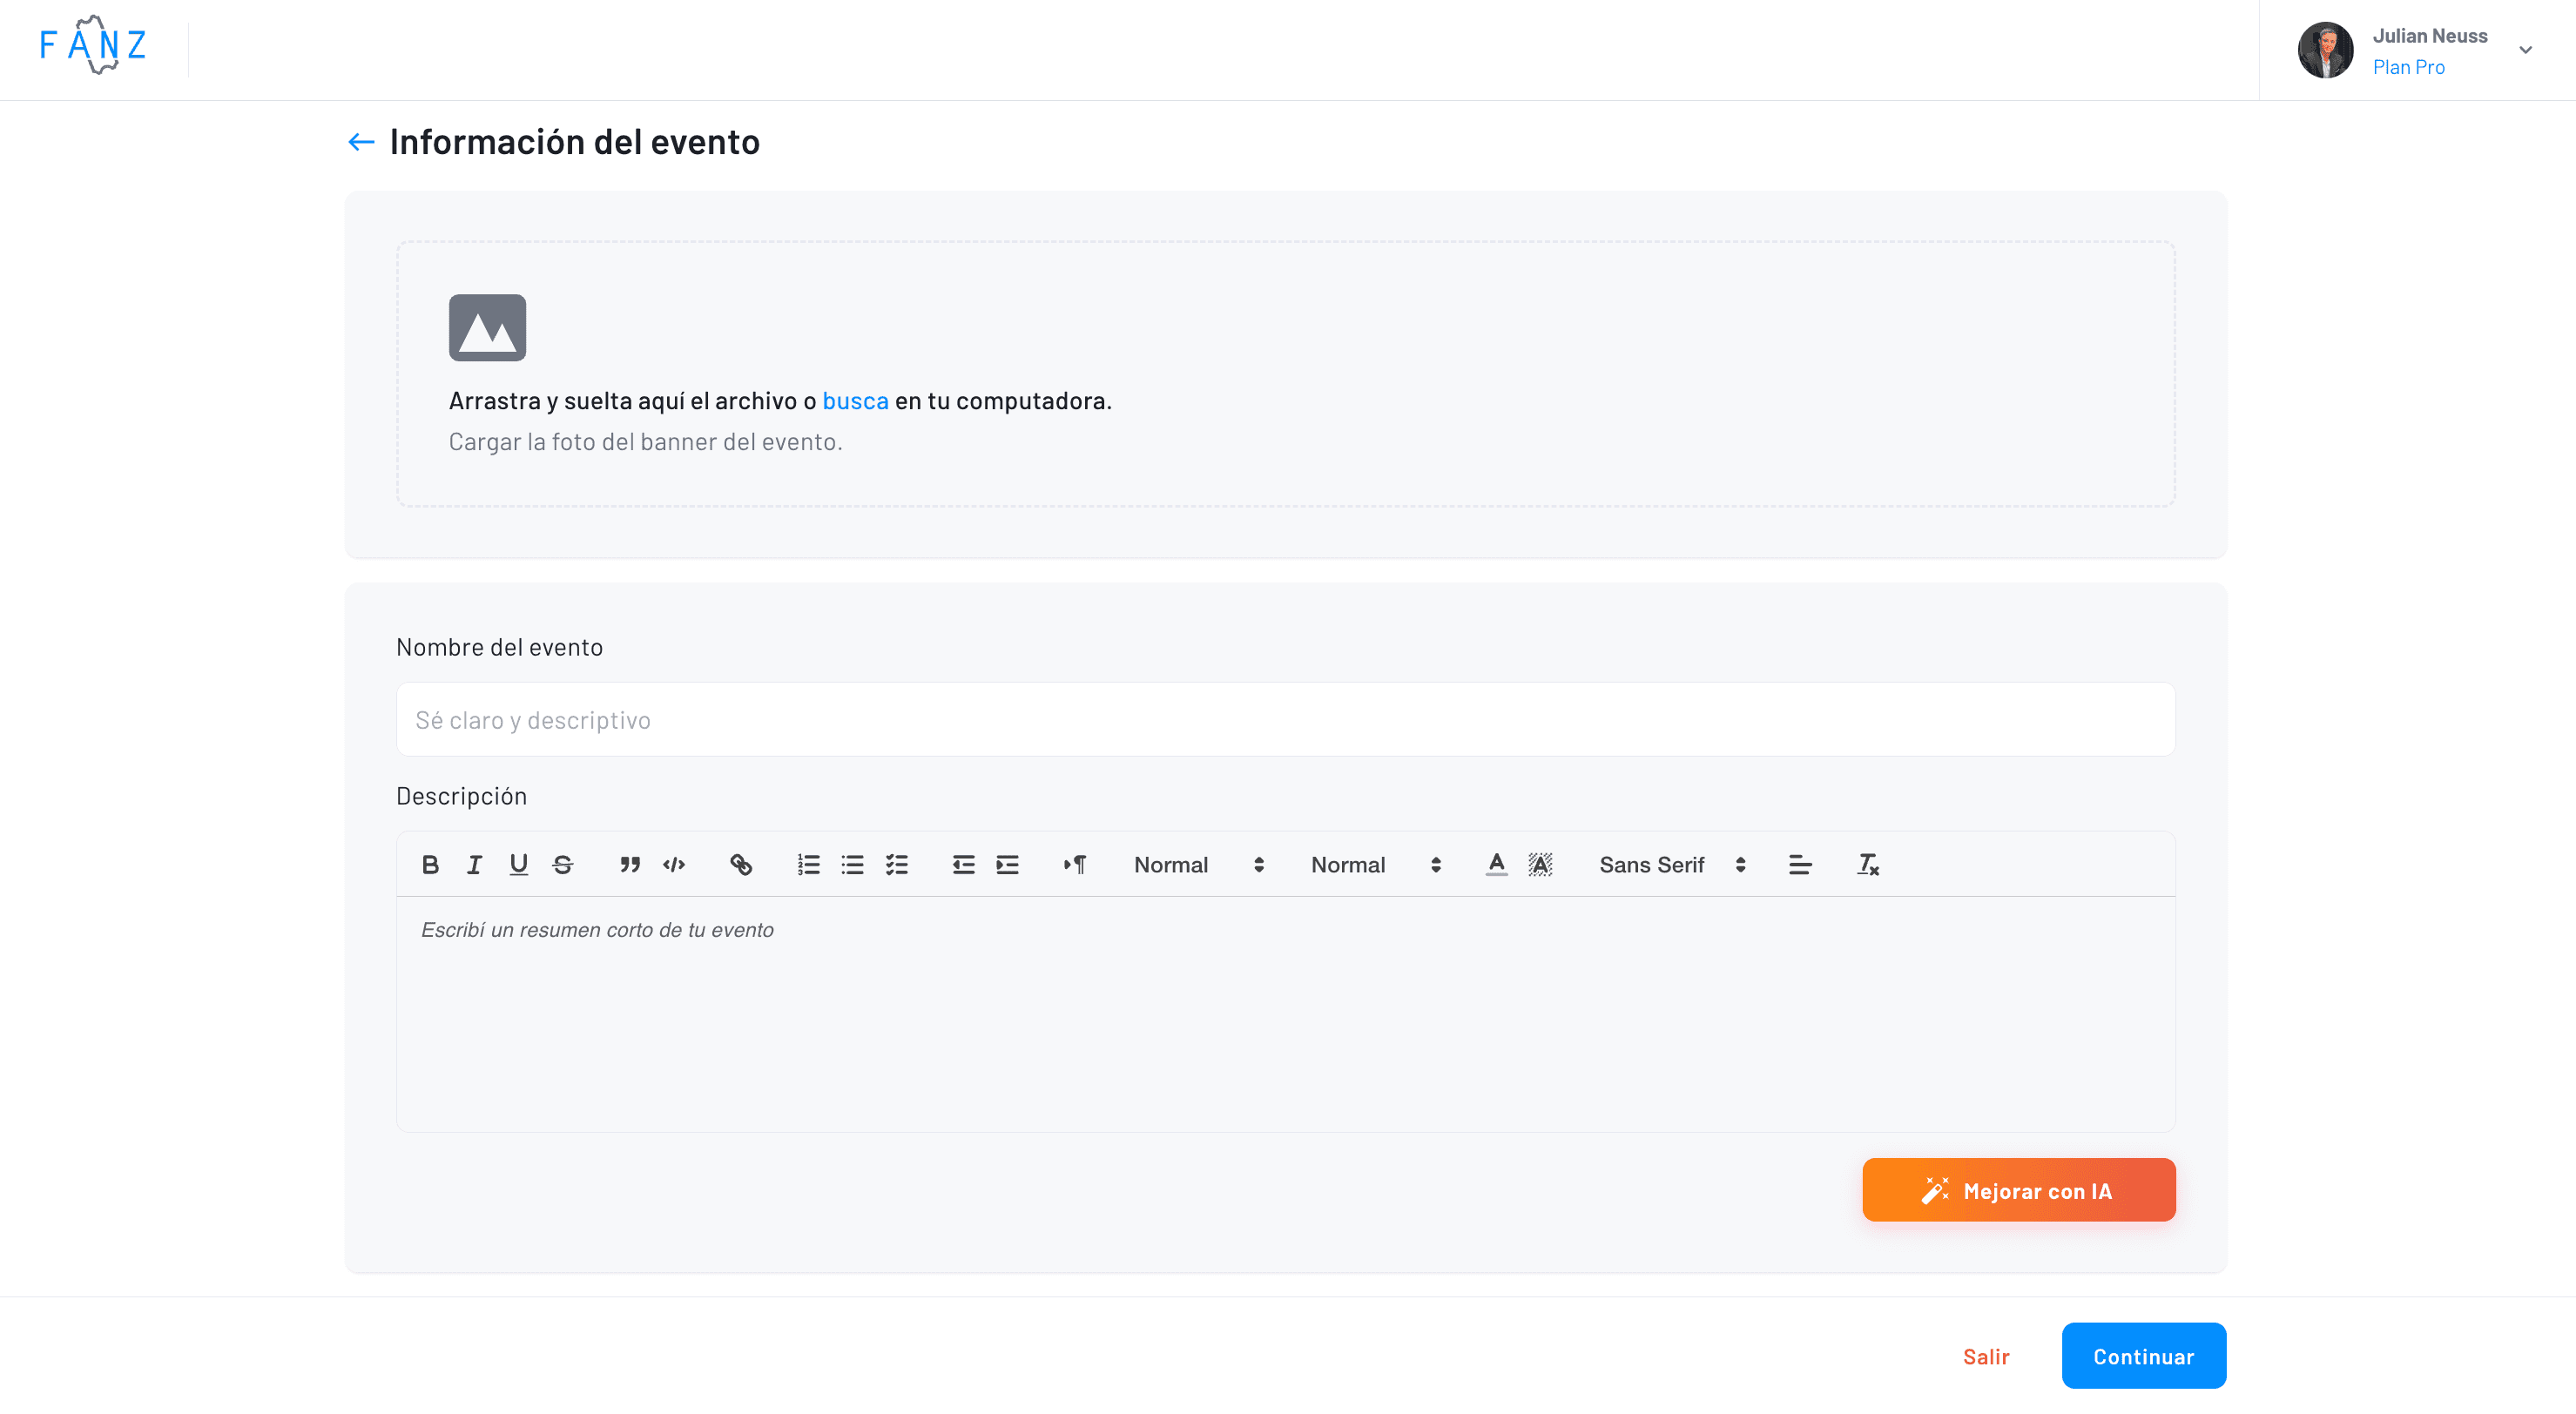
Click Create Event and a screen with three fields will appear.
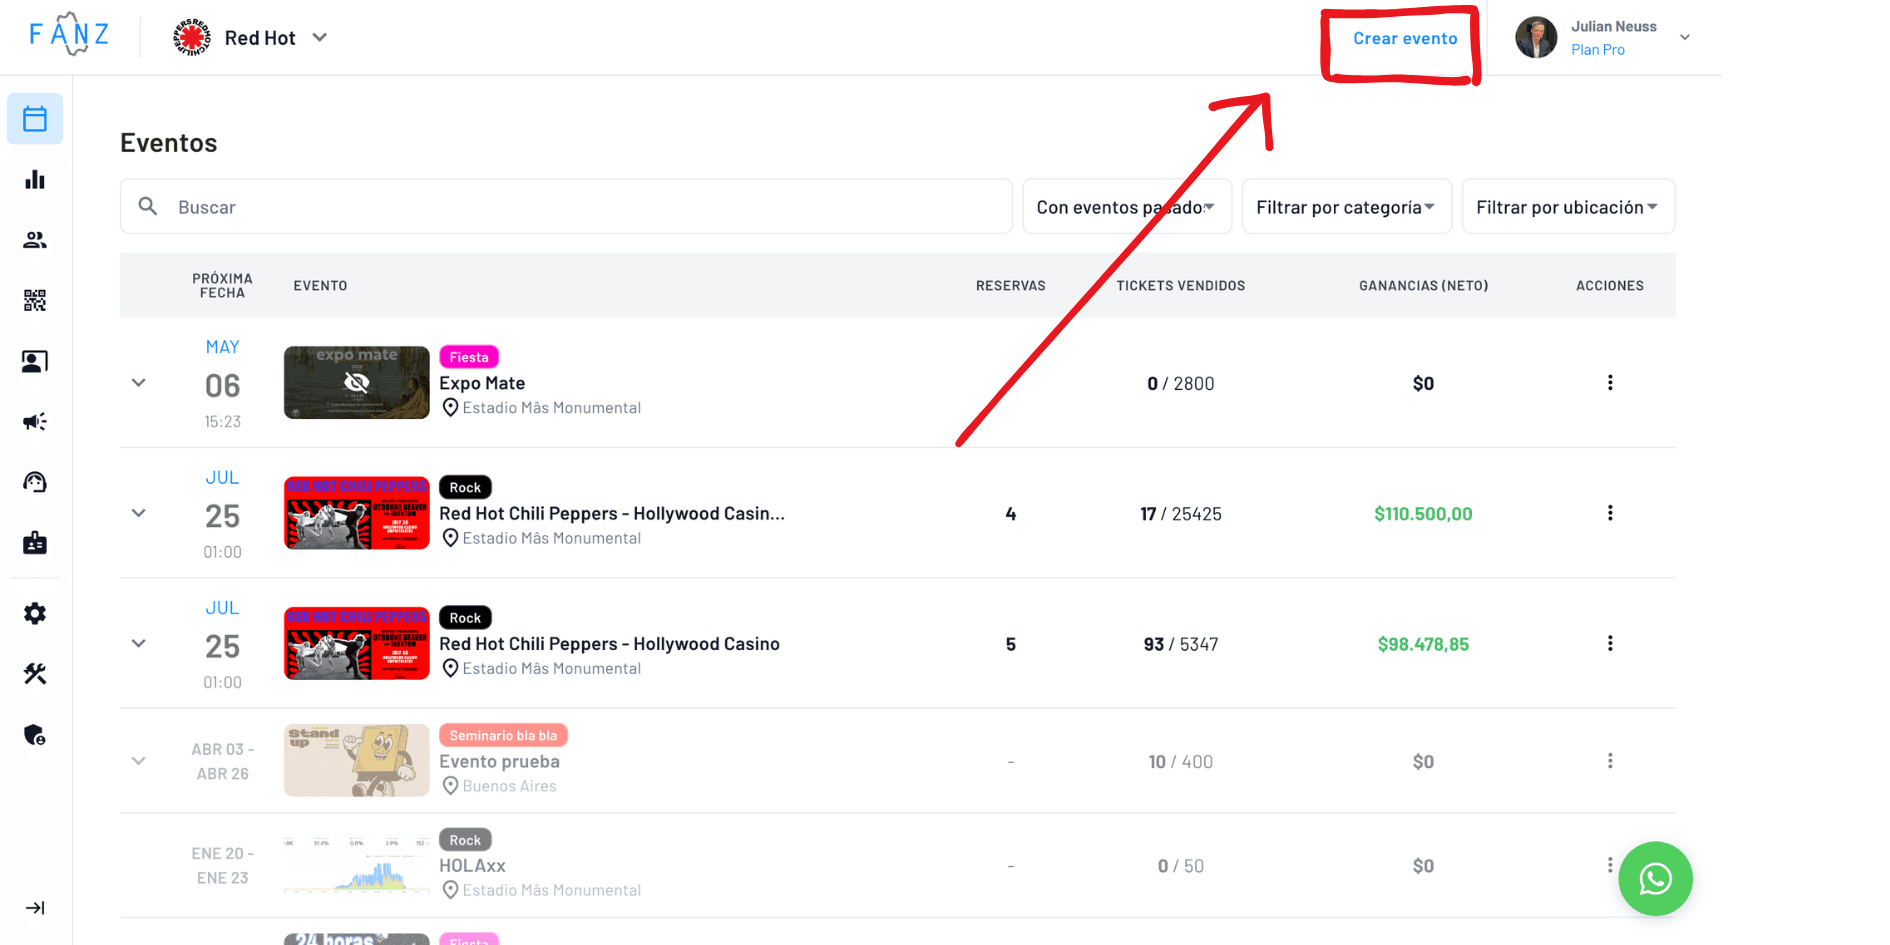
In the first field, upload the main photo—think of it as the poster at the door, rectangular and sharp. In the second, write the name, for example, The Tempest Play. In the third, describe in one sentence what it’s about. If you want it to sound better, click Improve with AI and the platform will suggest a text with emojis and nice formatting.
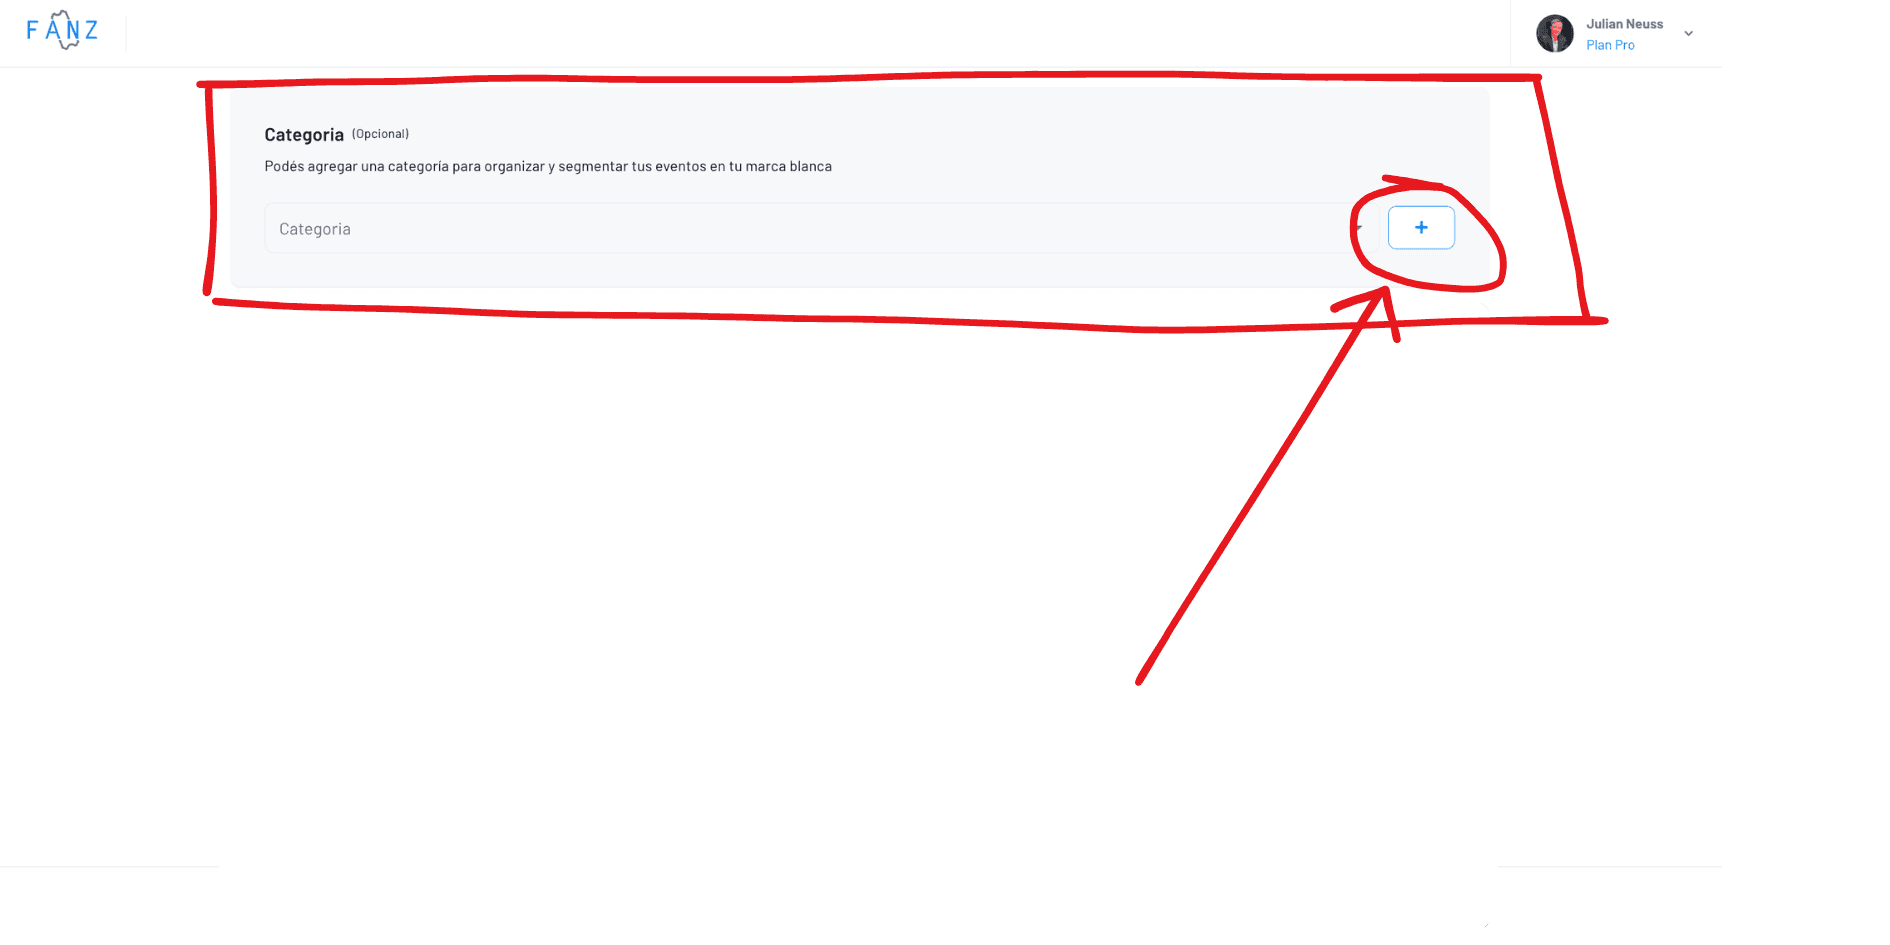
Step 2 — Select the category
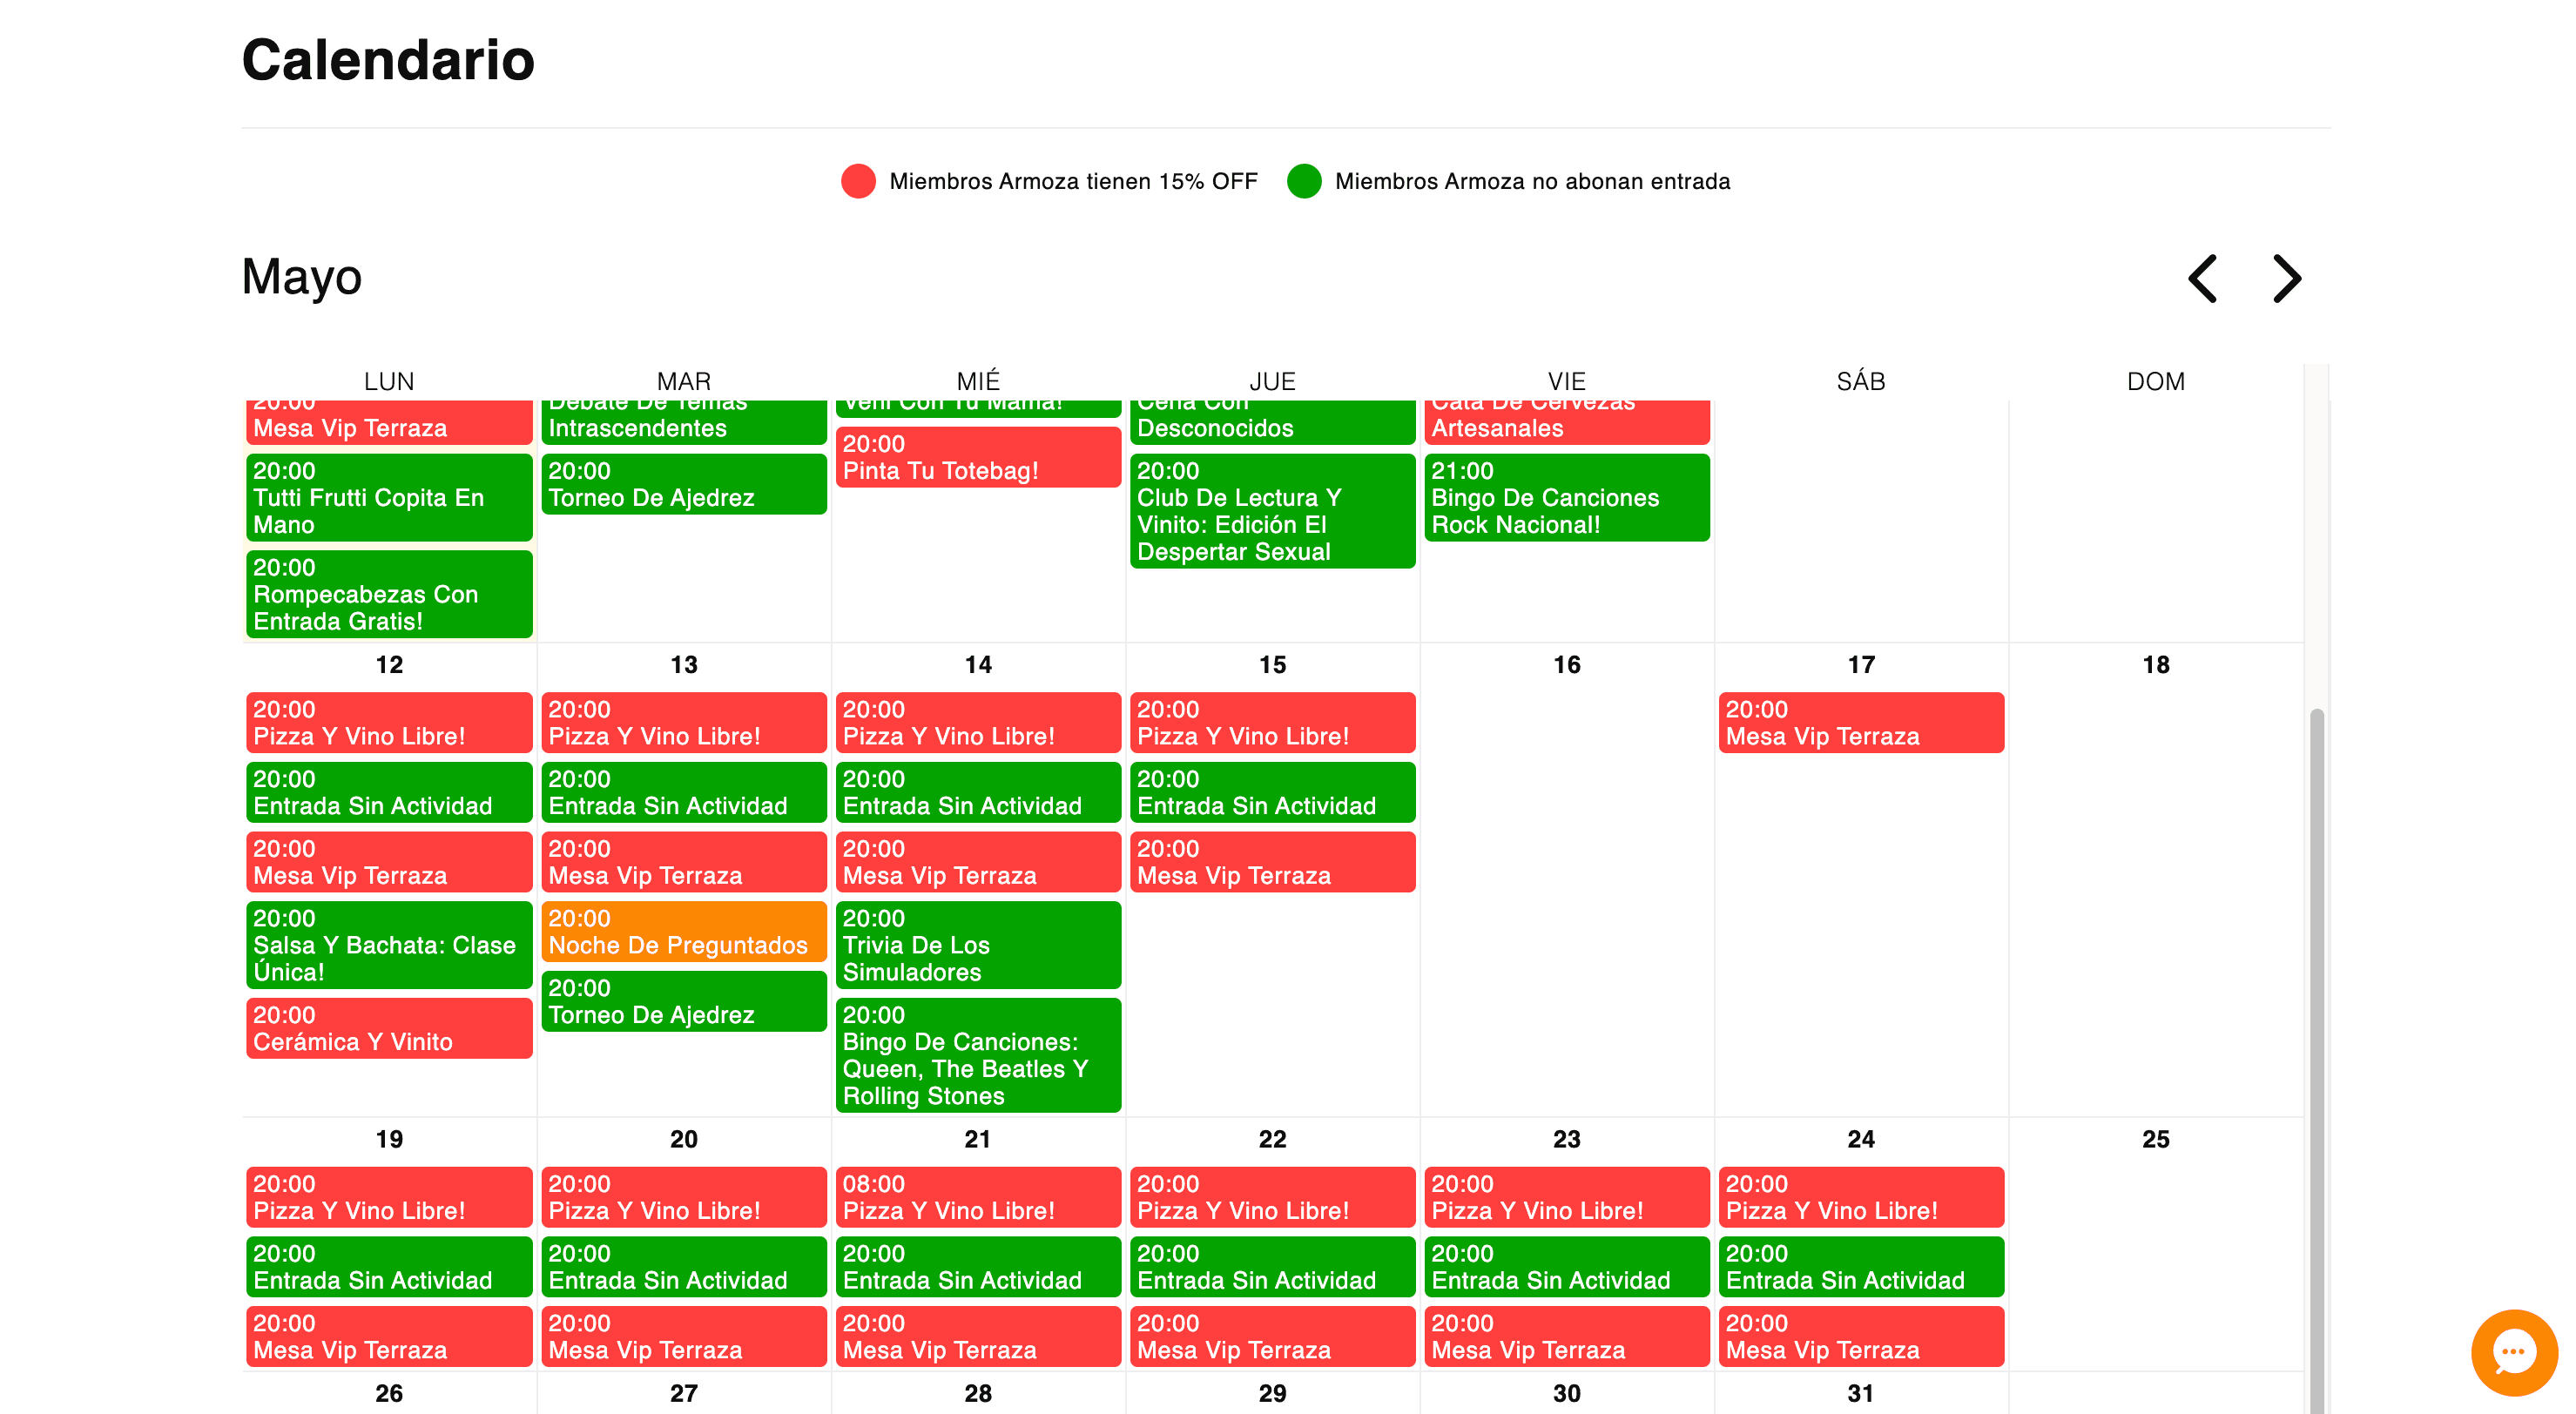
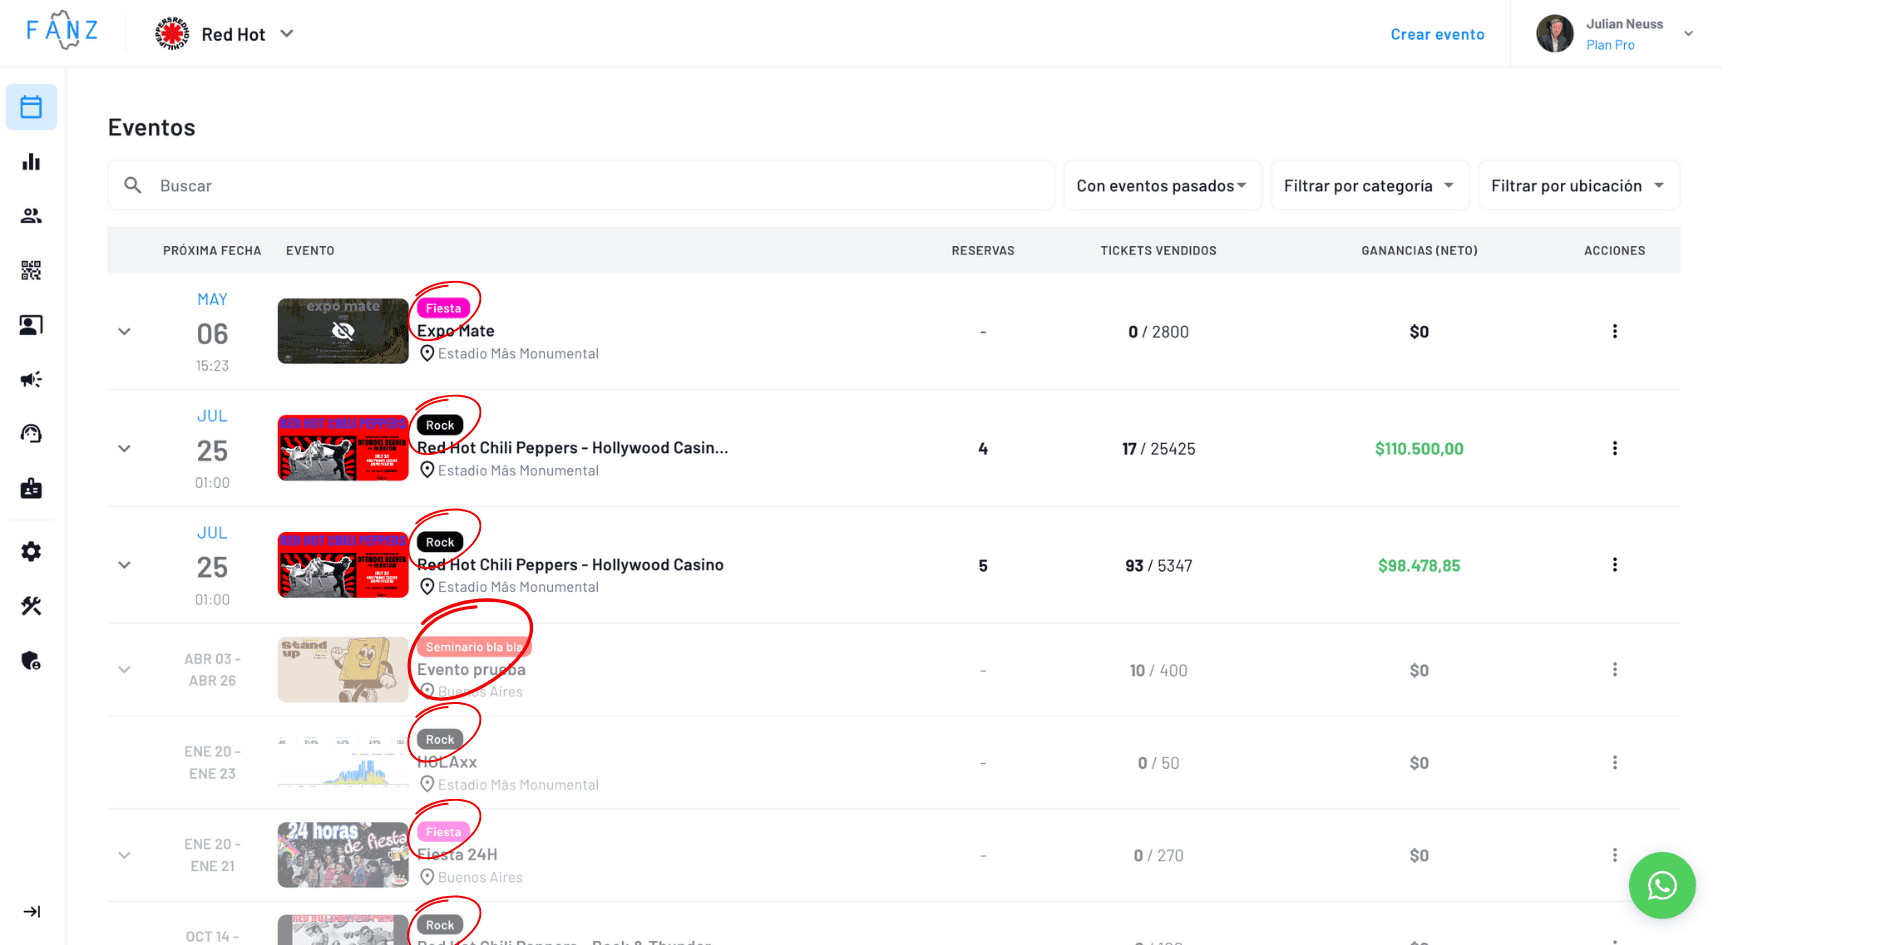
You create the categories once and they remain saved. They help organize your dashboard and allow the public to filter on your website’s calendar. Open the list and select the one that applies (Theatre, Music, Expo, etc.).

This is how your customer sees it in the calendar:
And this is how you see it in the dashboard, where you can filter by that same category:
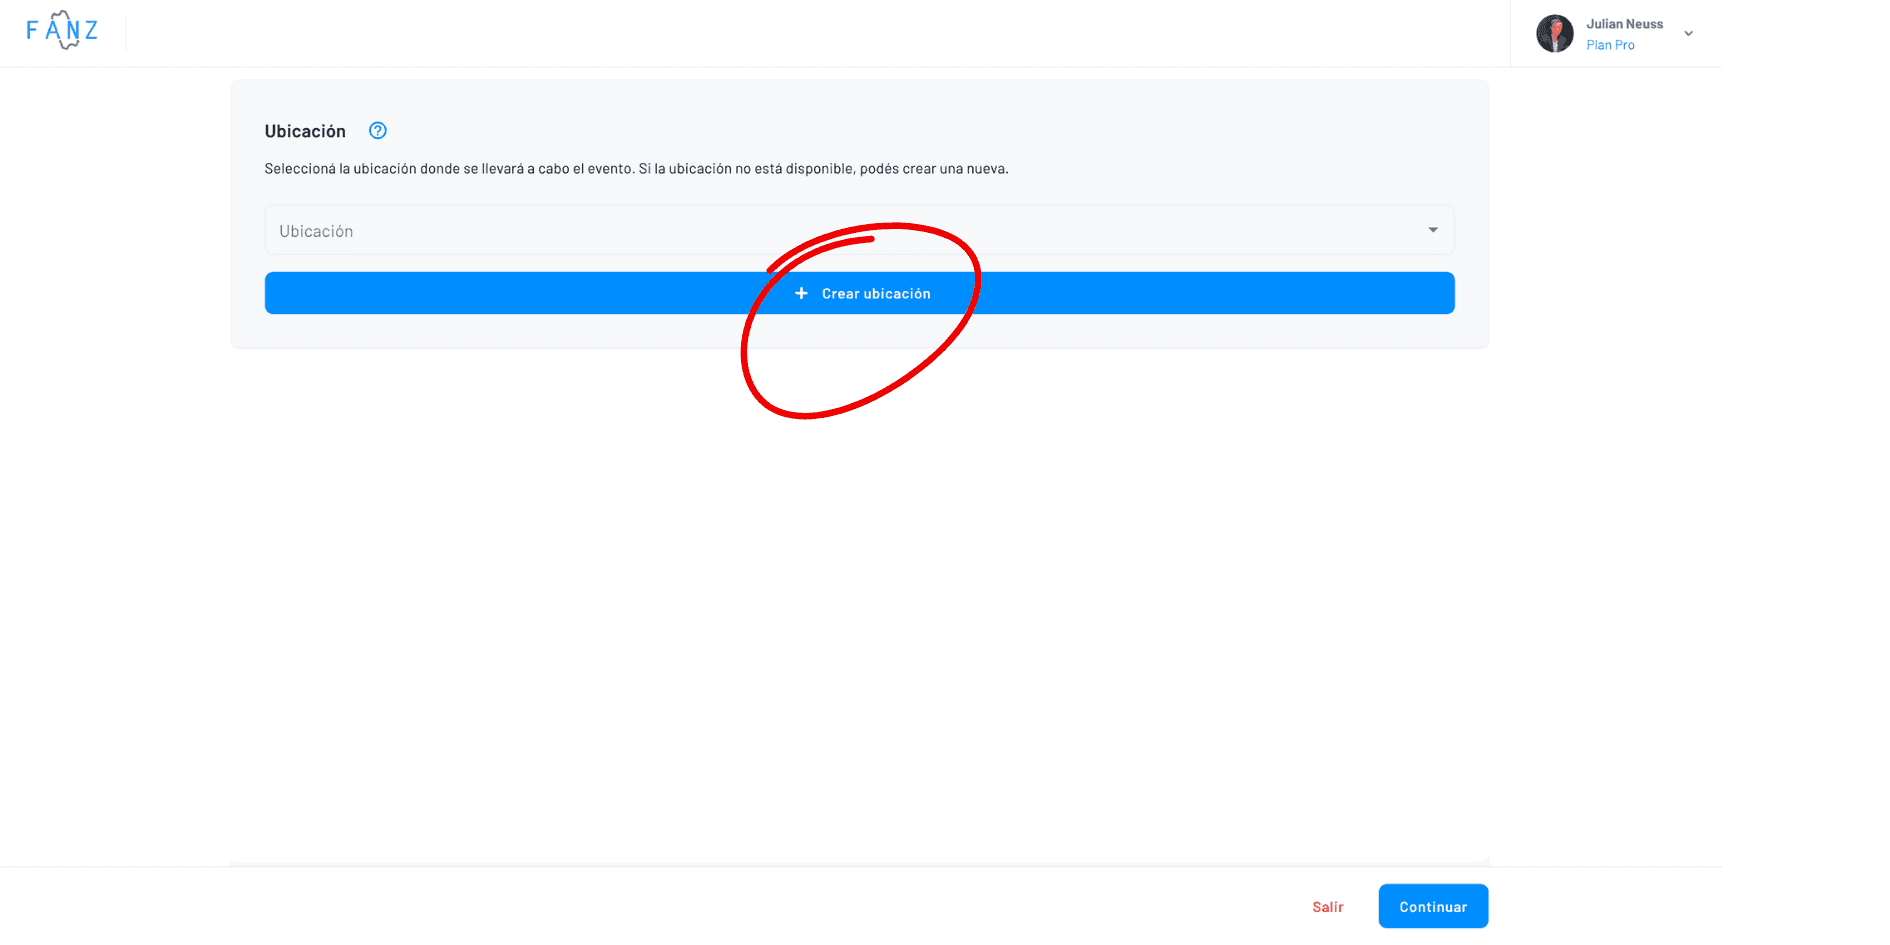
Step 3 — Location and time zone
Fanz works with reusable locations. If you always use the same theatre or cinema, you set it up once and then just select it later. Enter the venue’s address; Google Maps will suggest options, tap the correct one and you’ll see the map. If your venue has numbered seating, tick Use 3D seating map and choose the map you already created in the Constructor.
The location form asks for an internal name (for your use only), the actual address, and, if you wish, a different external name to display to the public.
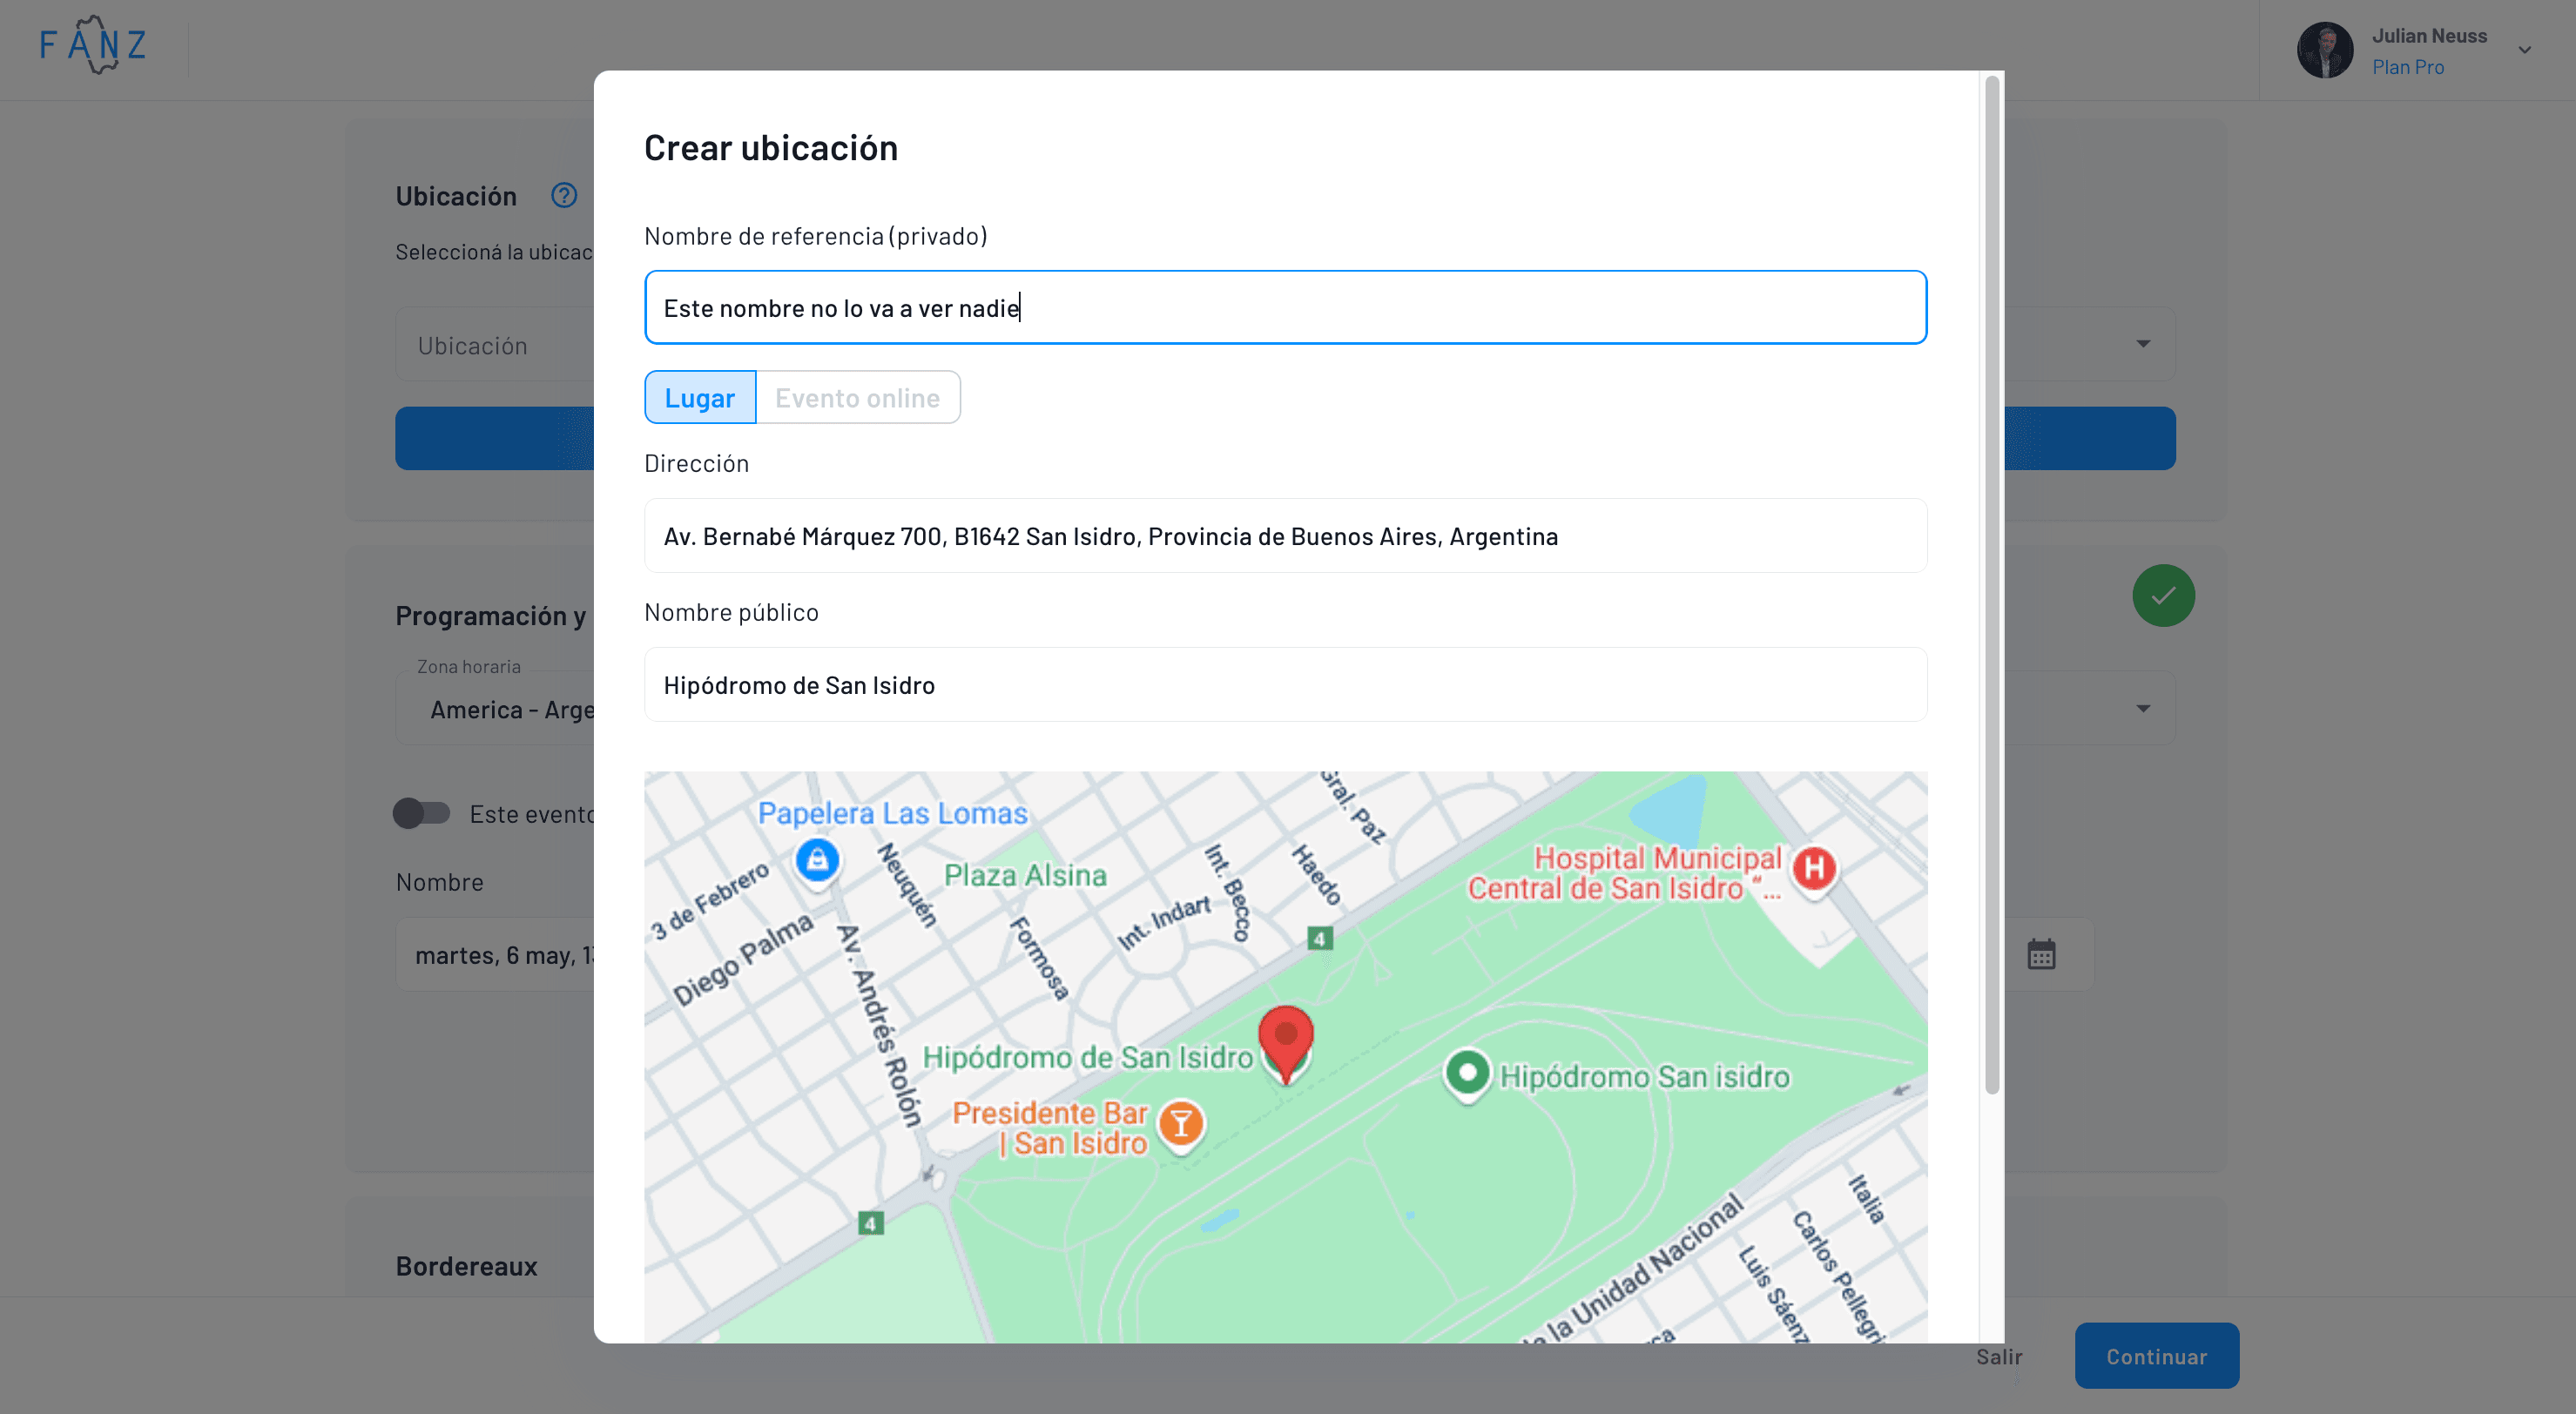
Finally, if you are using a numbered location (which you must first create in the Constructor), you will need to tick that option and select the correct seating map.
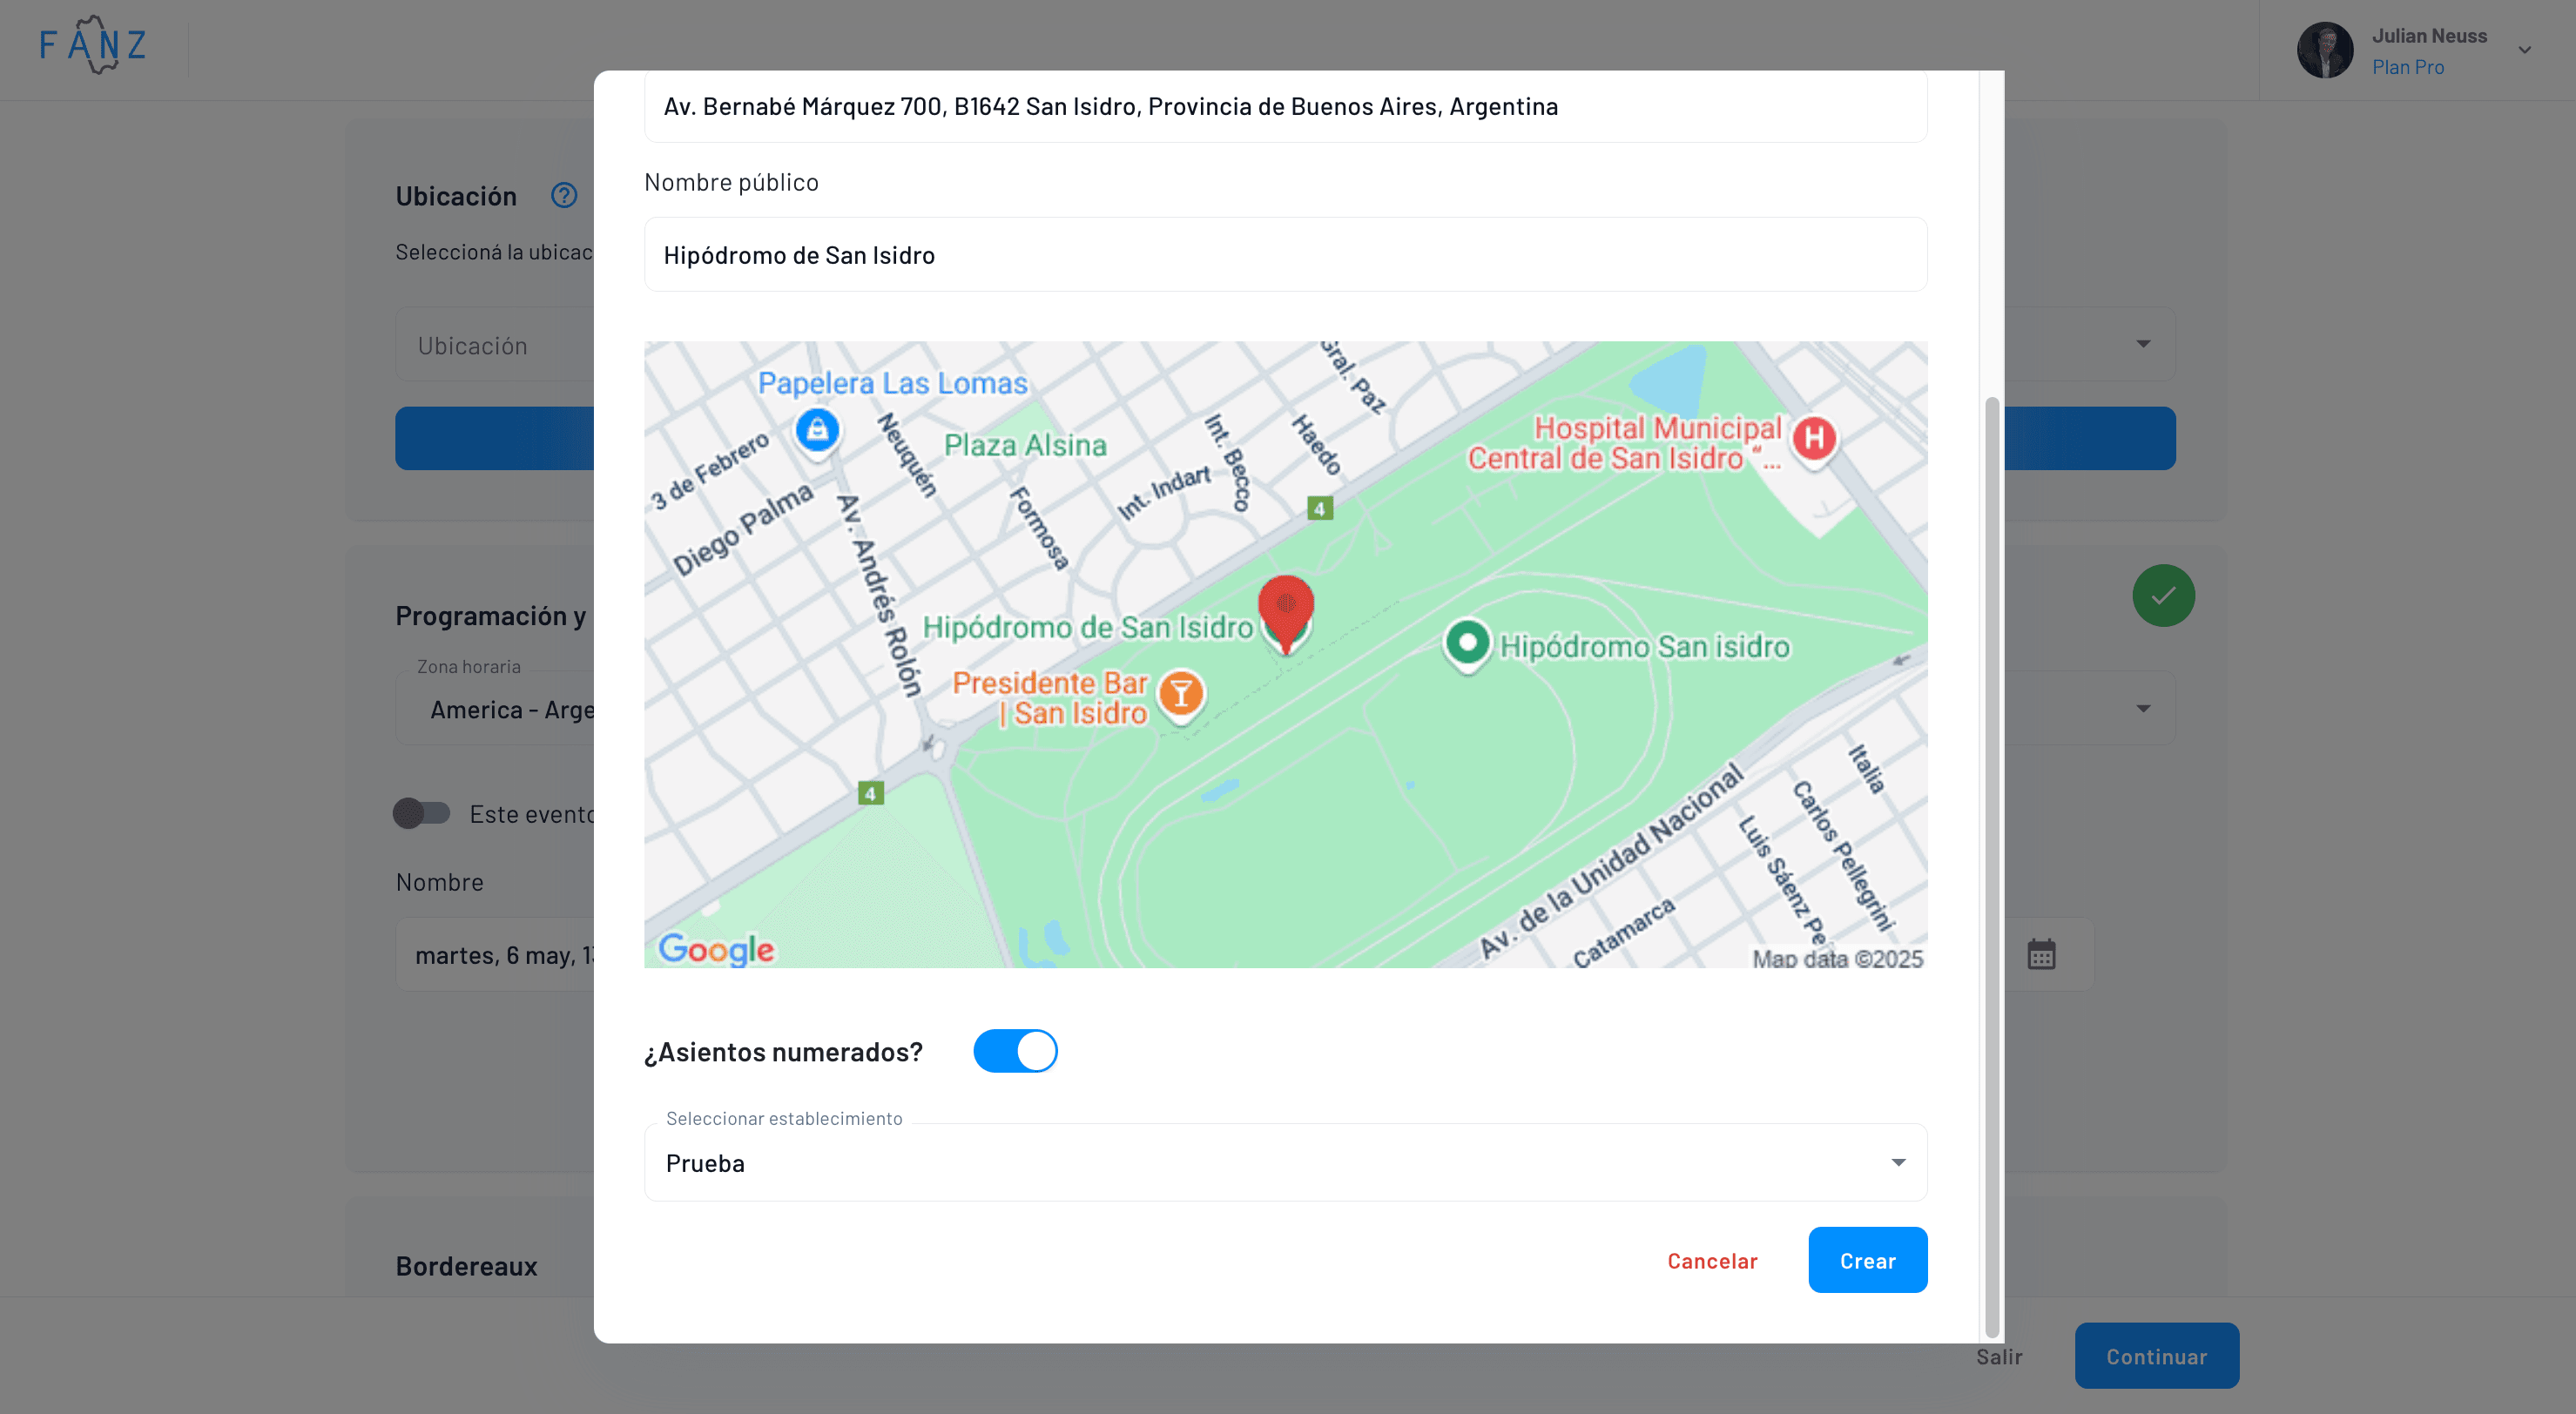
Once you’ve created the location, you’ll be able to select it for all your events with a single click.
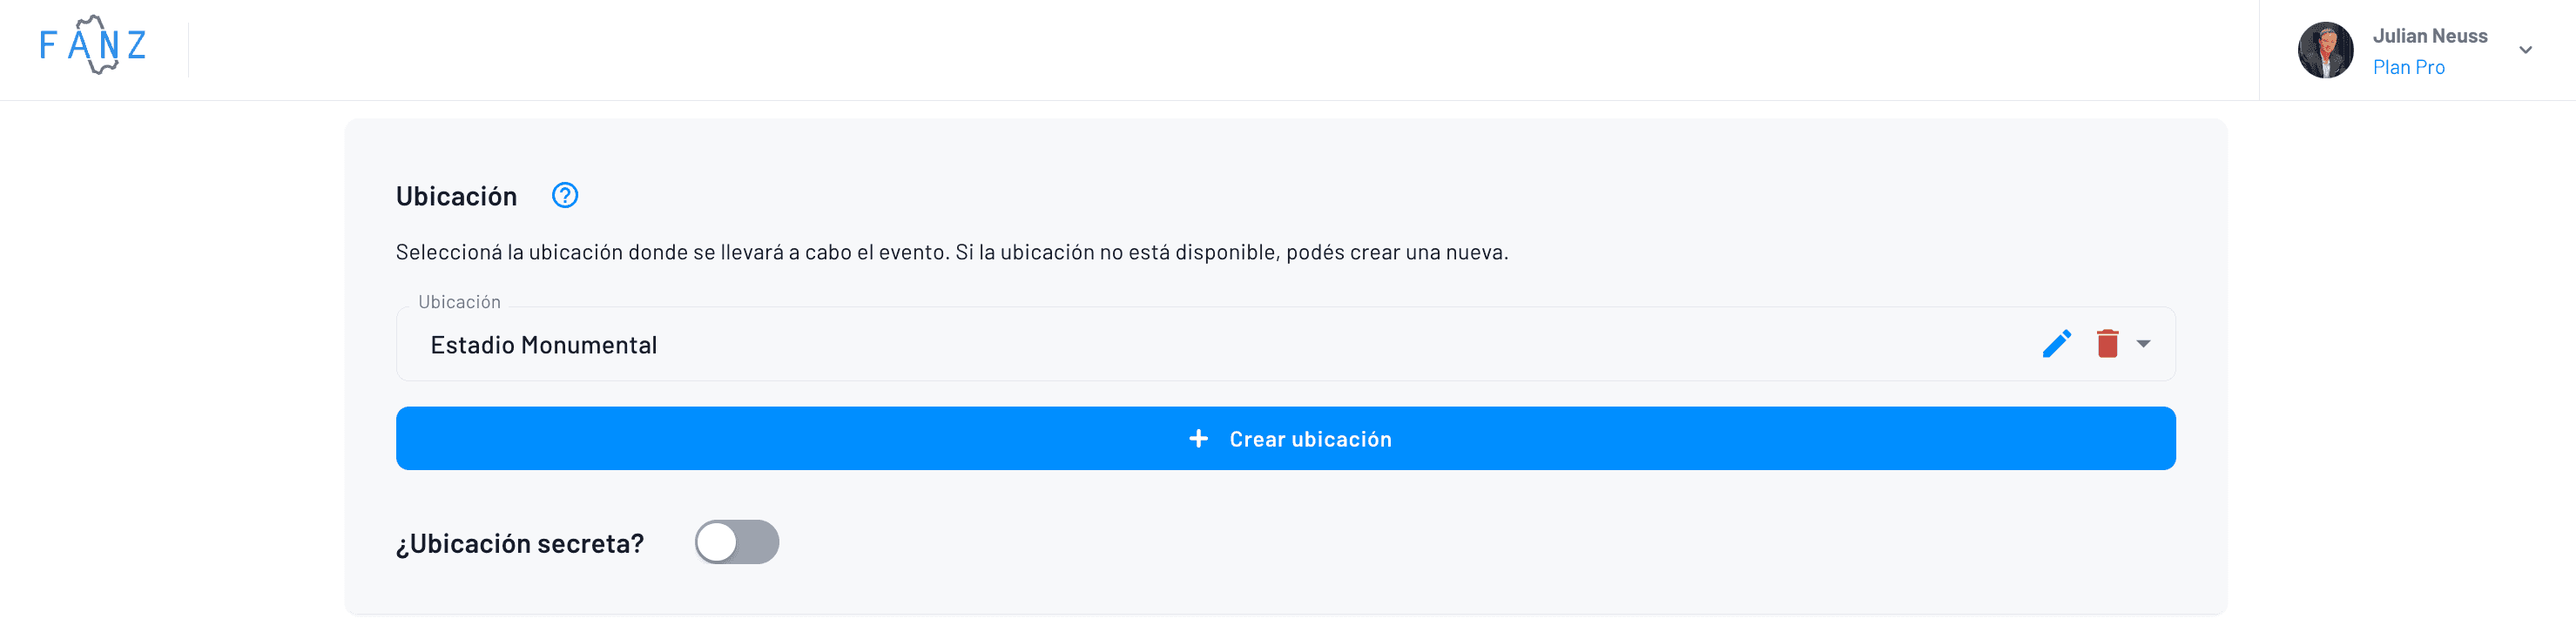
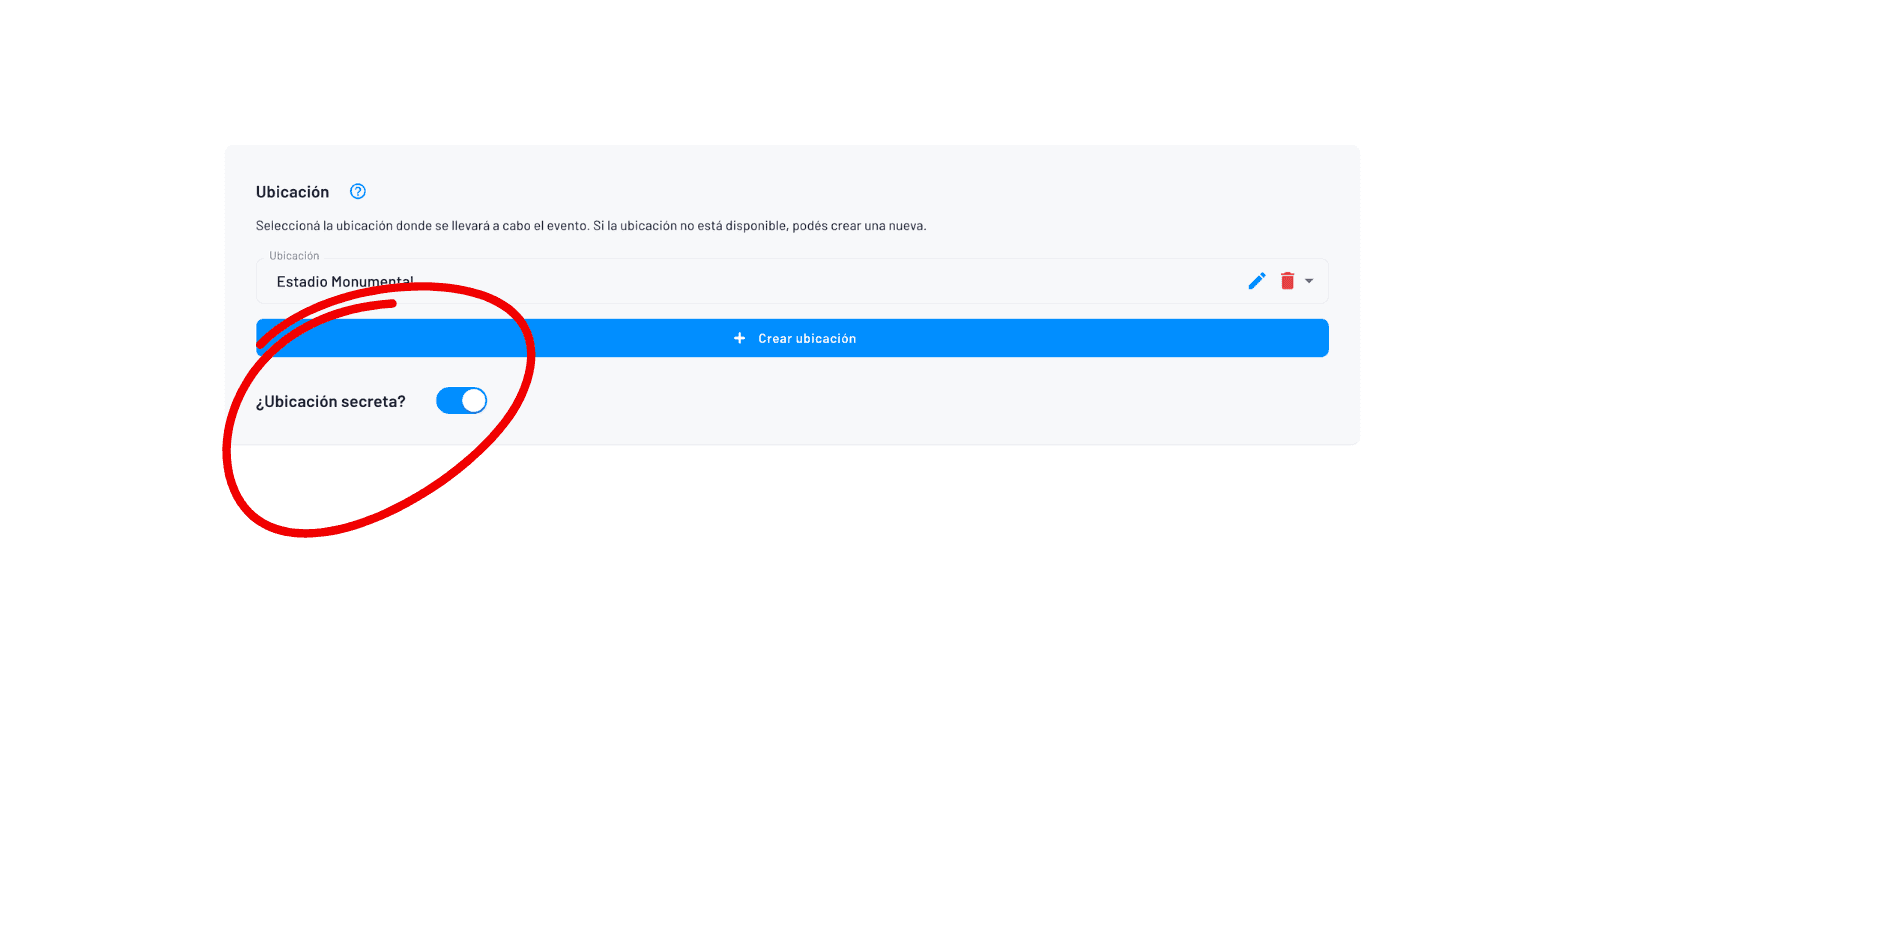
If you want to set the location to “secret” mode until the day you can announce it, you can do so with this button:
Step 4 — Single date or multiple showtimes
To set the dates, it’s important to choose the event’s time zone, which by default will be the location’s time zone, and then set the desired date.
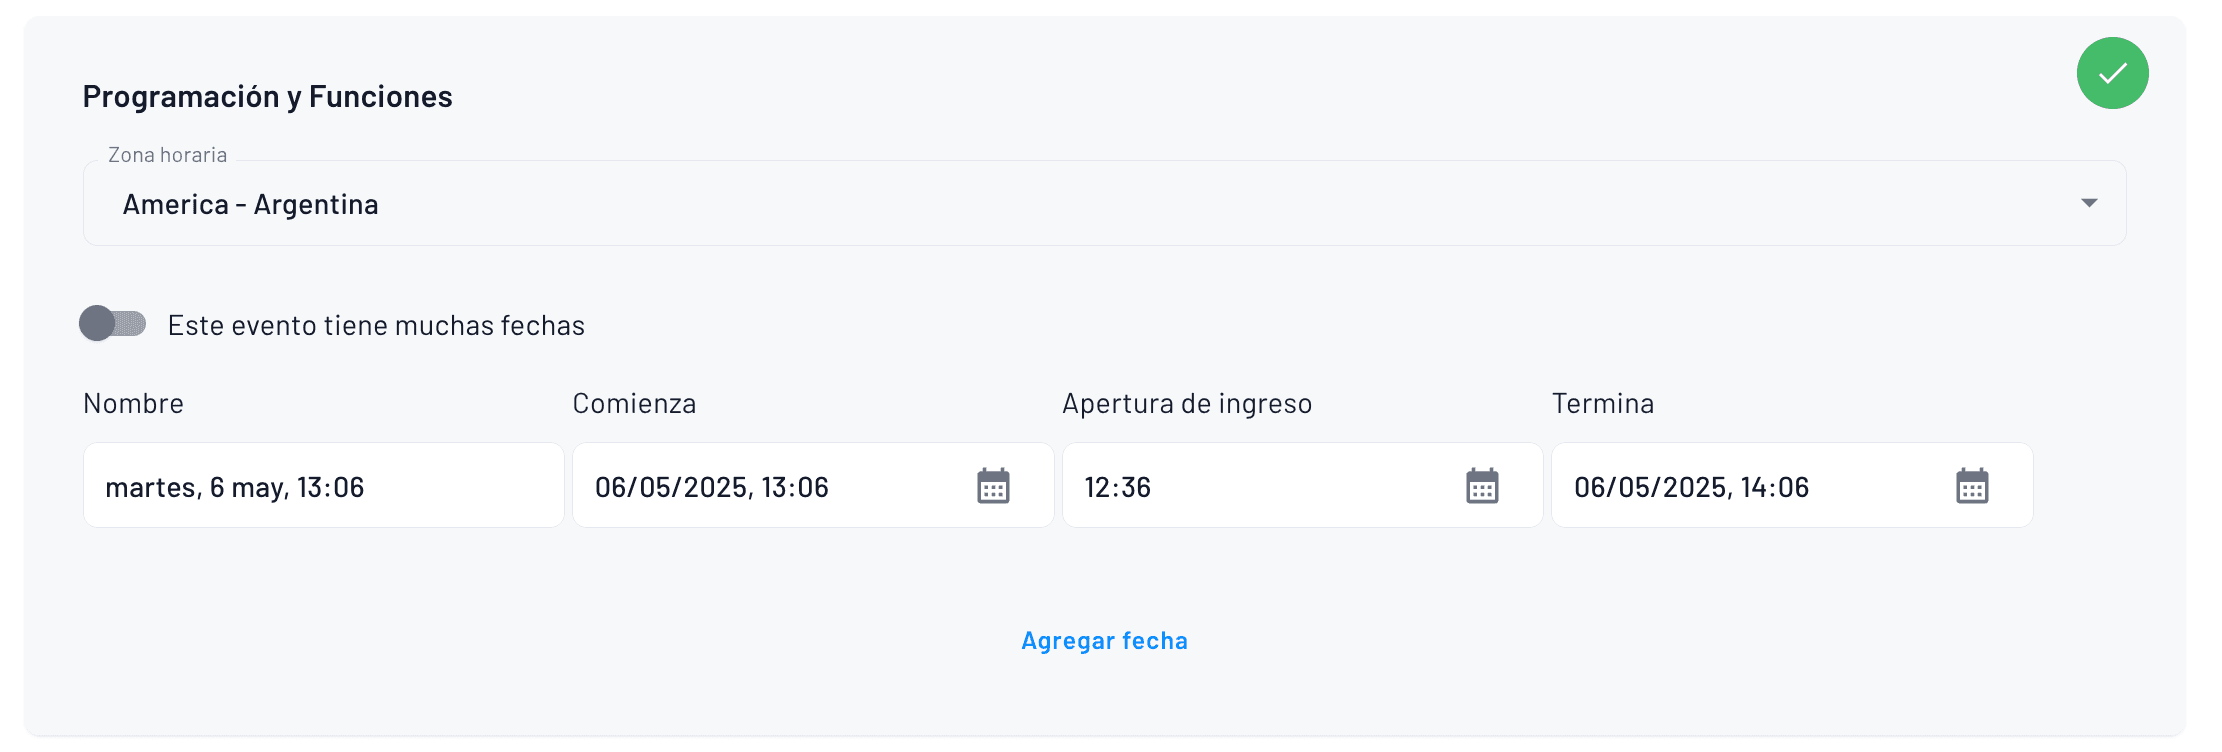
You can set dates for any type of event, whether it’s a single occurrence or has multiple showtimes.
If there are many showtimes, you can add them manually:
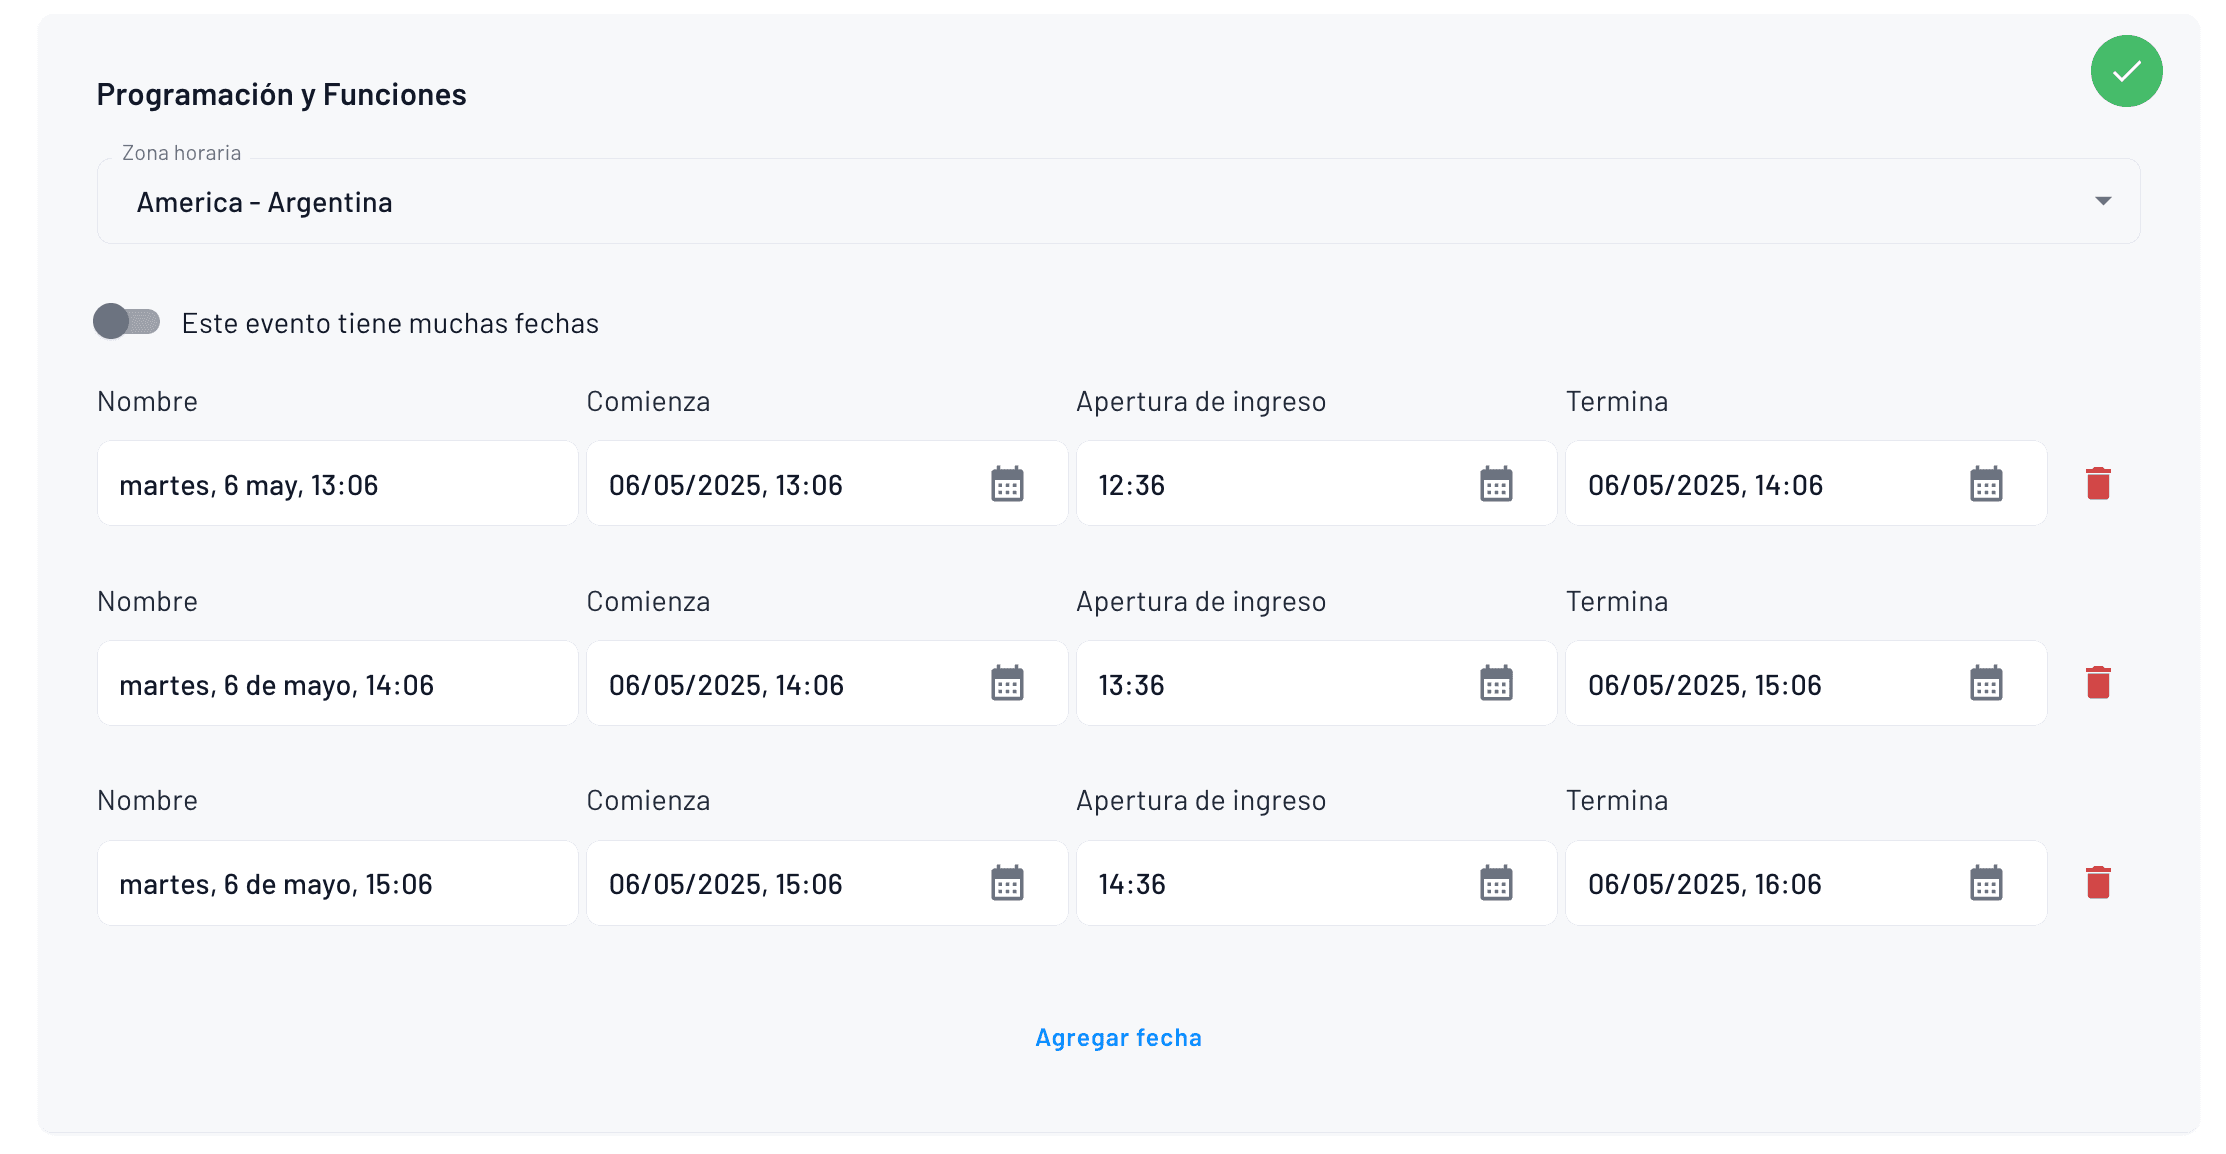
or use the multiple showtimes generator
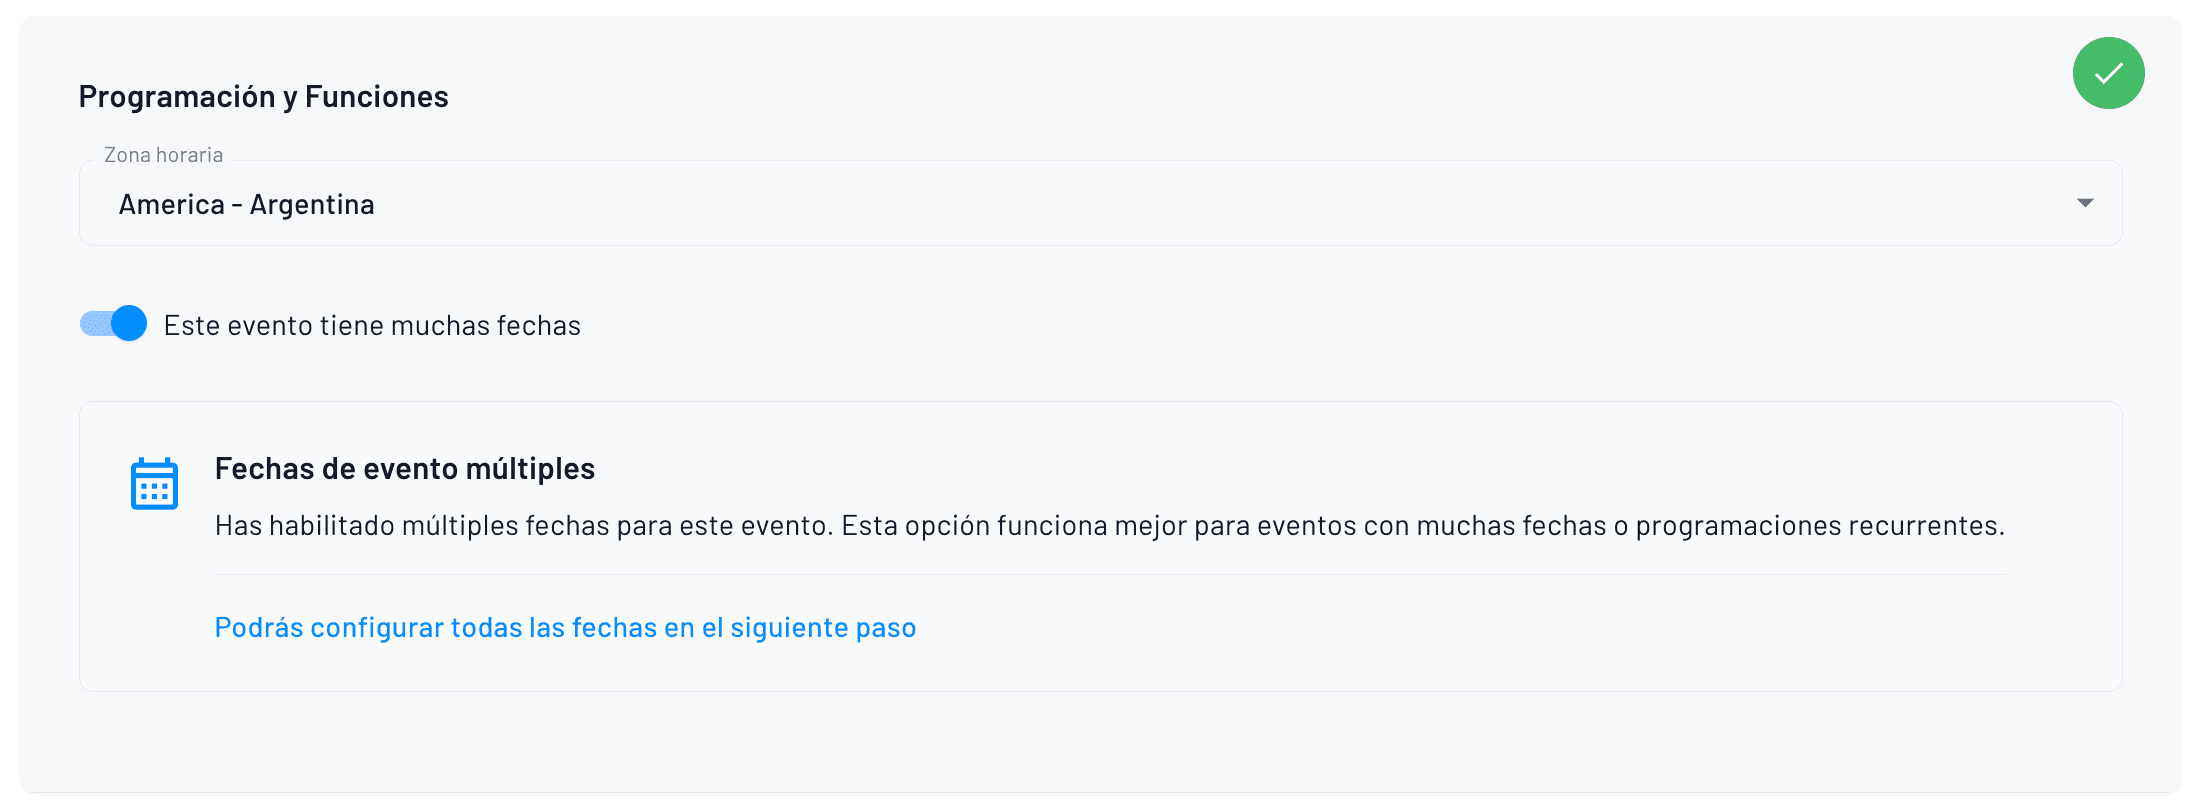
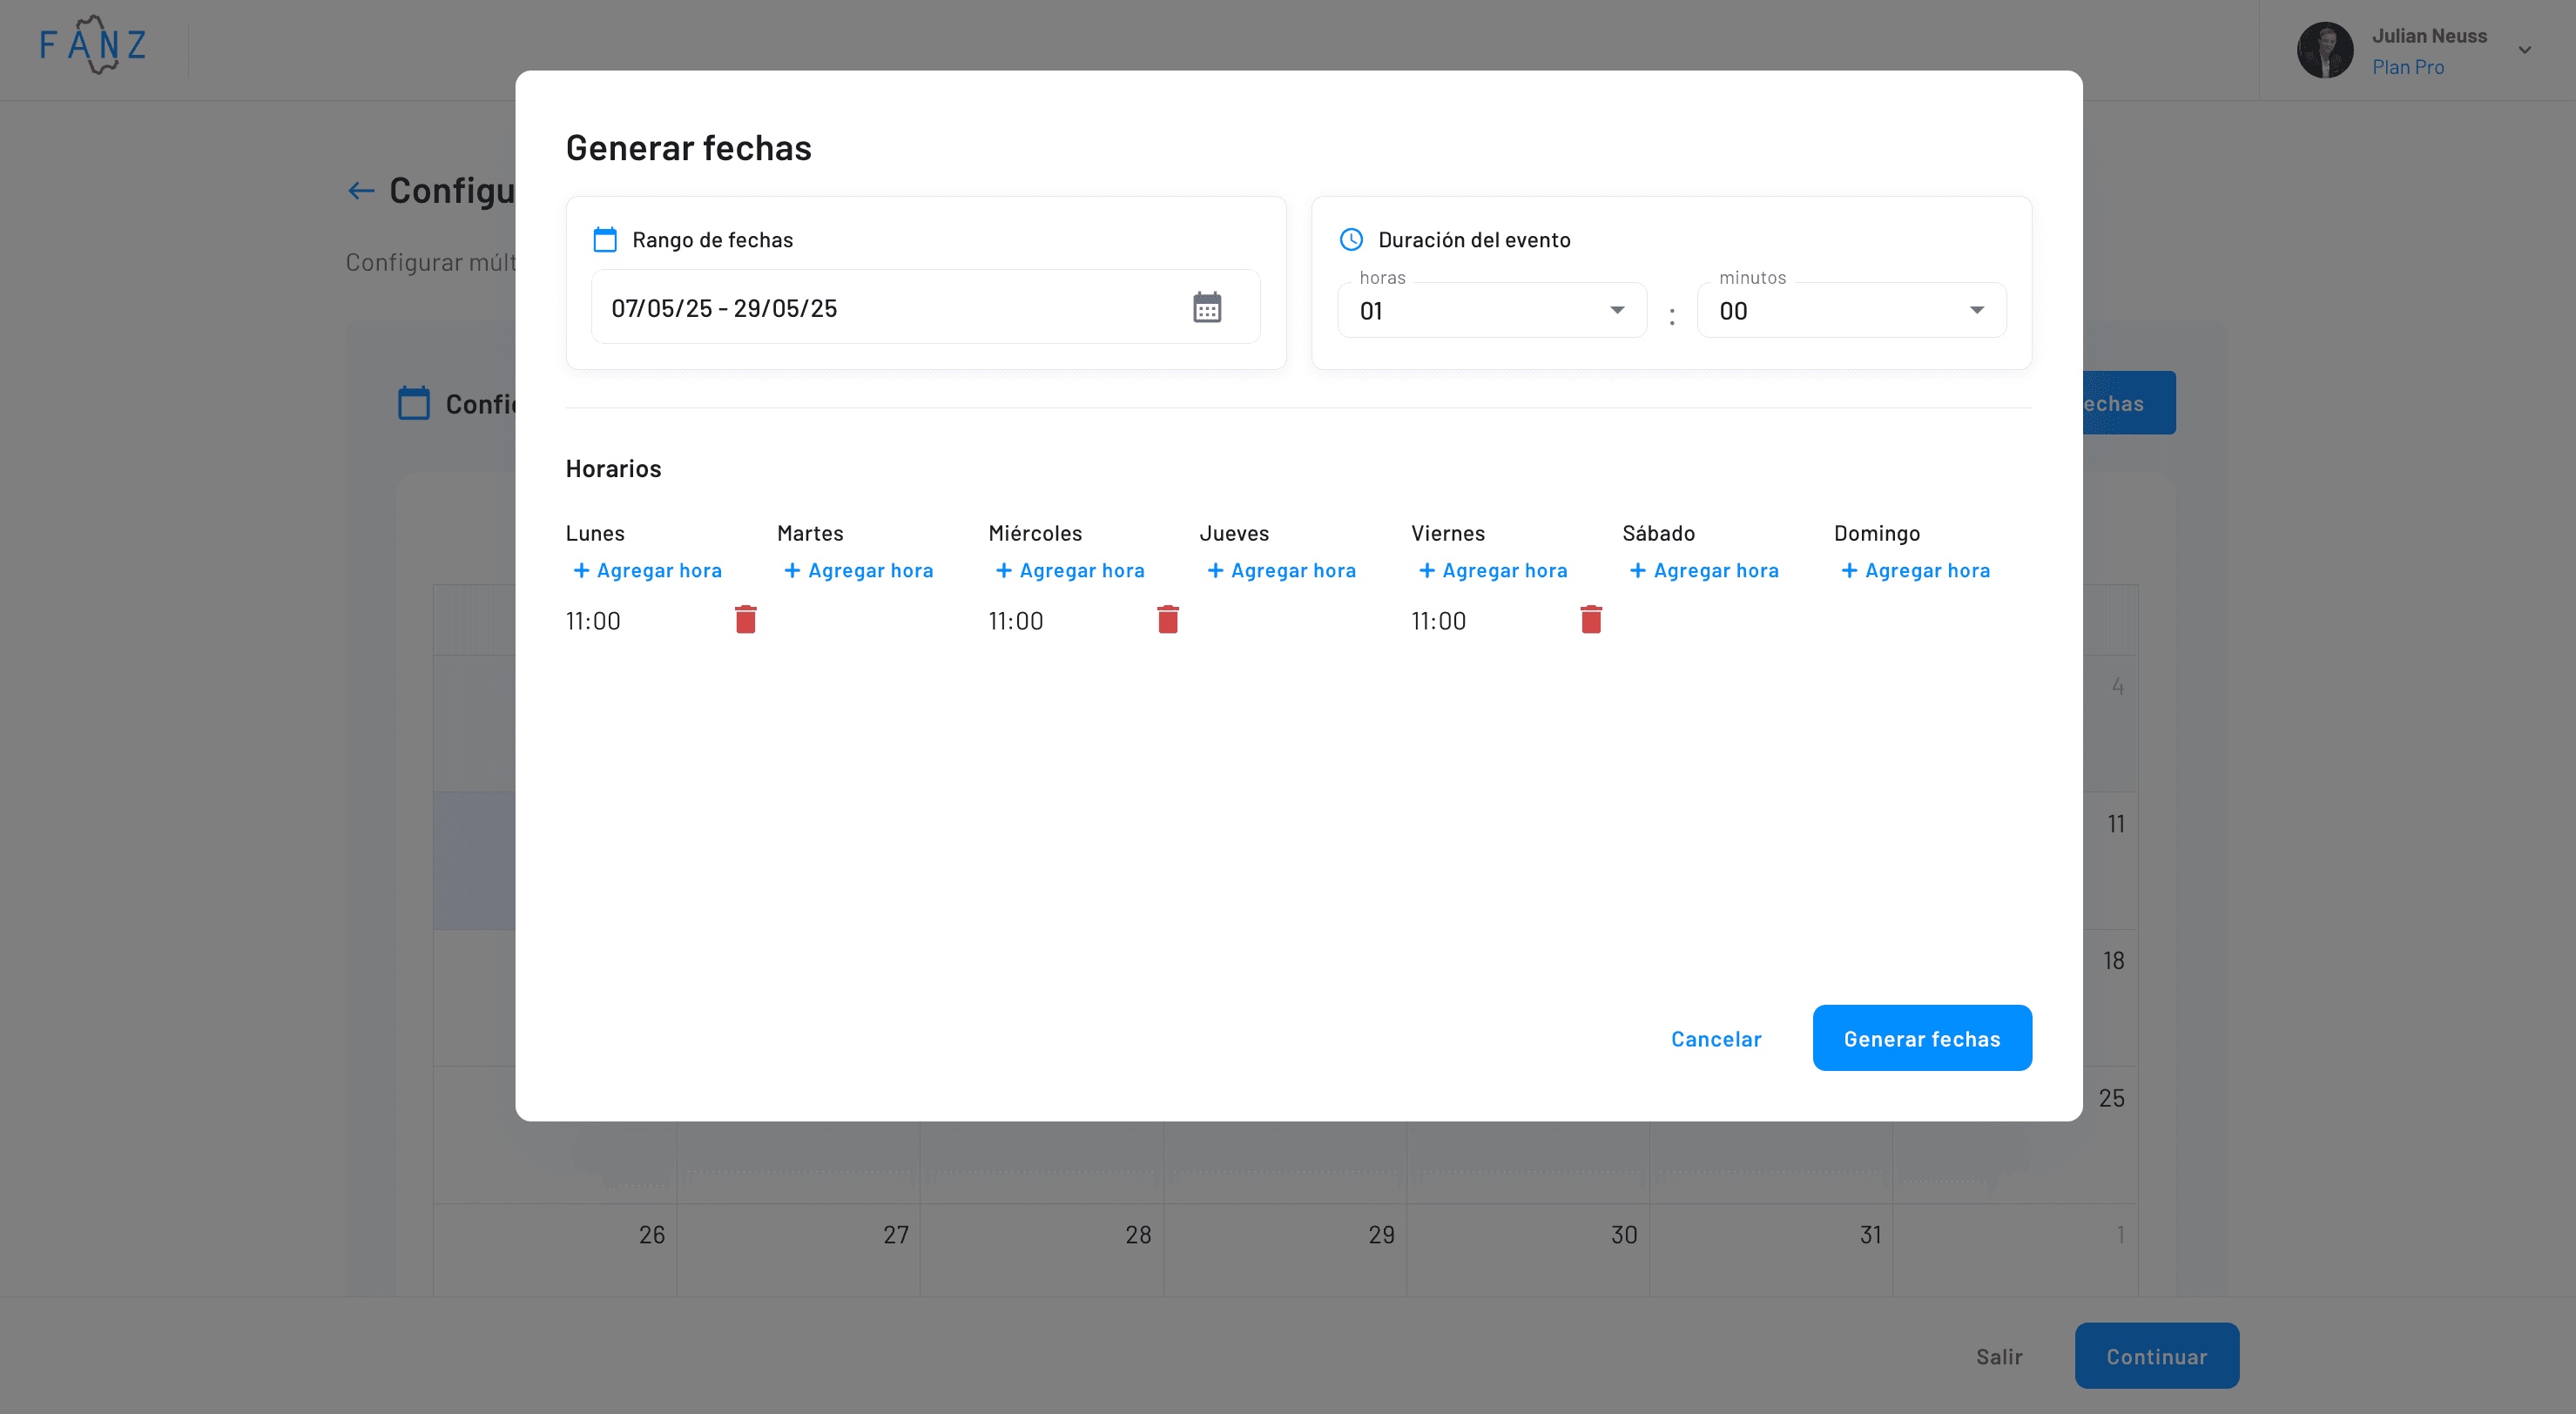
This will be enabled in the next step to finish generating all the showtimes. It’s often used when the same event is repeated on multiple days of the week at different times, allowing you to generate hundreds of showtimes in just 2 clicks.

this is what the form to generate the showtimes looks like:
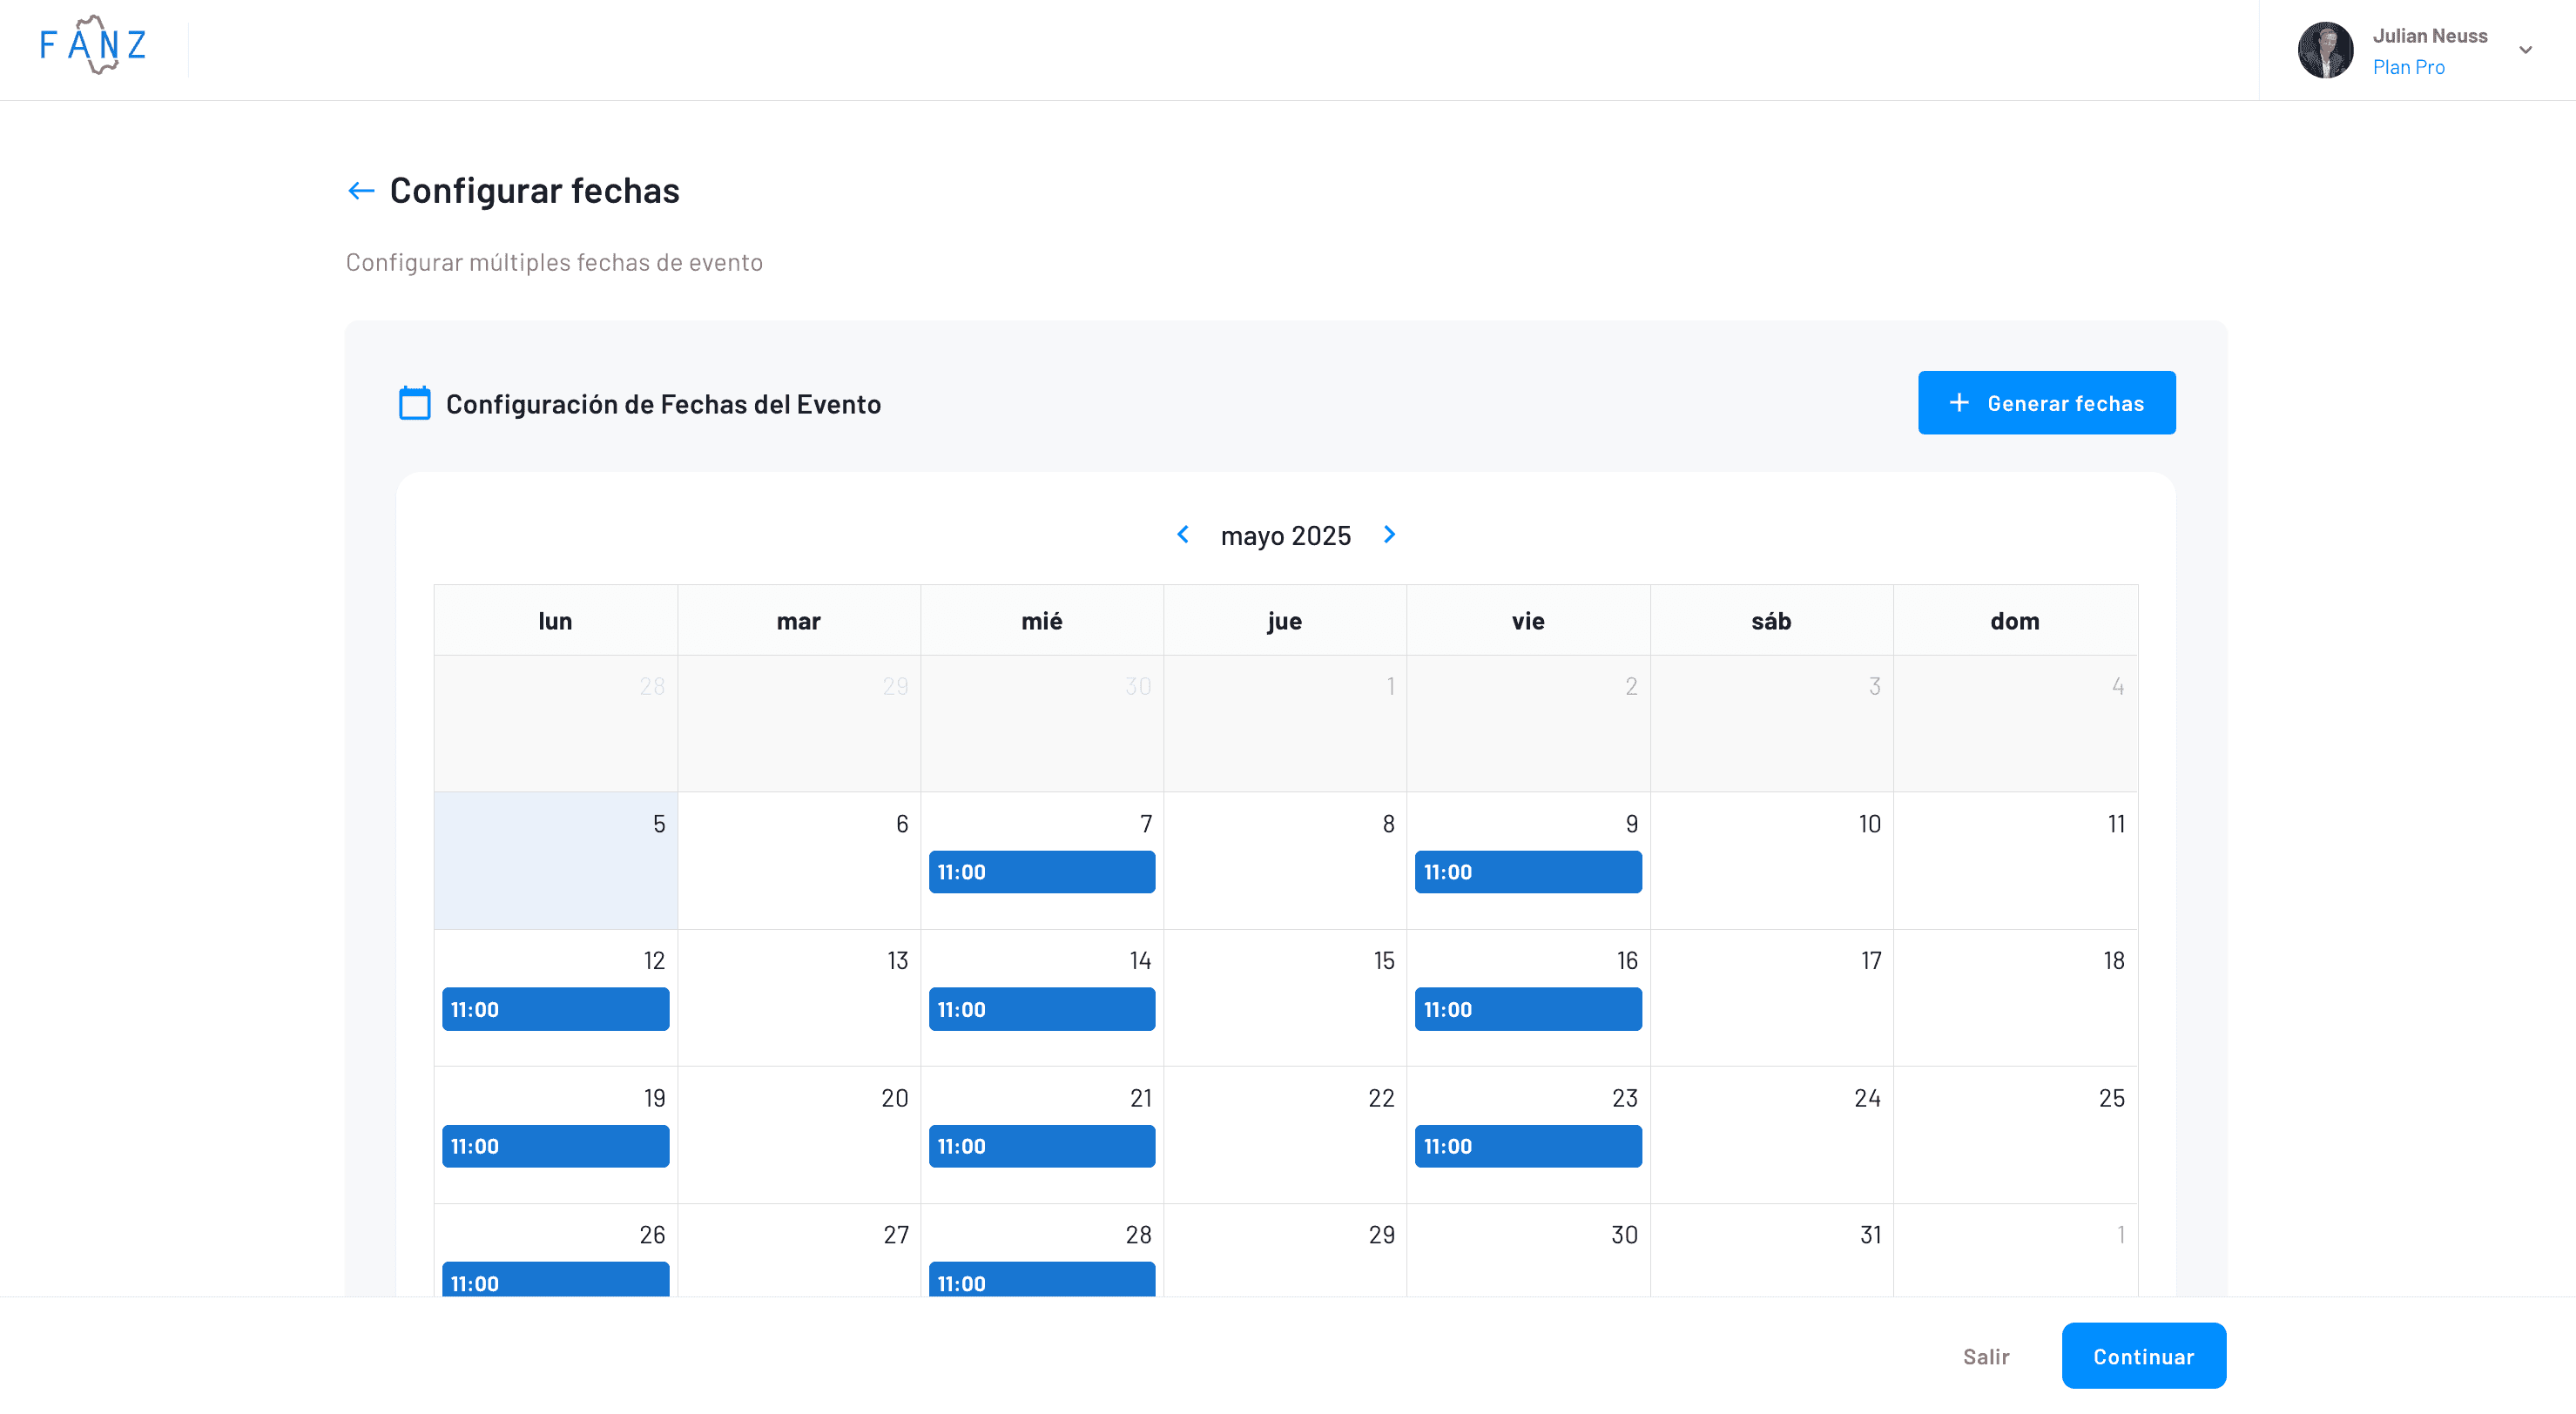
afterward, you can finish adjusting the generated showtimes in the calendar
Step 5 — Box office splits (Bordereaux)
If you need to split ticket revenue with partners or artists, first create the rule in Settings > Bordereaux.

you can then assign that configuration to any events you want

and then, within the events, you’ll be able to view it and have it adjust in real time
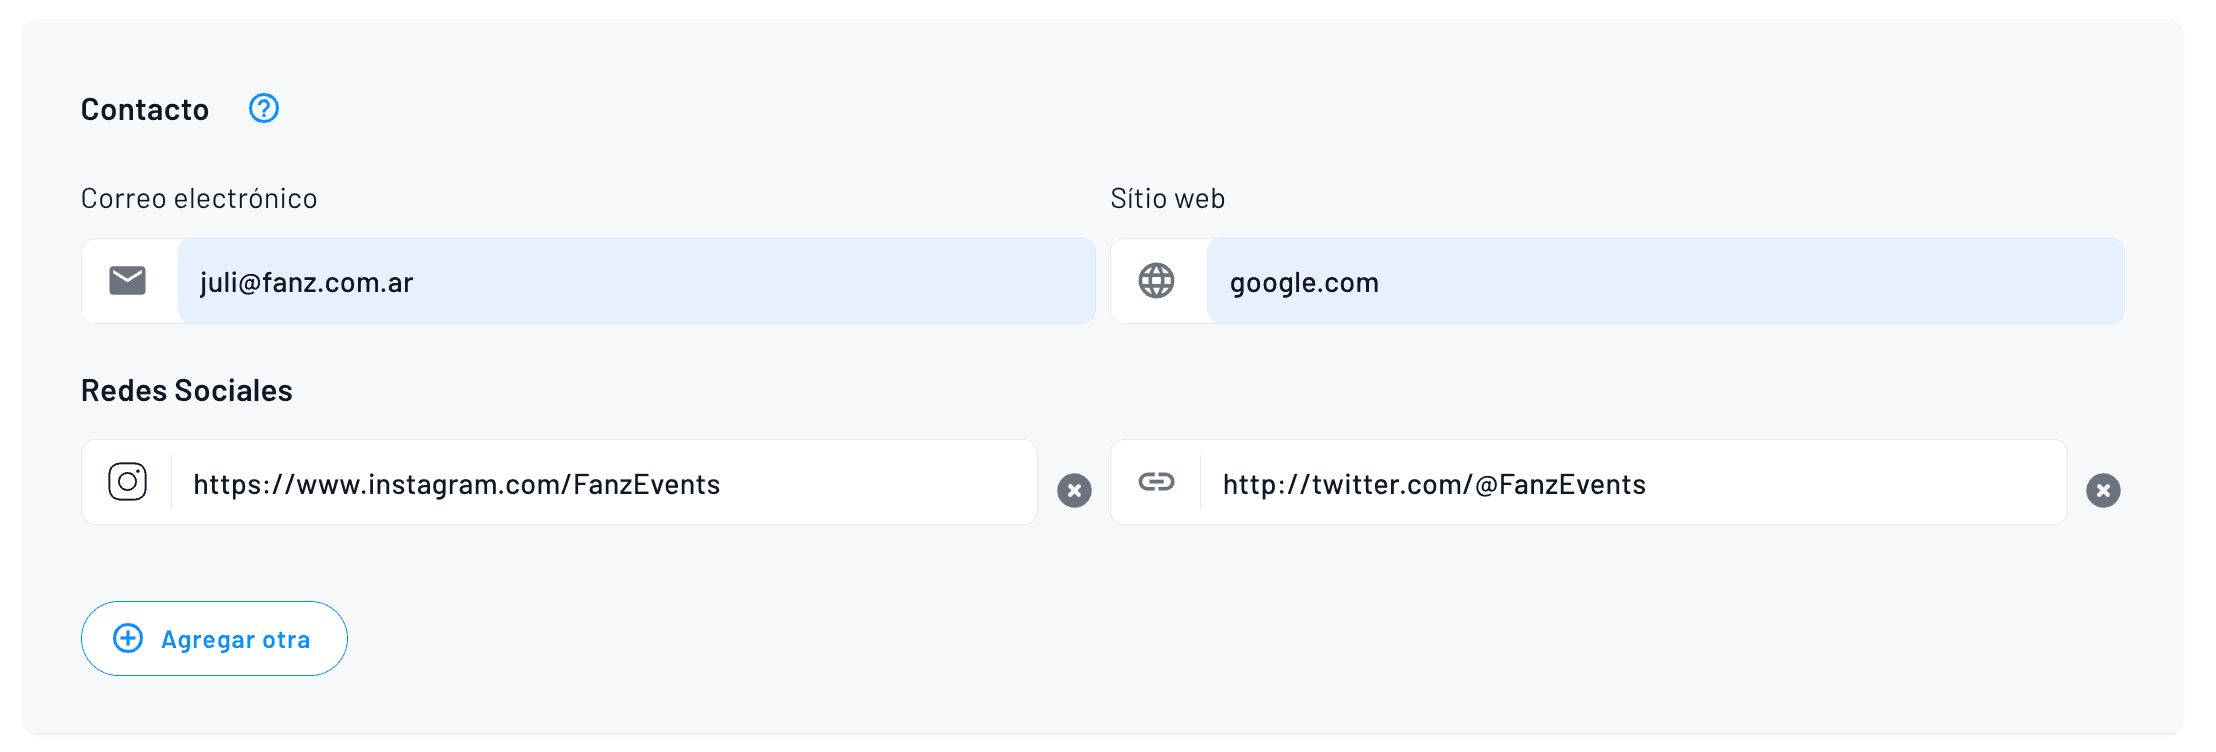
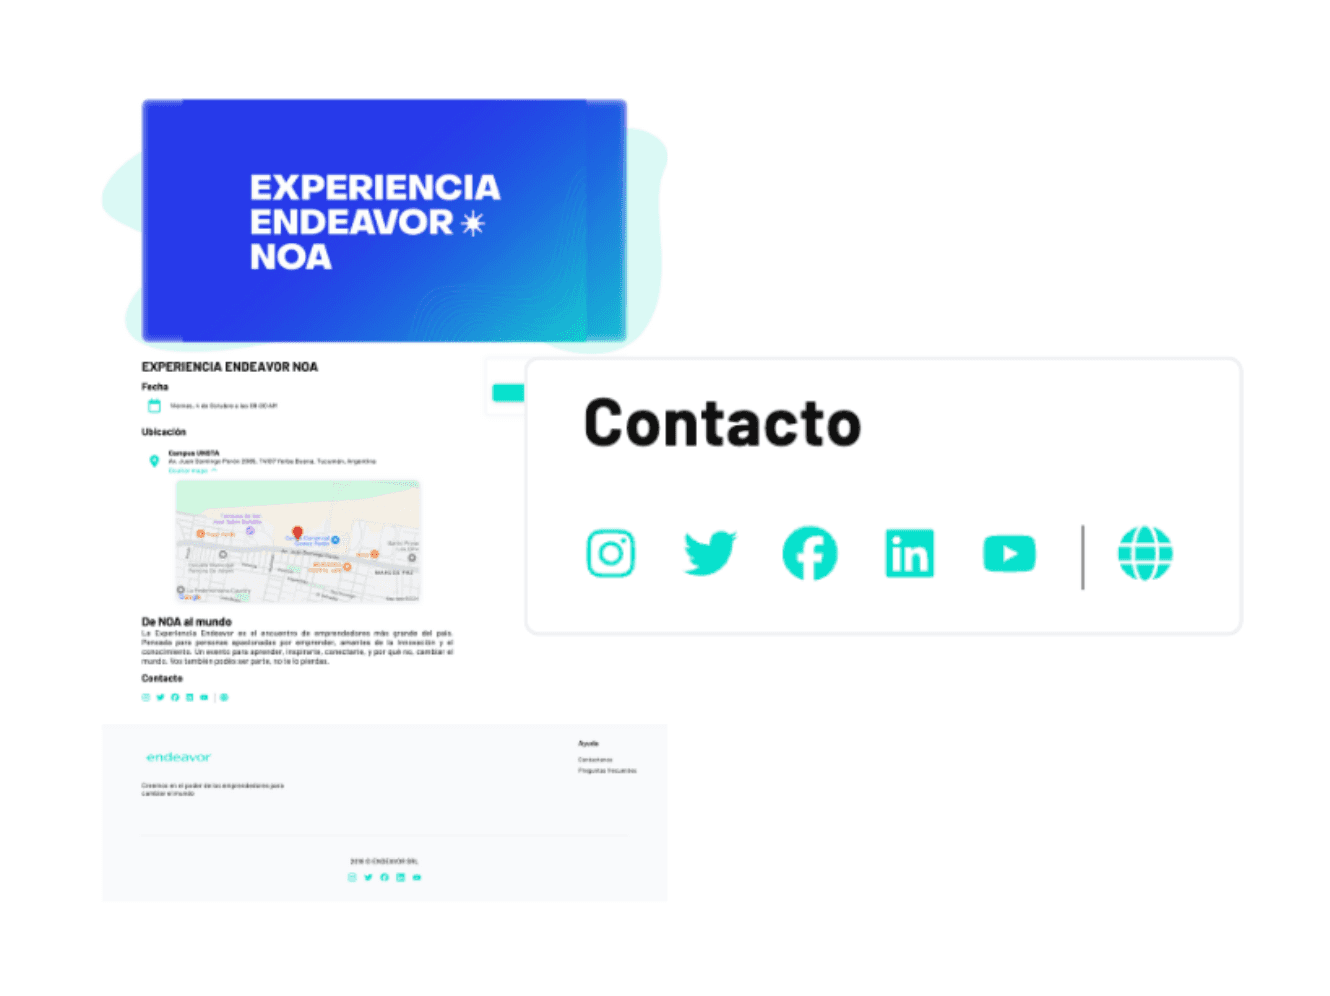
Step 6 — Contact and online presence
Fill in a support email, your website, and the event’s social media. All of this will be shown to the public so they can contact you or visit your page. If you have questions about the event, feel free to contact us.
This is how it looks on the event page:
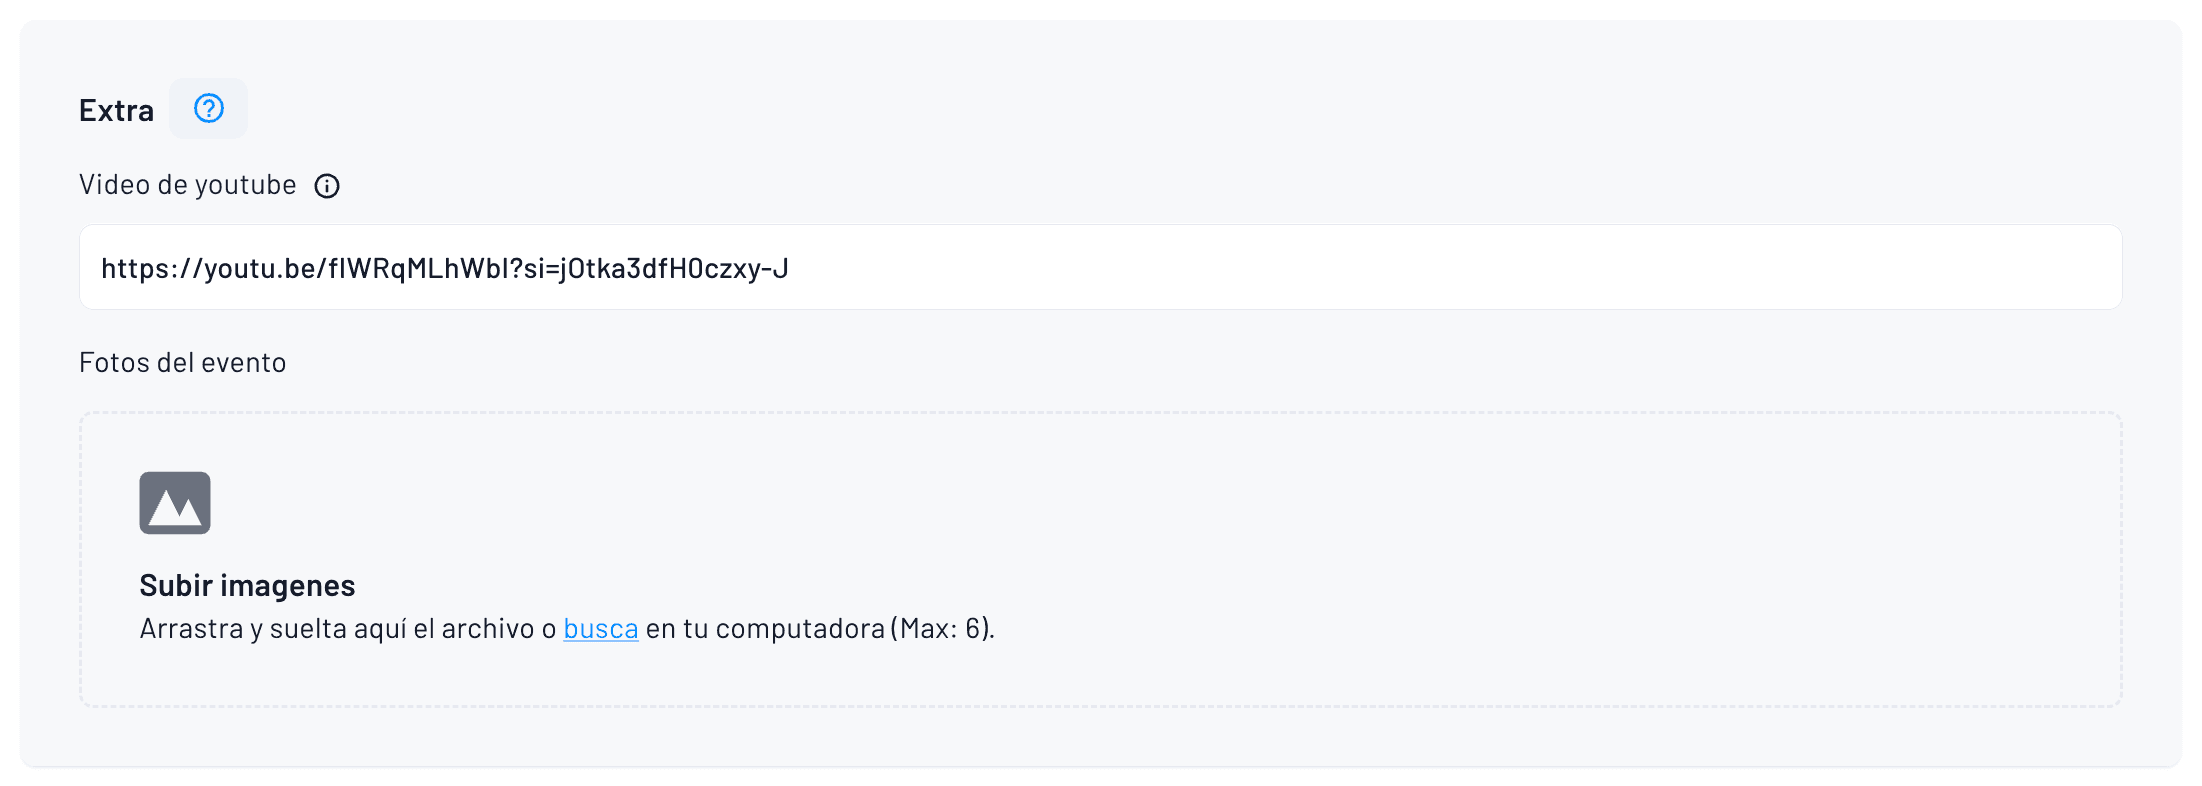
Step 7 — Event media
Paste a YouTube link if you want a trailer and upload up to five extra photos. Drag them into the box or select them from your computer and wait for them to finish uploading. You can also send a confirmation email with the link to the trailer and the additional photos.
Use horizontal images at 1920×1080 so they look sharp on any screen.
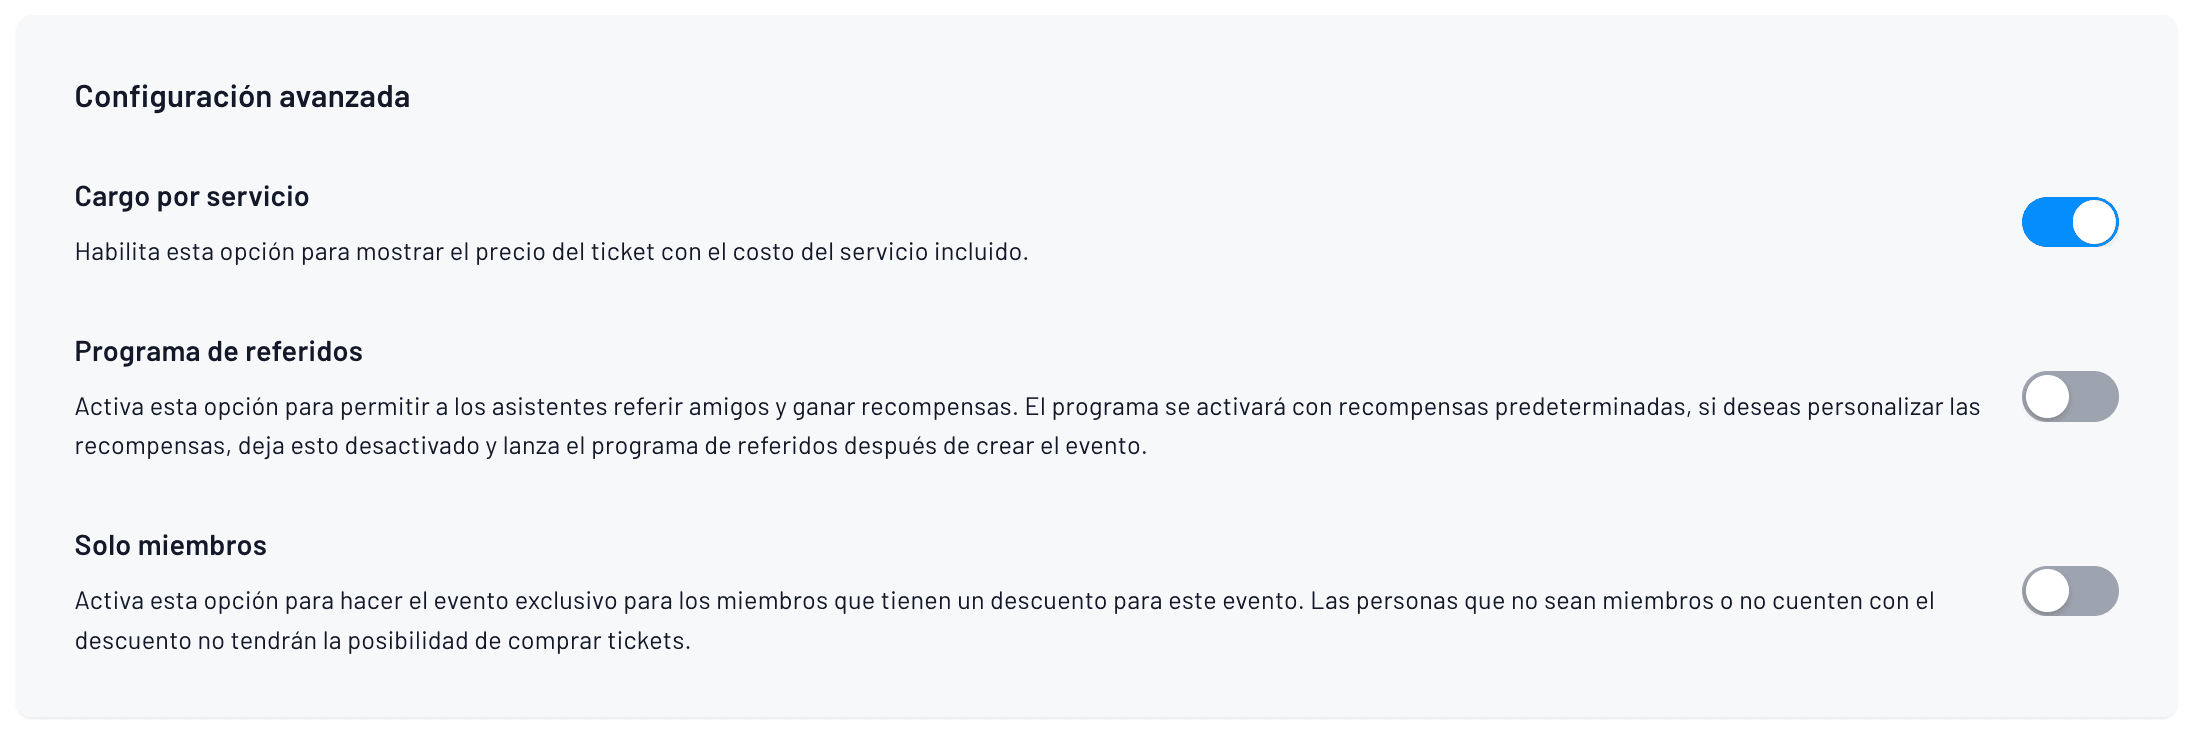
Step 8 — Advanced monetization options
You have three toggles.
Service fee included: The price already shows the fee, so no one is surprised at checkout, and payment is made easier through various options like cash, bank transfers, and cards.
Referral program: Activates links that give cashback to anyone who brings friends.
Members only: Blocks purchases from anyone who doesn’t have a VIP pass or discount. Choose the ones you need and continue.
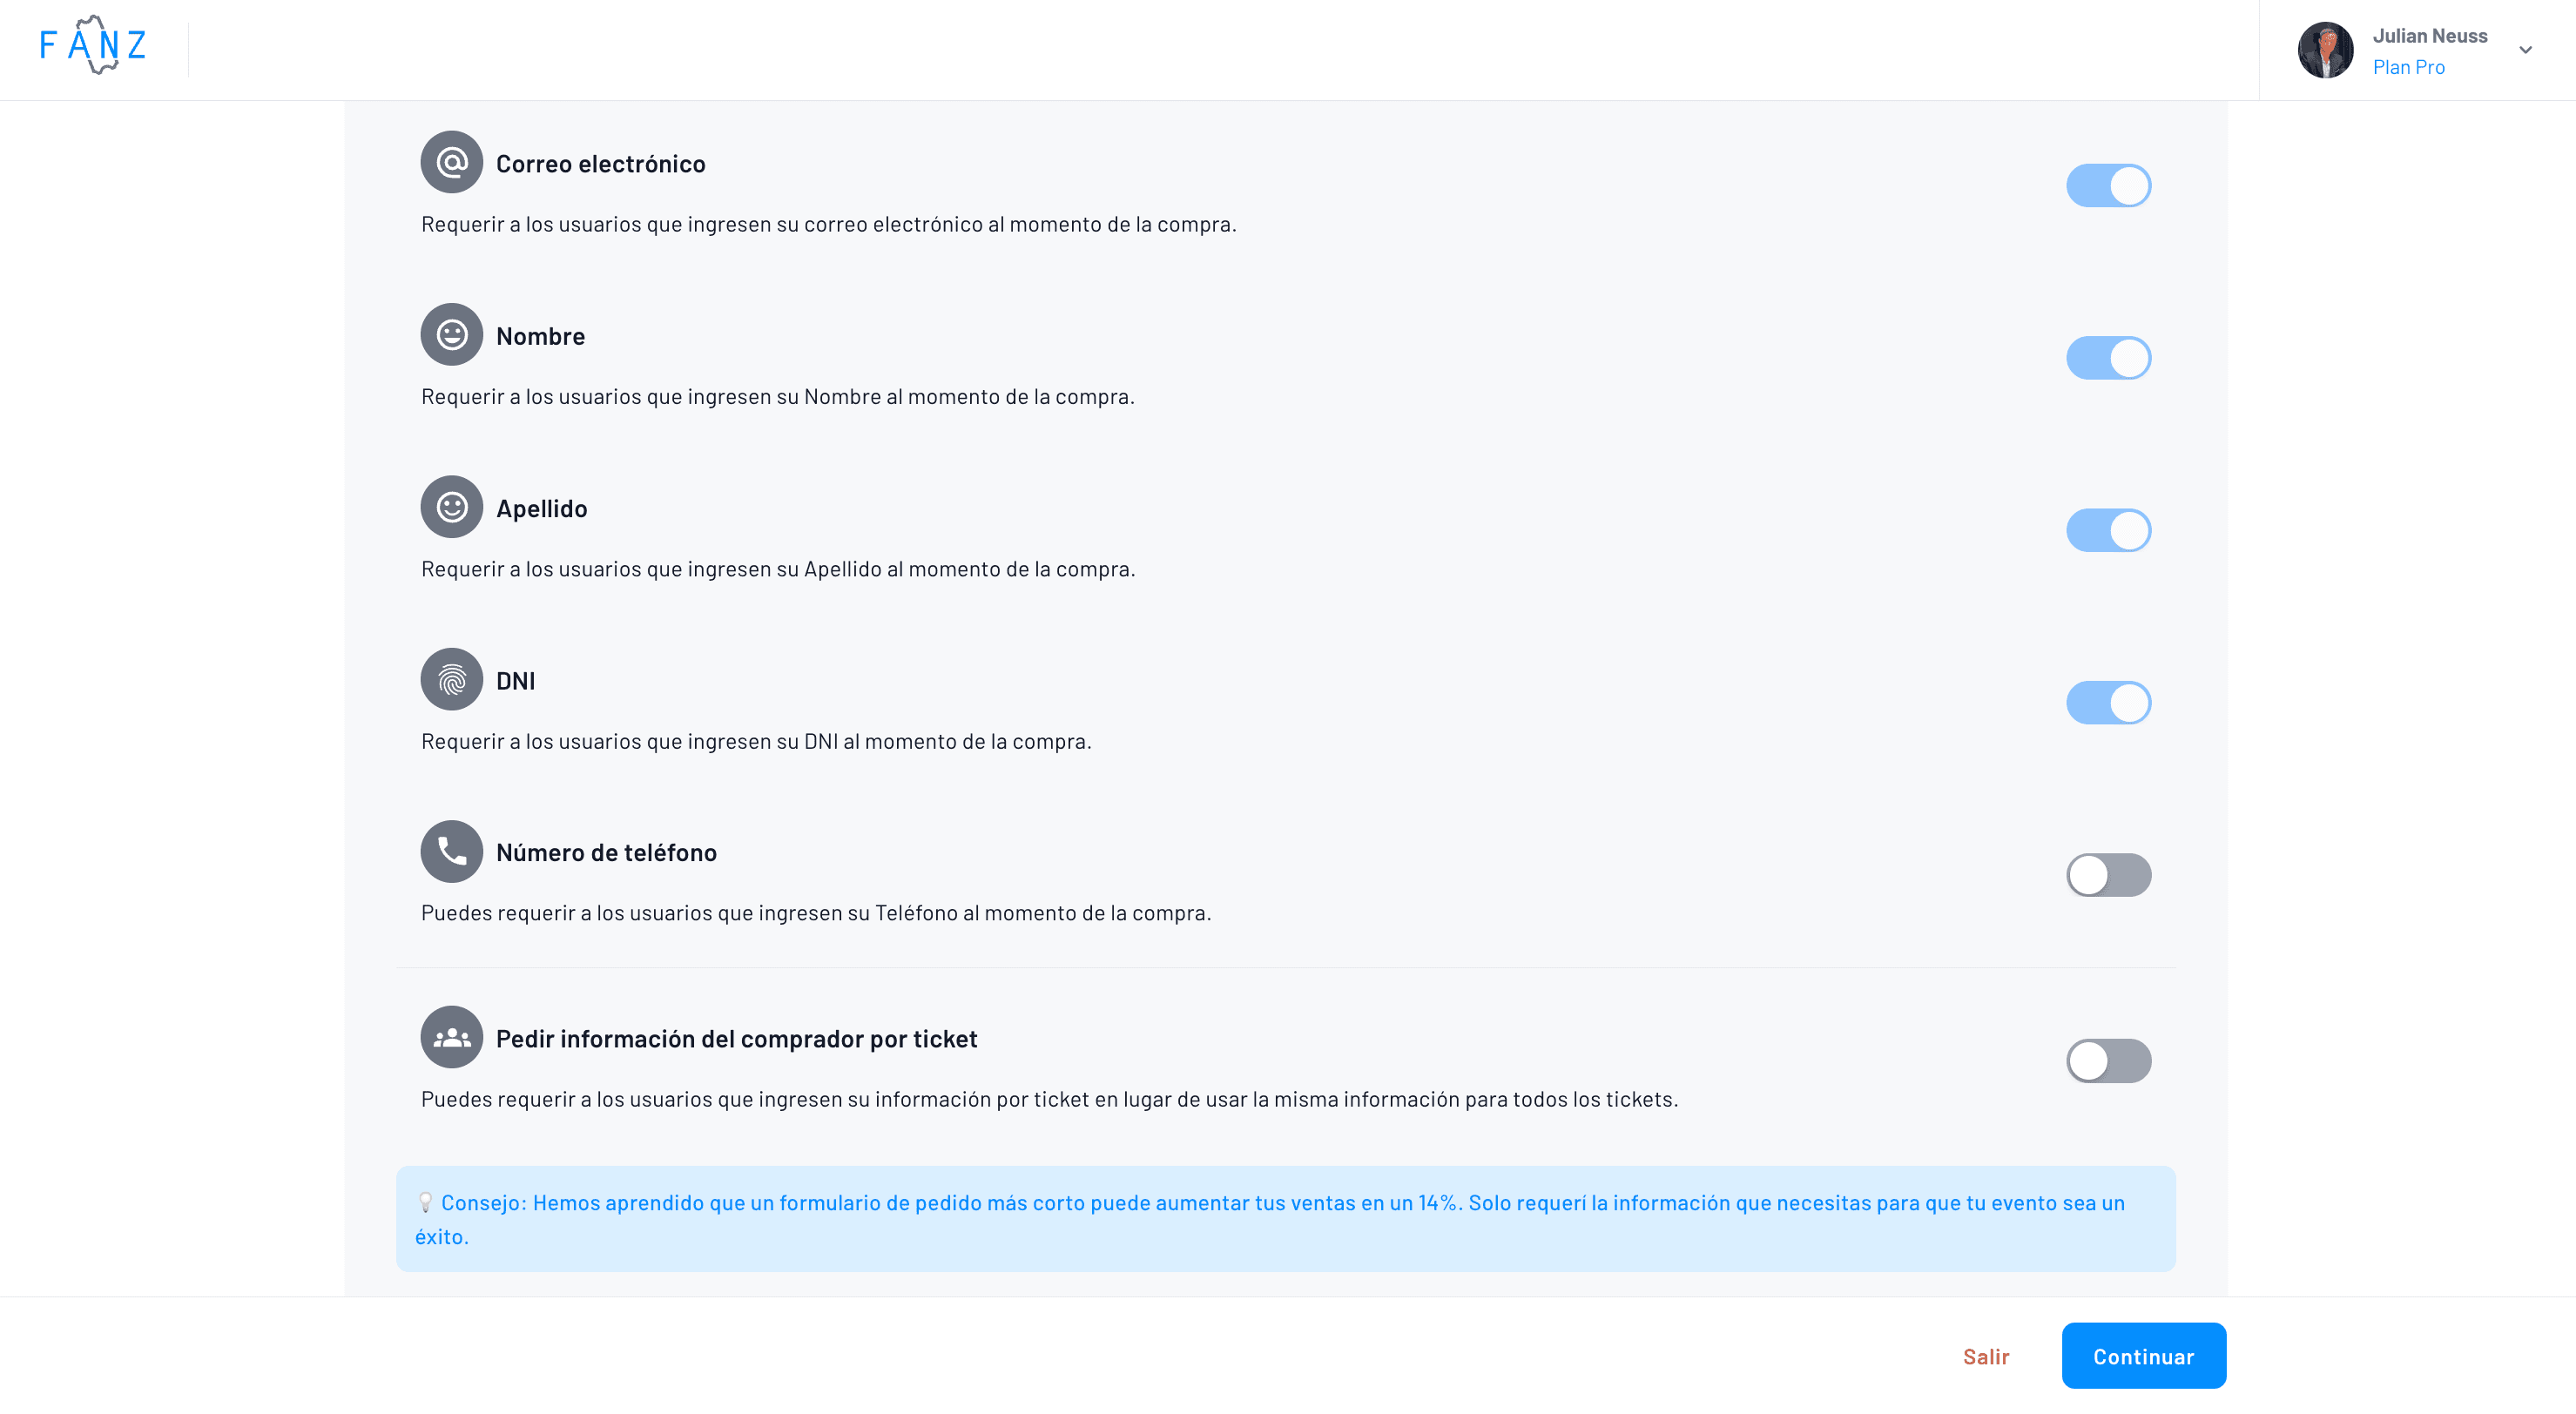
Step 9 — Buyer information
Select if you want to request email, first name, last name, ID, or phone number.
It is crucial to verify the buyer’s identity for events that require an ID.
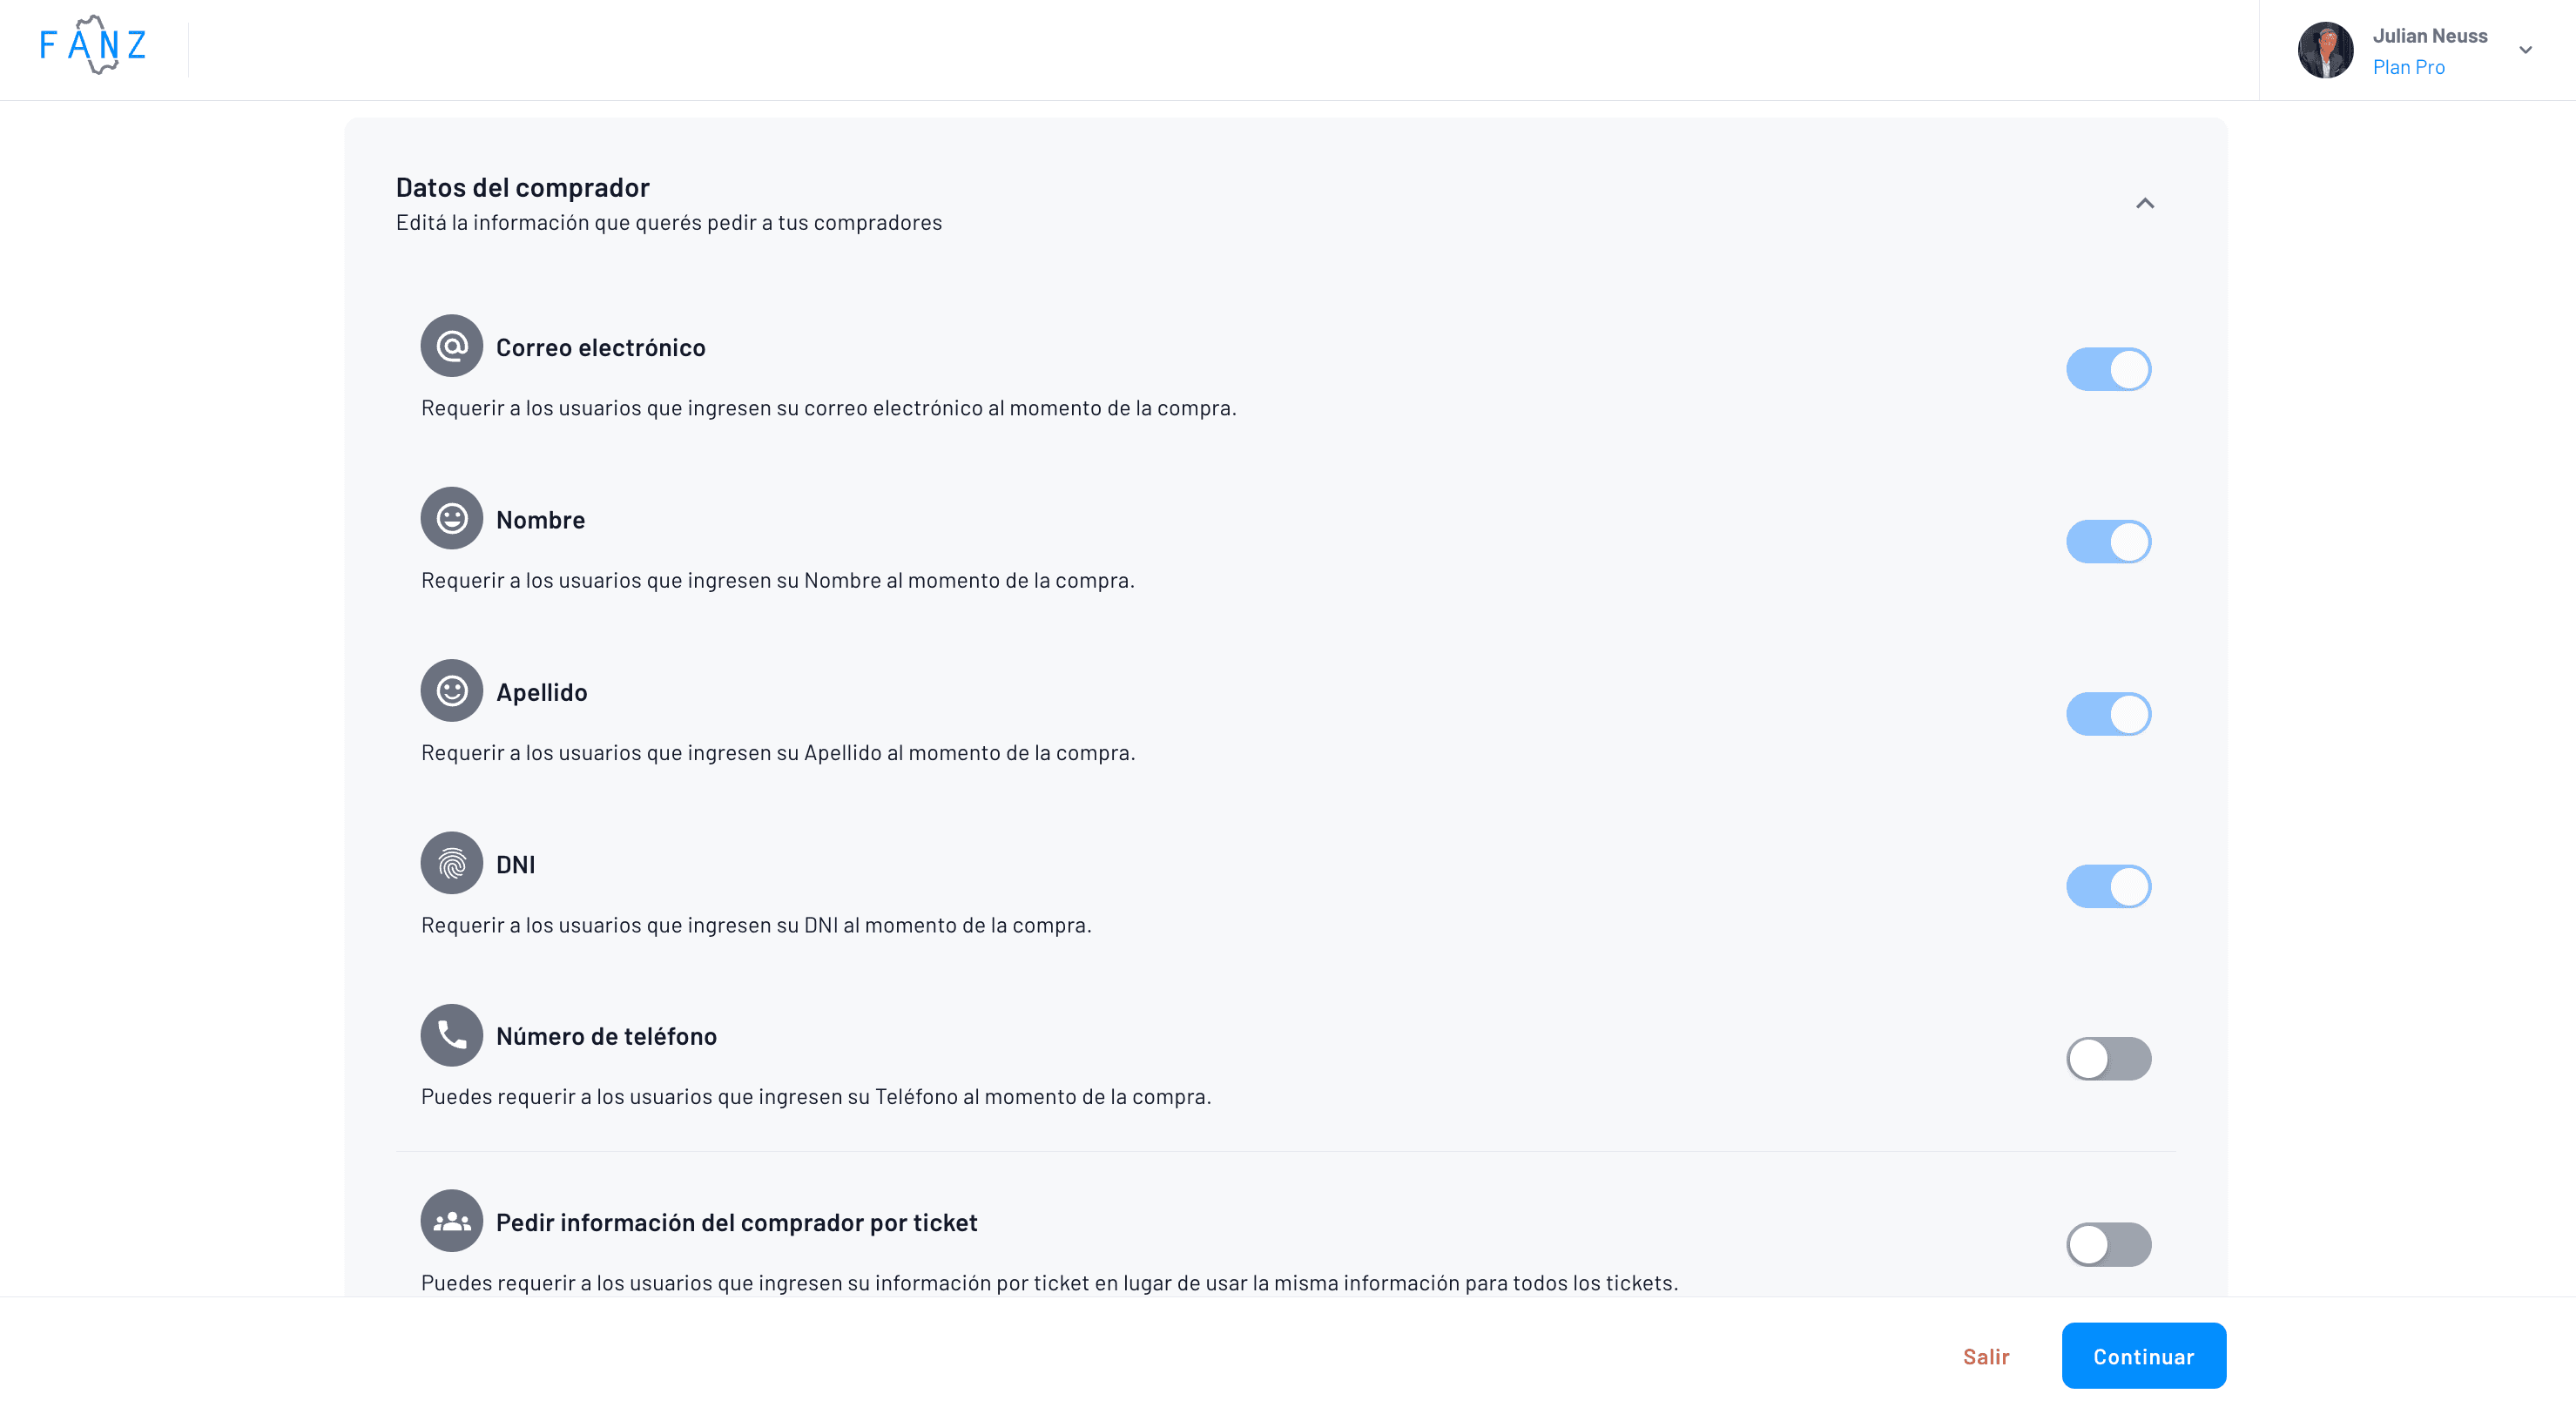
If the event requires information for each ticket (useful for marathons or assigned seating), enable “Request information per ticket.”
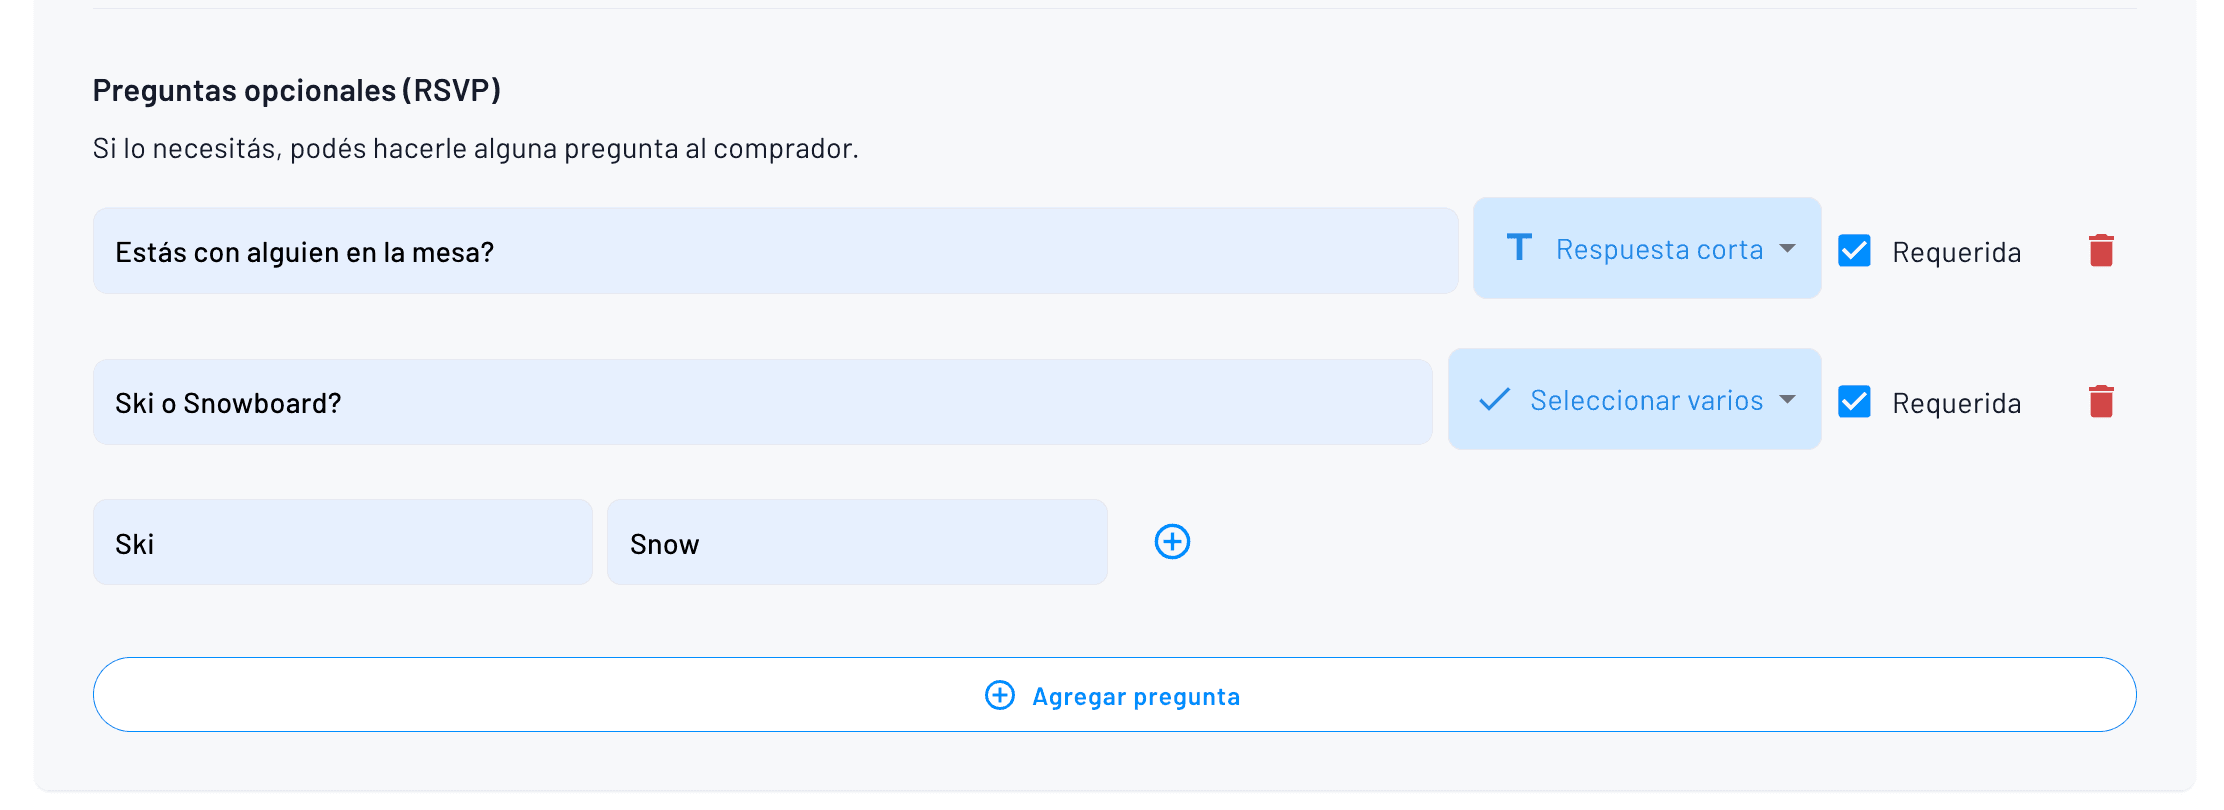
Step 10 — Optional questions (RSVP)
If you need any extra information, click “Add question”, write the text, and mark it as required if necessary. This way, you can ask about allergies, T-shirt size, company, or anything else you need.
Step 11 — Extra sections on the event page
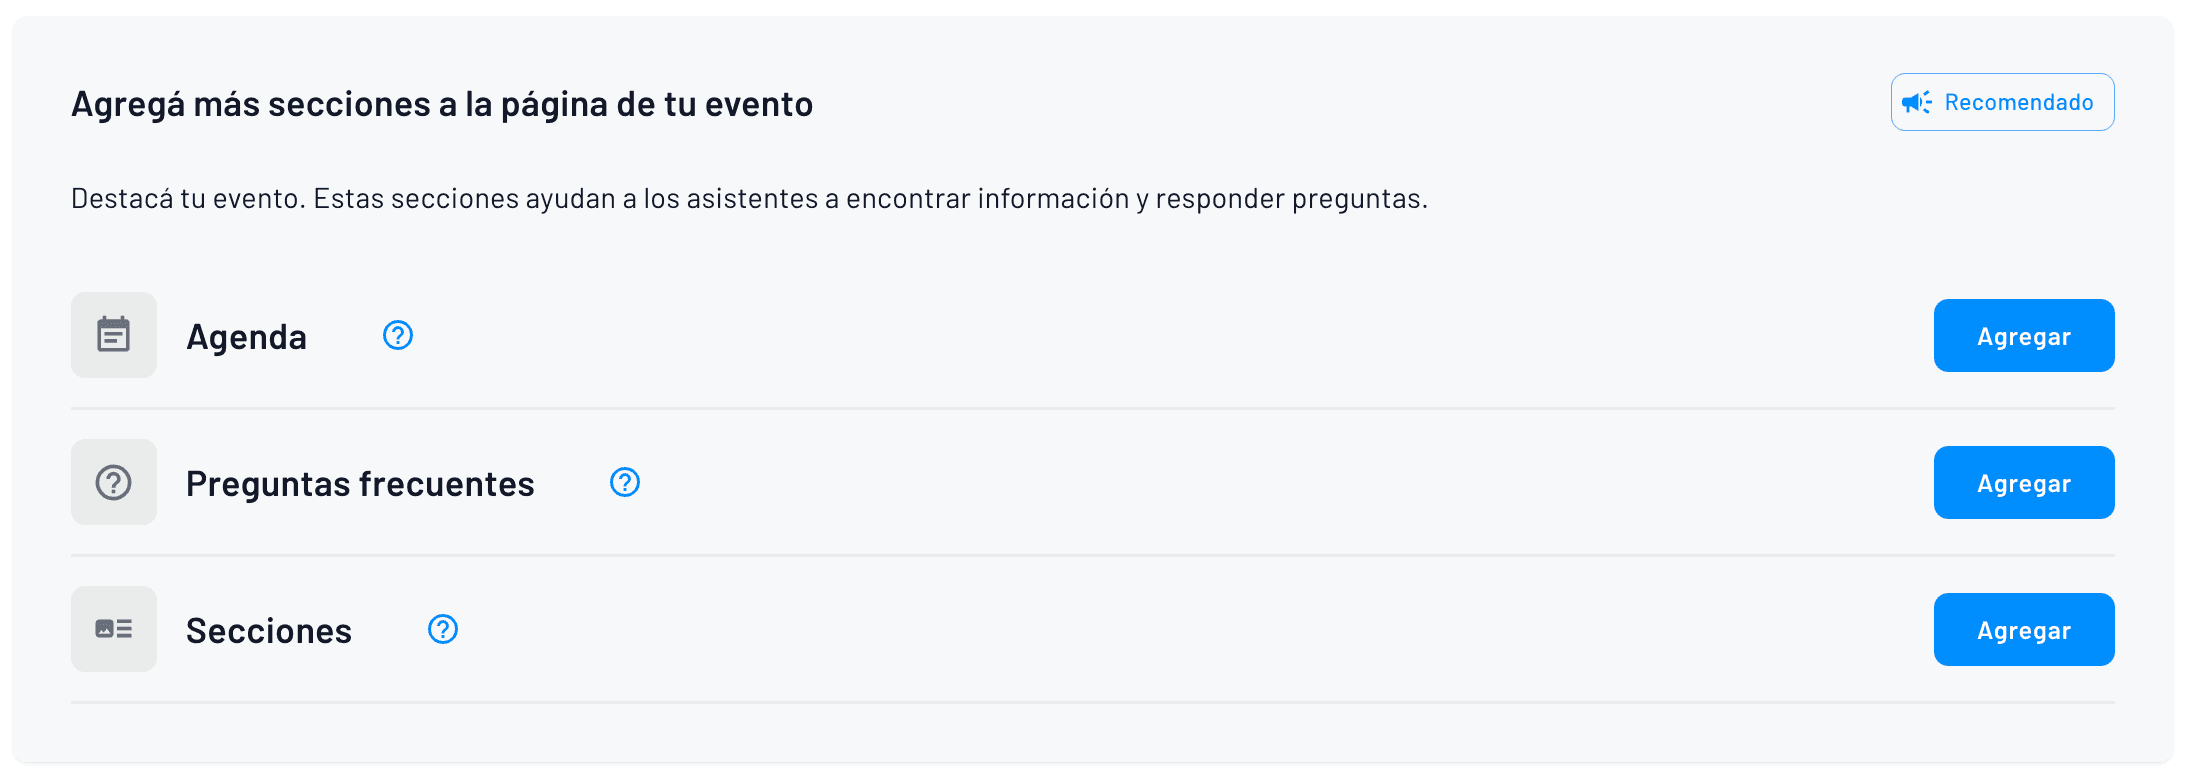
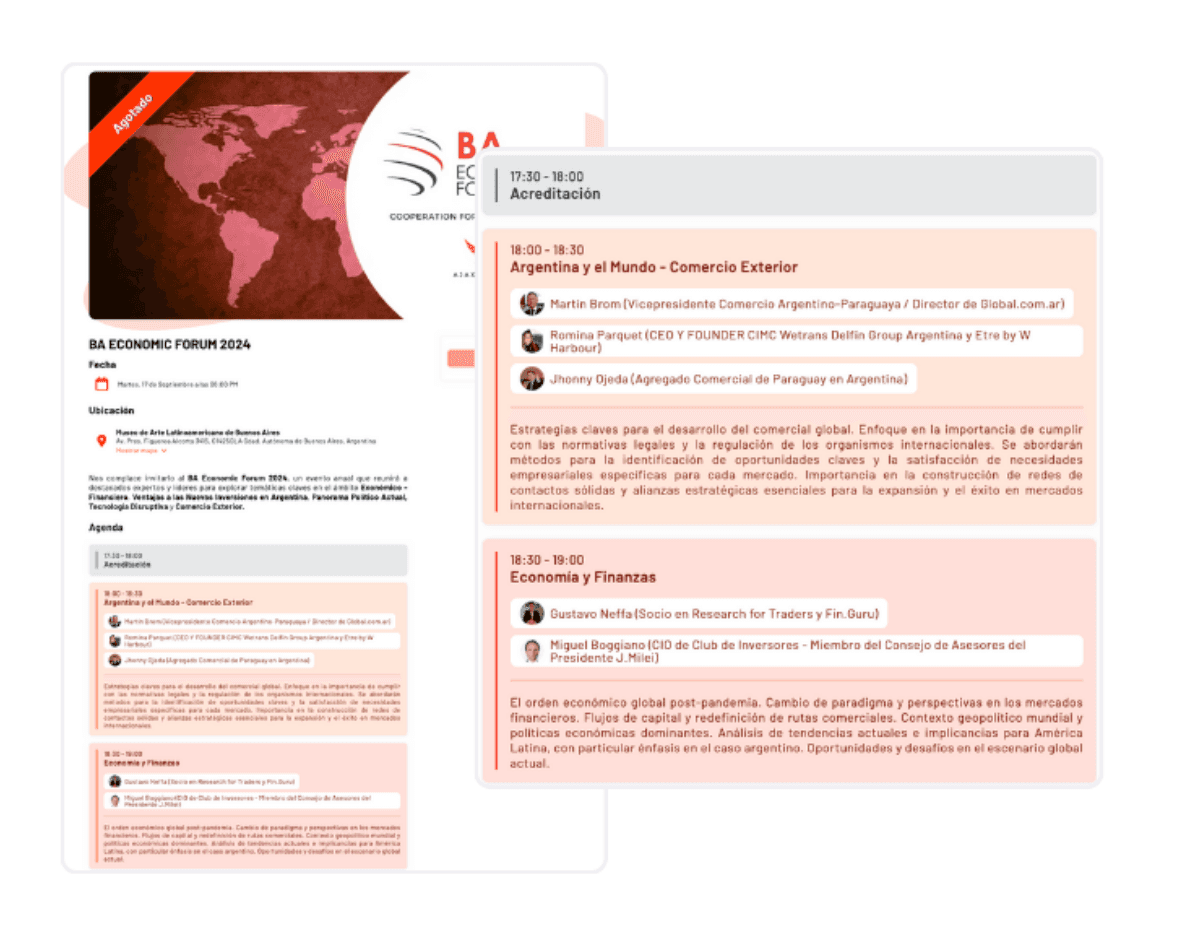
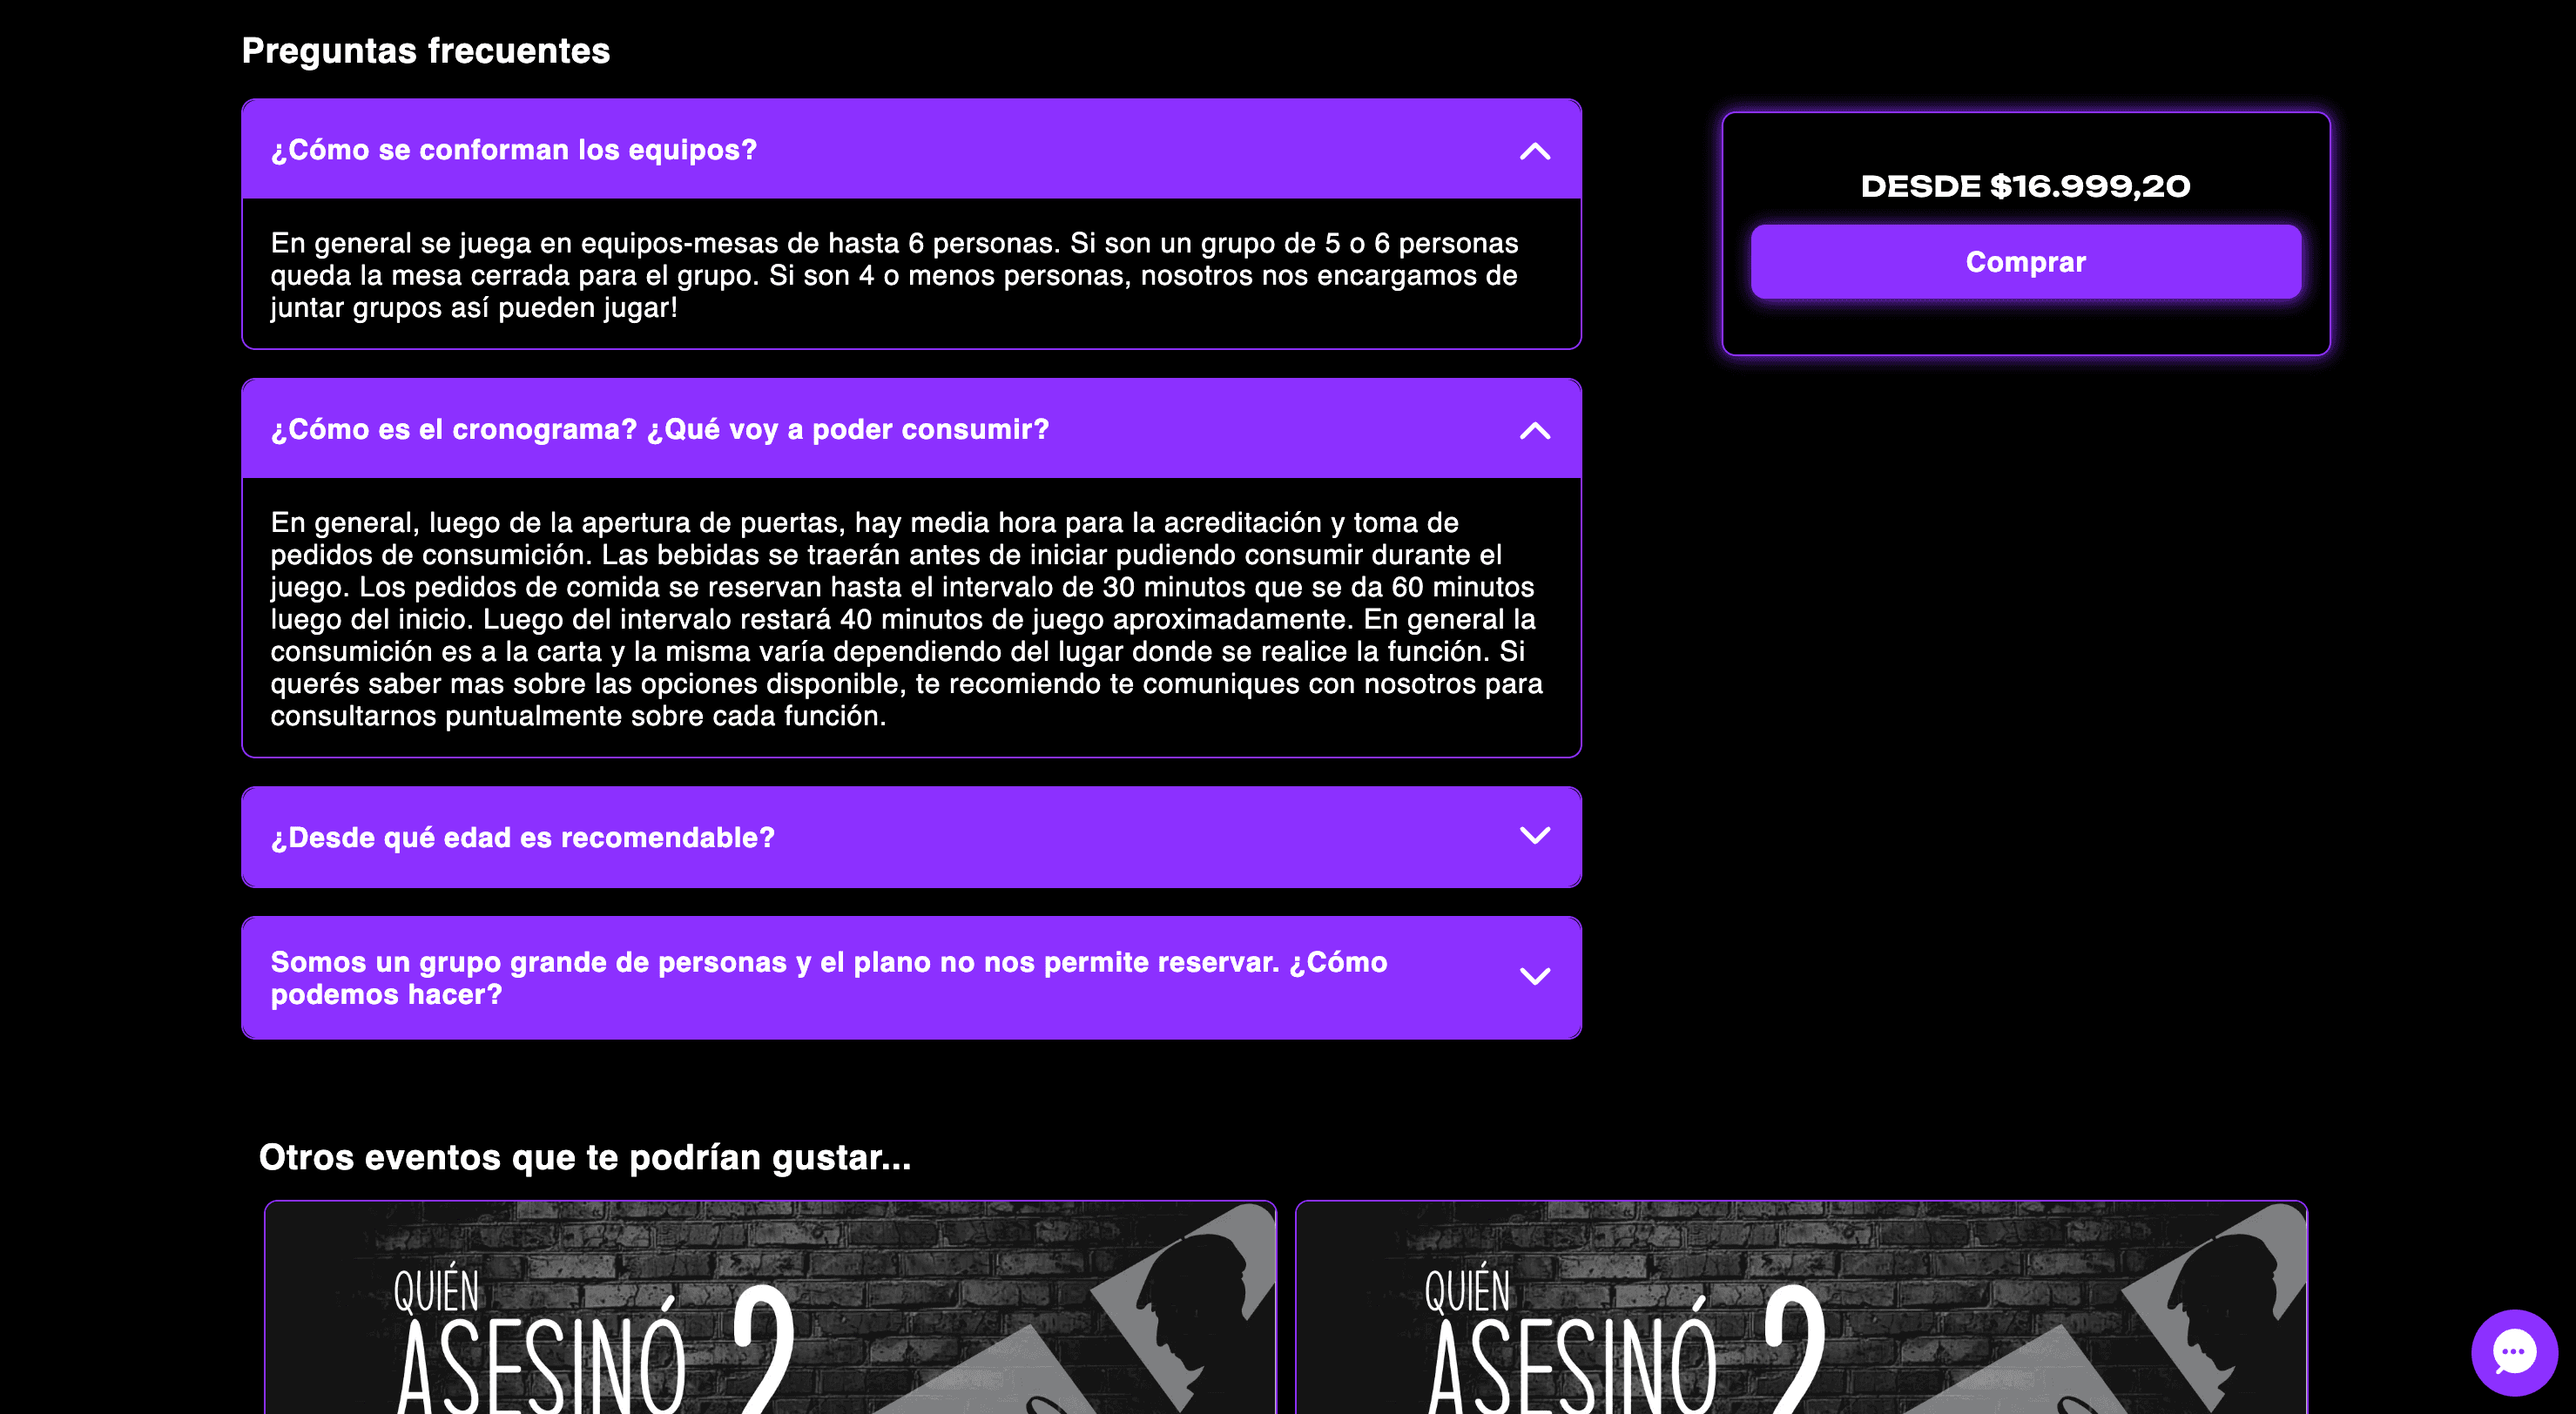
With “Add section”, you can add a detailed Agenda, a Frequently Asked Questions block, or any HTML section for sponsors.
Example of an agenda at the Buenos Aires Economic Forum at the MALBA:
Example of an agenda on the Enigmax website:

Example of FAQs on the Enigmax website:
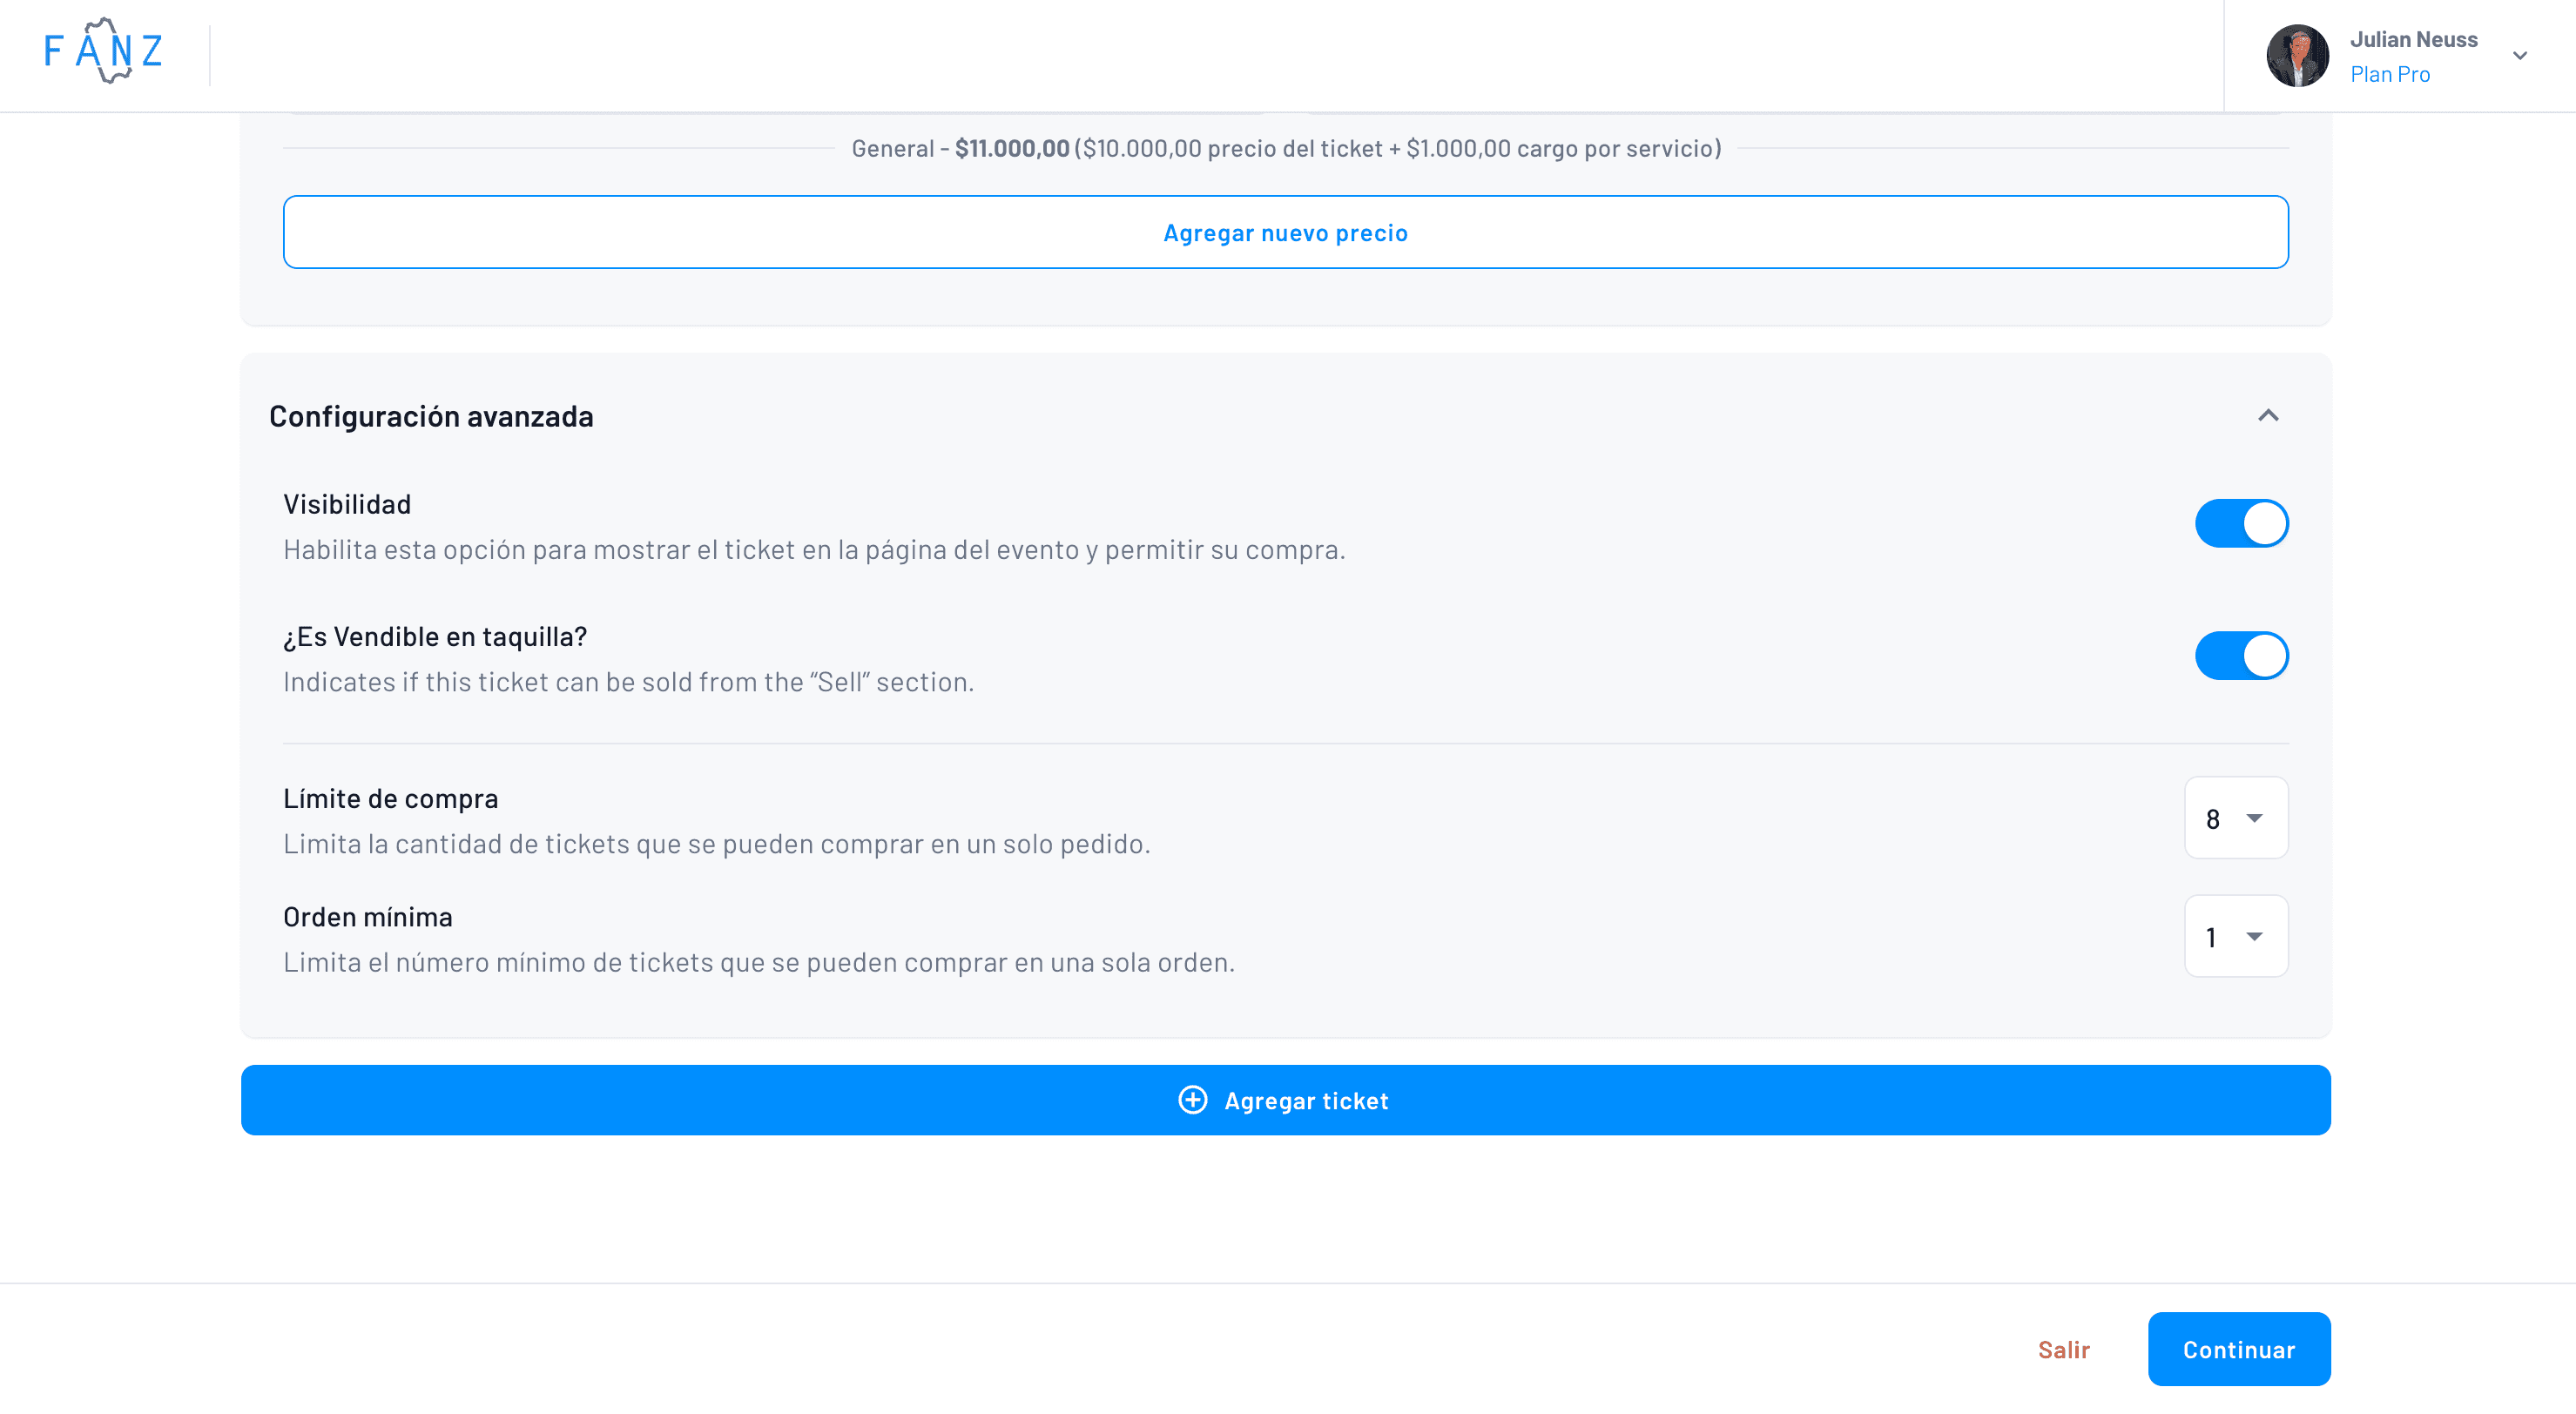
Step 12 — Create your tickets
After setting up the main details of the event, you’ll be able to configure the tickets—their quantity, description, price, and service charge.
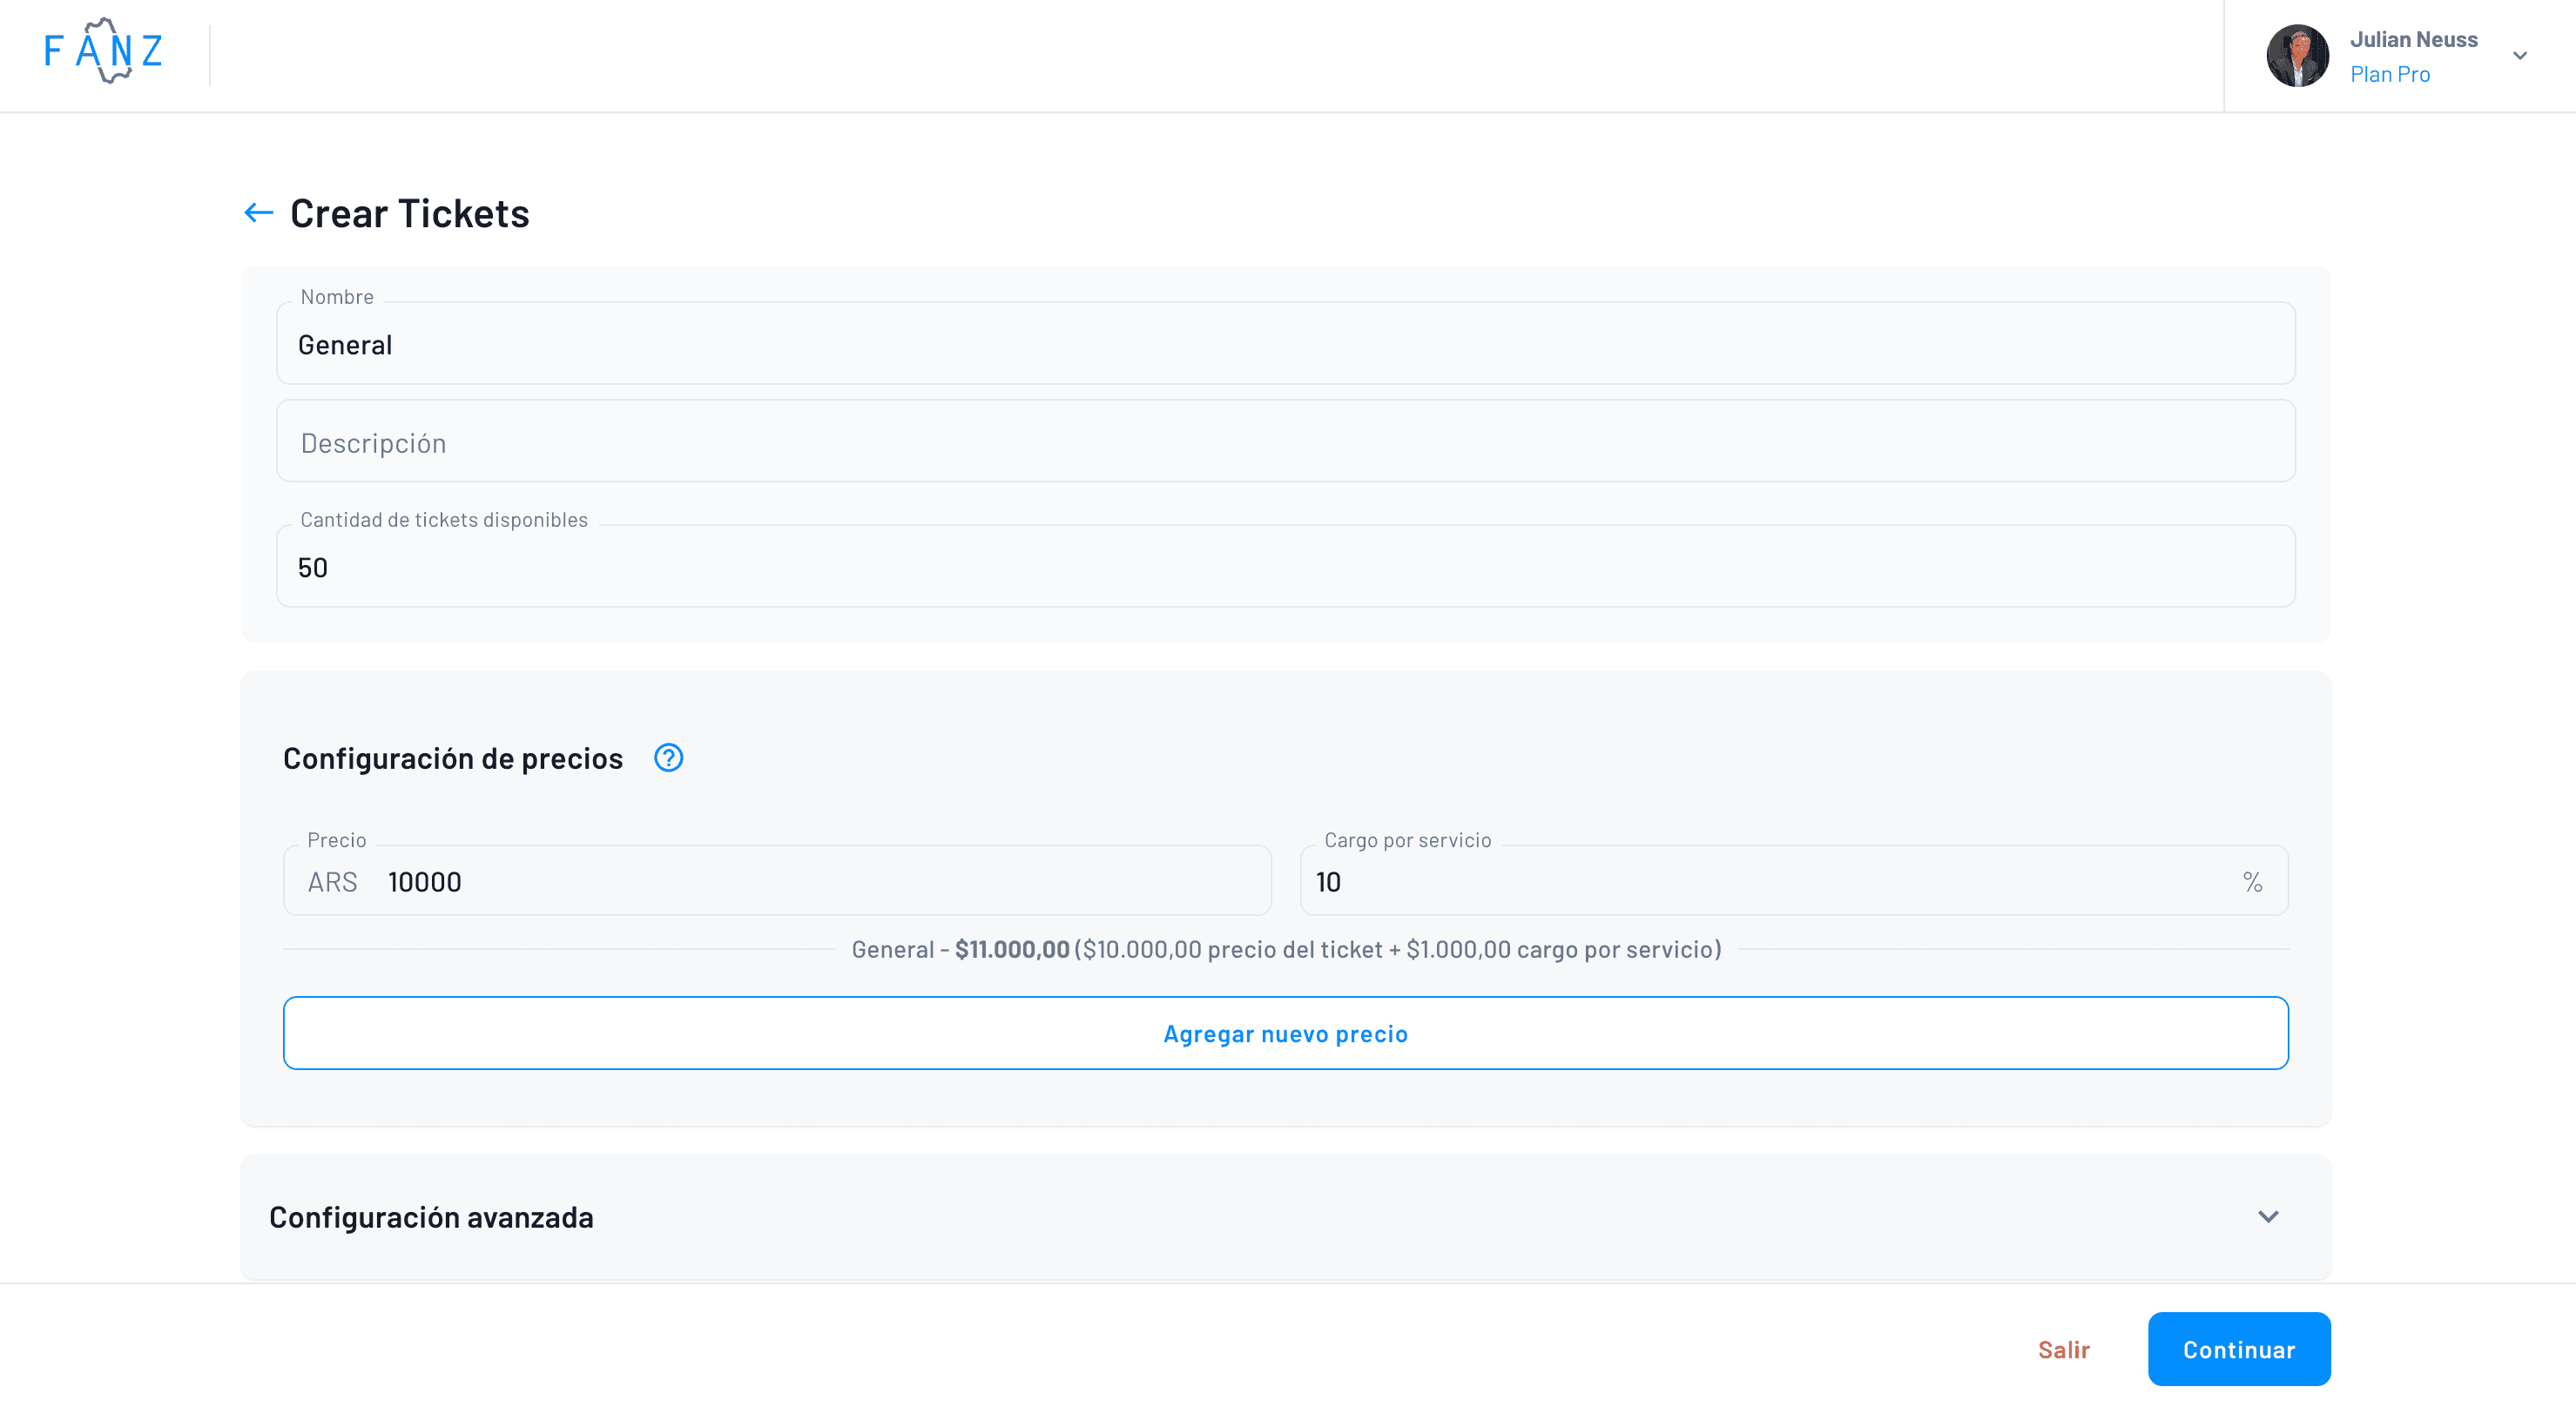
You’ll also be able to set the ticket’s visibility on the event page and at the box office, as well as define a maximum and minimum limit.
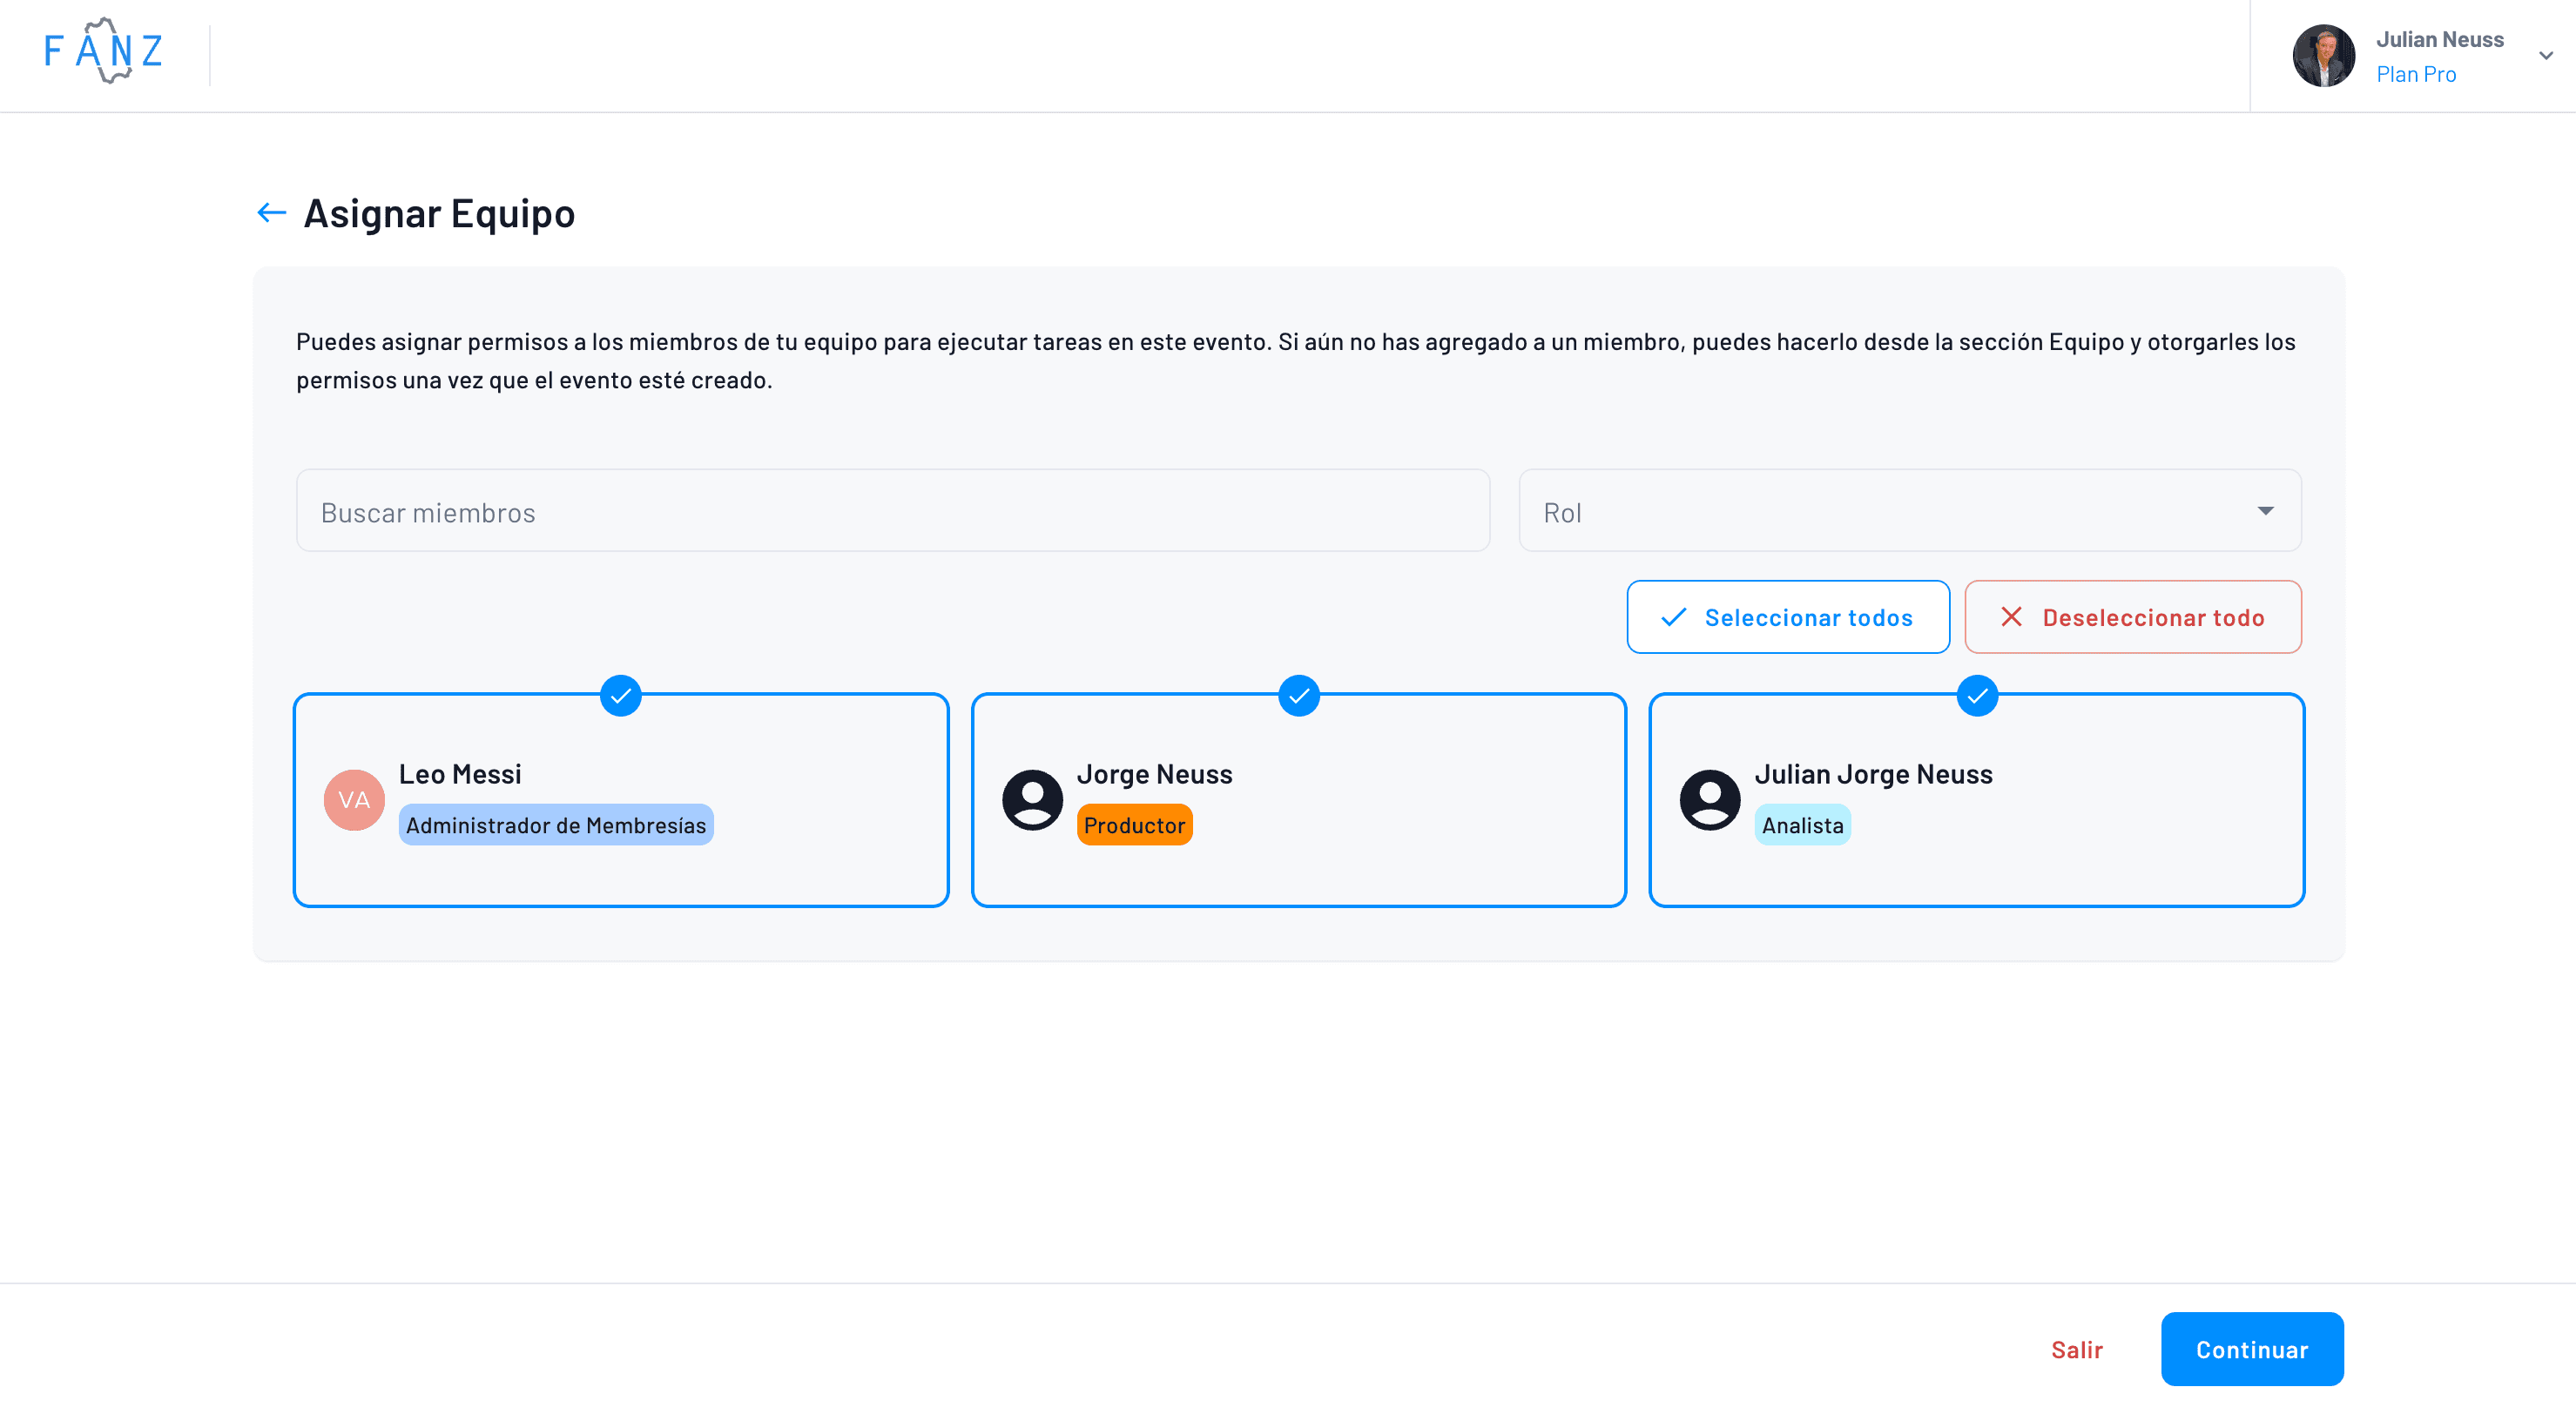
Step 13 — Assign your team and permissions
You have a shortcut to add team members responsible for the event through the platform. If they’re not already on your list, first add them in the **Team** section.
Step 14 — Payment methods and security
On our platform, we offer integration with MercadoPago and Stripe, allowing buyers to purchase tickets securely and reliably. Through MercadoPago, payments are accepted via credit and debit cards, account balance, MercadoCrédito, and more—covering a wide variety of options for attendees. Stripe, in turn, extends this flexibility to another 47 countries, enabling payments with all available methods in each of the 50 supported countries.
Our platform uses advanced security technology to protect buyers’ information and ensure transactions are safe. Payment data is encrypted and handled to the highest security standards, giving peace of mind to both organizers and attendees.
Event organizers can set up their own payment methods and establish the corresponding fees. In addition, we offer the option of installment payments through MercadoPago, which makes ticket purchases easier for buyers and can increase ticket sales. This flexibility in payment options is a significant advantage for attracting a broader and more diverse audience.
Step 15 — Event promotion
Once the event is created, it’s crucial to promote it to attract attendees. Our platform offers promotion tools that help organizers reach a wider audience and maximize ticket sales.
We offer a referral system that increases sales organically by encouraging all your ticket buyers to invite friends, with the possibility of receiving a partial refund. In addition, we have an AI-powered automated email marketing system that enables remarketing to past audiences, encouraging them to attend upcoming events.
Organizers can share their events on social media such as Facebook and Twitter, and our web platform integrates perfectly so that when a post with the event link is shared, the conversion process is extremely smooth. They can also send emails to their contacts, informing them about the event and encouraging ticket purchases.
Our platform also offers the option to create a personalized website for the event. This site allows organizers to display detailed information about the event, such as the agenda, speakers, and FAQs, and to sell tickets directly. This tool is especially useful for large or recurring events.
Another promotion strategy is to use our presale system, which allows tickets to be sold before the event is available to the general public. This not only generates early revenue but also creates a sense of exclusivity and urgency among potential attendees.
Step 16 — Preview and publication
Before publishing the event, it’s important to preview it to make sure everything is correct. Our platform offers a preview function that allows organizers to see how the event will look on the platform and make any necessary adjustments.
Once the event is ready, organizers can publish it and make it available to the public. Our platform also offers the option to schedule the event’s publication for a specific date and time, allowing for more strategic planning.
Organizers can receive real-time notifications of payments and sales, allowing them to stay updated on revenue and public interest. They can also access detailed reports about the event, including sales data, buyer behavior, and more. This information is invaluable for making informed decisions and improving marketing strategies for future events.
With these additional steps, your event will not only be well configured but also well promoted and managed, ensuring its success in the market.

Final 1-min checklist
✅ Hero image uploaded
✅ Showtimes in calendar
✅ Tickets visible
✅ Test transactional emails sent instantly
Call to Action
Want to see it running on your own domain?
Book a 15-min demo and publish your first event today.
Post FAQ section
Can I offer installment payments? Yes, via Stripe.
Can I duplicate an event for next week? Yes, one click on “Duplicate.”
What happens if I change venues? Use the Edit location option and Fanz updates all tickets and emails.
Introduction
In this guide, you’ll see—with screenshots and without skipping any steps—how to go from a blank page to a fully configured event ready to sell tickets. We’ll upload the main photo, choose the category, set the location, define whether there are numbered seats, decide if the buyer must provide an ID, display an agenda and FAQs, create tickets with prices, and, if you wish, generate hundreds of showtimes in just two clicks. You’ll also learn how to invite your team and connect your social media. By the end, your event will be published under your own white-label domain, ready to collect payments via Mercado Pago. Our platform also offers advantages such as zero commission for organizers and a simple, streamlined event management process.
Step 1 — Basic event details
Click Create Event and a screen with three fields will appear.
In the first field, upload the main photo—think of it as the poster at the door, rectangular and sharp. In the second, write the name, for example, The Tempest Play. In the third, describe in one sentence what it’s about. If you want it to sound better, click Improve with AI and the platform will suggest a text with emojis and nice formatting.
Step 2 — Select the category
You create the categories once and they remain saved. They help organize your dashboard and allow the public to filter on your website’s calendar. Open the list and select the one that applies (Theatre, Music, Expo, etc.).
This is how your customer sees it in the calendar:
And this is how you see it in the dashboard, where you can filter by that same category:
Step 3 — Location and time zone
Fanz works with reusable locations. If you always use the same theatre or cinema, you set it up once and then just select it later. Enter the venue’s address; Google Maps will suggest options, tap the correct one and you’ll see the map. If your venue has numbered seating, tick Use 3D seating map and choose the map you already created in the Constructor.
The location form asks for an internal name (for your use only), the actual address, and, if you wish, a different external name to display to the public.
Finally, if you are using a numbered location (which you must first create in the Constructor), you will need to tick that option and select the correct seating map.
Once you’ve created the location, you’ll be able to select it for all your events with a single click.
If you want to set the location to “secret” mode until the day you can announce it, you can do so with this button:
Step 4 — Single date or multiple showtimes
To set the dates, it’s important to choose the event’s time zone, which by default will be the location’s time zone, and then set the desired date.
You can set dates for any type of event, whether it’s a single occurrence or has multiple showtimes.
If there are many showtimes, you can add them manually:
or use the multiple showtimes generator
This will be enabled in the next step to finish generating all the showtimes. It’s often used when the same event is repeated on multiple days of the week at different times, allowing you to generate hundreds of showtimes in just 2 clicks.
this is what the form to generate the showtimes looks like:
afterward, you can finish adjusting the generated showtimes in the calendar
Step 5 — Box office splits (Bordereaux)
If you need to split ticket revenue with partners or artists, first create the rule in Settings > Bordereaux.
you can then assign that configuration to any events you want
and then, within the events, you’ll be able to view it and have it adjust in real time
Step 6 — Contact and online presence
Fill in a support email, your website, and the event’s social media. All of this will be shown to the public so they can contact you or visit your page. If you have questions about the event, feel free to contact us.
This is how it looks on the event page:
Step 7 — Event media
Paste a YouTube link if you want a trailer and upload up to five extra photos. Drag them into the box or select them from your computer and wait for them to finish uploading. You can also send a confirmation email with the link to the trailer and the additional photos.
Use horizontal images at 1920×1080 so they look sharp on any screen.
Step 8 — Advanced monetization options
You have three toggles.
Service fee included: The price already shows the fee, so no one is surprised at checkout, and payment is made easier through various options like cash, bank transfers, and cards.
Referral program: Activates links that give cashback to anyone who brings friends.
Members only: Blocks purchases from anyone who doesn’t have a VIP pass or discount. Choose the ones you need and continue.
Step 9 — Buyer information
Select if you want to request email, first name, last name, ID, or phone number.
It is crucial to verify the buyer’s identity for events that require an ID.
If the event requires information for each ticket (useful for marathons or assigned seating), enable “Request information per ticket.”
Step 10 — Optional questions (RSVP)
If you need any extra information, click “Add question”, write the text, and mark it as required if necessary. This way, you can ask about allergies, T-shirt size, company, or anything else you need.
Step 11 — Extra sections on the event page
With “Add section”, you can add a detailed Agenda, a Frequently Asked Questions block, or any HTML section for sponsors.
Example of an agenda at the Buenos Aires Economic Forum at the MALBA:
Example of an agenda on the Enigmax website:
Example of FAQs on the Enigmax website:
Step 12 — Create your tickets
After setting up the main details of the event, you’ll be able to configure the tickets—their quantity, description, price, and service charge.
You’ll also be able to set the ticket’s visibility on the event page and at the box office, as well as define a maximum and minimum limit.
Step 13 — Assign your team and permissions
You have a shortcut to add team members responsible for the event through the platform. If they’re not already on your list, first add them in the **Team** section.
Step 14 — Payment methods and security
On our platform, we offer integration with MercadoPago and Stripe, allowing buyers to purchase tickets securely and reliably. Through MercadoPago, payments are accepted via credit and debit cards, account balance, MercadoCrédito, and more—covering a wide variety of options for attendees. Stripe, in turn, extends this flexibility to another 47 countries, enabling payments with all available methods in each of the 50 supported countries.
Our platform uses advanced security technology to protect buyers’ information and ensure transactions are safe. Payment data is encrypted and handled to the highest security standards, giving peace of mind to both organizers and attendees.
Event organizers can set up their own payment methods and establish the corresponding fees. In addition, we offer the option of installment payments through MercadoPago, which makes ticket purchases easier for buyers and can increase ticket sales. This flexibility in payment options is a significant advantage for attracting a broader and more diverse audience.
Step 15 — Event promotion
Once the event is created, it’s crucial to promote it to attract attendees. Our platform offers promotion tools that help organizers reach a wider audience and maximize ticket sales.
We offer a referral system that increases sales organically by encouraging all your ticket buyers to invite friends, with the possibility of receiving a partial refund. In addition, we have an AI-powered automated email marketing system that enables remarketing to past audiences, encouraging them to attend upcoming events.
Organizers can share their events on social media such as Facebook and Twitter, and our web platform integrates perfectly so that when a post with the event link is shared, the conversion process is extremely smooth. They can also send emails to their contacts, informing them about the event and encouraging ticket purchases.
Our platform also offers the option to create a personalized website for the event. This site allows organizers to display detailed information about the event, such as the agenda, speakers, and FAQs, and to sell tickets directly. This tool is especially useful for large or recurring events.
Another promotion strategy is to use our presale system, which allows tickets to be sold before the event is available to the general public. This not only generates early revenue but also creates a sense of exclusivity and urgency among potential attendees.
Step 16 — Preview and publication
Before publishing the event, it’s important to preview it to make sure everything is correct. Our platform offers a preview function that allows organizers to see how the event will look on the platform and make any necessary adjustments.
Once the event is ready, organizers can publish it and make it available to the public. Our platform also offers the option to schedule the event’s publication for a specific date and time, allowing for more strategic planning.
Organizers can receive real-time notifications of payments and sales, allowing them to stay updated on revenue and public interest. They can also access detailed reports about the event, including sales data, buyer behavior, and more. This information is invaluable for making informed decisions and improving marketing strategies for future events.
With these additional steps, your event will not only be well configured but also well promoted and managed, ensuring its success in the market.
Final 1-min checklist
✅ Hero image uploaded
✅ Showtimes in calendar
✅ Tickets visible
✅ Test transactional emails sent instantly
Call to Action
Want to see it running on your own domain?
Book a 15-min demo and publish your first event today.
Post FAQ section
Can I offer installment payments? Yes, via Stripe.
Can I duplicate an event for next week? Yes, one click on “Duplicate.”
What happens if I change venues? Use the Edit location option and Fanz updates all tickets and emails.
Book your meeting today.
Sell with your own branding and domain, get instant payouts, and boost your sales by up to 35% with automated remarketing.
